Lexmark X500n Service Manual - Page 131
Accessing jam areas, Diagnostic aids, Paper Jam A1, Rear tray 1, Rear
 |
View all Lexmark X500n manuals
Add to My Manuals
Save this manual to your list of manuals |
Page 131 highlights
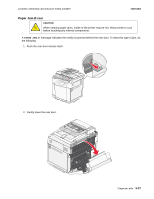
Lexmark confidential until announce edited 1/4/2007 7100-XXX Accessing jam areas Open doors and covers, and remove trays to access jam areas. The illustration shows the location of sources and possible jam areas. Use the following table to locate instructions for a particular jam; however, to resolve any message, you must clear all media from the media path. Jam message Paper Jam A1, Rear (tray 1) Paper Jam A2, Rear (tray 2) Paper Jam B, Rear Paper Jam C, Rear Go to page "Paper Jam A1, rear (tray 1)" on page 3-24. "Paper Jam A2, rear (tray 2)" on page 3-26. "Paper Jam B rear" on page 3-27. "Paper Jam C rear" on page 3-29. Diagnostic aids 3-23
-
 1
1 -
2
-
3
-
4
-
5
-
6
-
7
-
8
-
9
-
10
-
11
-
12
-
13
-
14
-
15
-
16
-
17
-
18
-
19
-
20
-
21
-
22
-
23
-
24
-
25
-
26
-
27
-
28
-
29
-
30
-
31
-
32
-
33
-
34
-
35
-
36
-
37
-
38
-
39
-
40
-
41
-
42
-
43
-
44
-
45
-
46
-
47
-
48
-
49
-
50
-
51
-
52
-
53
-
54
-
55
-
56
-
57
-
58
-
59
-
60
-
61
-
62
-
63
-
64
-
65
-
66
-
67
-
68
-
69
-
70
-
71
-
72
-
73
-
74
-
75
-
76
-
77
-
78
-
79
-
80
-
81
-
82
-
83
-
84
-
85
-
86
-
87
-
88
-
89
-
90
-
91
-
92
-
93
-
94
-
95
-
96
-
97
-
98
-
99
-
100
-
101
-
102
-
103
-
104
-
105
-
106
-
107
-
108
-
109
-
110
-
111
-
112
-
113
-
114
-
115
-
116
-
117
-
118
-
119
-
120
-
121
-
122
-
123
-
124
-
125
-
 126
126 -
 127
127 -
 128
128 -
 129
129 -
 130
130 -
 131
131 -
 132
132 -
 133
133 -
 134
134 -
 135
135 -
 136
136 -
137
-
138
-
139
-
140
-
141
-
142
-
143
-
144
-
145
-
146
-
147
-
148
-
149
-
150
-
151
-
152
-
153
-
154
-
155
-
156
-
157
-
158
-
159
-
160
-
161
-
162
-
163
-
164
-
165
-
166
-
167
-
168
-
169
-
170
-
171
-
172
-
173
-
174
-
175
-
176
-
177
-
178
-
179
-
180
-
181
-
182
-
183
-
184
-
185
-
186
-
187
-
188
-
189
-
190
-
191
-
192
-
193
-
194
-
195
-
196
-
197
-
198
-
199
-
200
-
201
-
202
-
203
-
204
-
205
-
206
-
207
-
208
-
209
-
210
-
211
-
212
-
213
-
214
-
215
-
216
-
217
-
218
-
219
-
220
-
221
-
222
-
223
-
224
-
225
-
226
-
227
-
228
-
229
-
230
-
231
-
232
-
233
-
234
-
235
-
236
-
237
-
238
-
239
-
240
-
241
-
242
-
243
-
244
 |
 |

Diagnostic aids
3-23
Lexmark confidential until announce edited 1/4/2007
7100-XXX
Accessing jam areas
Open doors and covers, and remove trays to access jam areas. The illustration shows the location of
sources and possible jam areas.
Use the following table to locate instructions for a particular jam; however, to resolve any message, you
must clear all media from the media path.
Jam message
Go to page
Paper Jam A1, Rear (tray 1)
“Paper Jam A1, rear (tray 1)” on
page 3-24
.
Paper Jam A2, Rear (tray 2)
“Paper Jam A2, rear (tray 2)” on
page 3-26
.
Paper Jam B, Rear
“Paper Jam B rear” on page 3-27
.
Paper Jam C, Rear
“Paper Jam C rear” on page 3-29
.