Lexmark X500n Service Manual - Page 167
Clutch removal, Main drive gear assembly removal, Right cover removal
 |
View all Lexmark X500n manuals
Add to My Manuals
Save this manual to your list of manuals |
Page 167 highlights
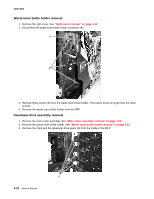
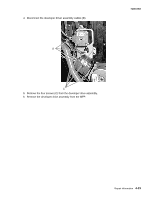
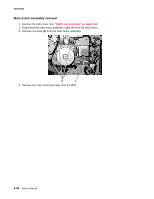
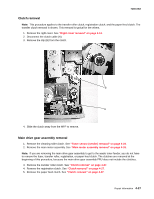
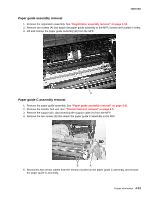
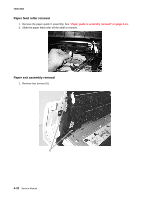
7100-XXX Clutch removal Note: This procedure applies to the transfer roller clutch, registration clutch, and the paper feed clutch. The transfer clutch removal is shown. This removal is typical for the others. 1. Remove the right cover. See "Right cover removal" on page 4-13. 2. Disconnect the clutch cable (A). 3. Remove the clip (B) from the clutch. B A 4. Slide the clutch away from the MFP to remove. Main drive gear assembly removal 1. Remove the cleaning roller clutch. See "Toner sensor (sender) removal" on page 4-24. 2. Remove the main motor assembly. See "Main motor assembly removal" on page 4-26. Note: If you are removing the main drive gear assembly to get to the waste toner feeder, you do not have to remove the fuser, transfer roller, registration, or paper feed clutch. The clutches are removed at the beginning of this procedure, because the main drive gear assembly FRU does not include the clutches. 3. Remove the transfer roller clutch. See "Clutch removal" on page 4-27. 4. Remove the registration clutch. See "Clutch removal" on page 4-27. 5. Remove the paper feed clutch. See "Clutch removal" on page 4-27. Repair information 4-27
-
 1
1 -
2
-
3
-
4
-
5
-
6
-
7
-
8
-
9
-
10
-
11
-
12
-
13
-
14
-
15
-
16
-
17
-
18
-
19
-
20
-
21
-
22
-
23
-
24
-
25
-
26
-
27
-
28
-
29
-
30
-
31
-
32
-
33
-
34
-
35
-
36
-
37
-
38
-
39
-
40
-
41
-
42
-
43
-
44
-
45
-
46
-
47
-
48
-
49
-
50
-
51
-
52
-
53
-
54
-
55
-
56
-
57
-
58
-
59
-
60
-
61
-
62
-
63
-
64
-
65
-
66
-
67
-
68
-
69
-
70
-
71
-
72
-
73
-
74
-
75
-
76
-
77
-
78
-
79
-
80
-
81
-
82
-
83
-
84
-
85
-
86
-
87
-
88
-
89
-
90
-
91
-
92
-
93
-
94
-
95
-
96
-
97
-
98
-
99
-
100
-
101
-
102
-
103
-
104
-
105
-
106
-
107
-
108
-
109
-
110
-
111
-
112
-
113
-
114
-
115
-
116
-
117
-
118
-
119
-
120
-
121
-
122
-
123
-
124
-
125
-
126
-
127
-
128
-
129
-
130
-
131
-
132
-
133
-
134
-
135
-
136
-
137
-
138
-
139
-
140
-
141
-
142
-
143
-
144
-
145
-
146
-
147
-
148
-
149
-
150
-
151
-
152
-
153
-
154
-
155
-
156
-
157
-
158
-
159
-
160
-
161
-
 162
162 -
 163
163 -
 164
164 -
 165
165 -
 166
166 -
 167
167 -
 168
168 -
 169
169 -
 170
170 -
 171
171 -
 172
172 -
173
-
174
-
175
-
176
-
177
-
178
-
179
-
180
-
181
-
182
-
183
-
184
-
185
-
186
-
187
-
188
-
189
-
190
-
191
-
192
-
193
-
194
-
195
-
196
-
197
-
198
-
199
-
200
-
201
-
202
-
203
-
204
-
205
-
206
-
207
-
208
-
209
-
210
-
211
-
212
-
213
-
214
-
215
-
216
-
217
-
218
-
219
-
220
-
221
-
222
-
223
-
224
-
225
-
226
-
227
-
228
-
229
-
230
-
231
-
232
-
233
-
234
-
235
-
236
-
237
-
238
-
239
-
240
-
241
-
242
-
243
-
244
 |
 |
