Lexmark X500n Service Manual - Page 150
Cover removals, Top cover assembly removal
 |
View all Lexmark X500n manuals
Add to My Manuals
Save this manual to your list of manuals |
Page 150 highlights
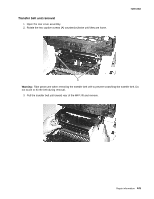
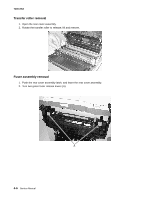
7100-XXX Cover removals Top cover assembly removal 1. Remove the scanner assembly. See "Flatbed assembly removal" on page 4-49. 2. Remove the upper right rear cover. See "Upper right rear cover removal" on page 4-17. 3. Remove the cleaning roller cover. See "Cleaning roller cover removal" on page 4-4. 4. Remove the photodeveloper cartridge. See "Photodeveloper cartridge removal" on page 4-8. 5. Open the OPC cover. 6. Remove the two screws (A) from the top cover assembly. A 7. Open the rear cover. 8. Remove the upper right rear cover. See "Upper right rear cover removal" on page 4-17. 4-10 Service Manual
-
 1
1 -
2
-
3
-
4
-
5
-
6
-
7
-
8
-
9
-
10
-
11
-
12
-
13
-
14
-
15
-
16
-
17
-
18
-
19
-
20
-
21
-
22
-
23
-
24
-
25
-
26
-
27
-
28
-
29
-
30
-
31
-
32
-
33
-
34
-
35
-
36
-
37
-
38
-
39
-
40
-
41
-
42
-
43
-
44
-
45
-
46
-
47
-
48
-
49
-
50
-
51
-
52
-
53
-
54
-
55
-
56
-
57
-
58
-
59
-
60
-
61
-
62
-
63
-
64
-
65
-
66
-
67
-
68
-
69
-
70
-
71
-
72
-
73
-
74
-
75
-
76
-
77
-
78
-
79
-
80
-
81
-
82
-
83
-
84
-
85
-
86
-
87
-
88
-
89
-
90
-
91
-
92
-
93
-
94
-
95
-
96
-
97
-
98
-
99
-
100
-
101
-
102
-
103
-
104
-
105
-
106
-
107
-
108
-
109
-
110
-
111
-
112
-
113
-
114
-
115
-
116
-
117
-
118
-
119
-
120
-
121
-
122
-
123
-
124
-
125
-
126
-
127
-
128
-
129
-
130
-
131
-
132
-
133
-
134
-
135
-
136
-
137
-
138
-
139
-
140
-
141
-
142
-
143
-
144
-
 145
145 -
 146
146 -
 147
147 -
 148
148 -
 149
149 -
 150
150 -
 151
151 -
 152
152 -
 153
153 -
 154
154 -
 155
155 -
156
-
157
-
158
-
159
-
160
-
161
-
162
-
163
-
164
-
165
-
166
-
167
-
168
-
169
-
170
-
171
-
172
-
173
-
174
-
175
-
176
-
177
-
178
-
179
-
180
-
181
-
182
-
183
-
184
-
185
-
186
-
187
-
188
-
189
-
190
-
191
-
192
-
193
-
194
-
195
-
196
-
197
-
198
-
199
-
200
-
201
-
202
-
203
-
204
-
205
-
206
-
207
-
208
-
209
-
210
-
211
-
212
-
213
-
214
-
215
-
216
-
217
-
218
-
219
-
220
-
221
-
222
-
223
-
224
-
225
-
226
-
227
-
228
-
229
-
230
-
231
-
232
-
233
-
234
-
235
-
236
-
237
-
238
-
239
-
240
-
241
-
242
-
243
-
244
 |
 |

4-10
Service Manual
7100-XXX
Cover removals
Top cover assembly removal
1.
Remove the scanner assembly. See
“Flatbed assembly removal” on page 4-49
.
2.
Remove the upper right rear cover. See
“Upper right rear cover removal” on page 4-17
.
3.
Remove the cleaning roller cover. See
“Cleaning roller cover removal” on page 4-4
.
4.
Remove the photodeveloper cartridge. See
“Photodeveloper cartridge removal” on page 4-8
.
5.
Open the OPC cover.
6.
Remove the two screws (A) from the top cover assembly.
7.
Open the rear cover.
8.
Remove the upper right rear cover. See
“Upper right rear cover removal” on page 4-17
.
A