NEC e616 User Guide - Page 22
Setup, USIM Card
 |
View all NEC e616 manuals
Add to My Manuals
Save this manual to your list of manuals |
Page 22 highlights
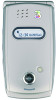
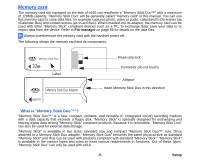
Setup Before you use your handset you will need to carry out the following actions: • Insert a valid USIM (Universal Subscriber Identity Module) card • Charge the battery • Insert the memory card (Memory Stick Duo™ in the side slot) (optional) • Set the date and time This section will guide you through this step by step. USIM Card When you become a subscriber to 3, you are issued a USIM card with a security code or PIN (Personal Identification Number). The USIM card contains your personal subscriber data and must be inserted into your handset. If the USIM card is removed then the handset becomes unusable until a valid USIM is inserted. The holder for the USIM card is located underneath the battery. Always disconnect the charger and other accessories from your handset before inserting and removing your USIM card. To Insert the USIM Card 1 Ensure that the power is off. If the power is on, press and hold the End (On-Off) key until power is off. 2 Remove the battery. (Refer to the illustration on the next page.) 3 Slide the USIM card into the USIM card holder. 4 Replace the battery. To Remove the USIM Card 1 Ensure that the power is off. If the power is on, press and hold the End (On-Off) key until power is off. 2 Remove the battery. (Refer to the illustration on the next page.) 3 Slide the USIM card out of the USIM card holder. -5- Setup
-
 1
1 -
2
-
3
-
4
-
5
-
6
-
7
-
8
-
9
-
10
-
11
-
12
-
13
-
14
-
15
-
16
-
 17
17 -
 18
18 -
 19
19 -
 20
20 -
 21
21 -
 22
22 -
 23
23 -
 24
24 -
 25
25 -
 26
26 -
 27
27 -
28
-
29
-
30
-
31
-
32
-
33
-
34
-
35
-
36
-
37
-
38
-
39
-
40
-
41
-
42
-
43
-
44
-
45
-
46
-
47
-
48
-
49
-
50
-
51
-
52
-
53
-
54
-
55
-
56
-
57
-
58
-
59
-
60
-
61
-
62
-
63
-
64
-
65
-
66
-
67
-
68
-
69
-
70
-
71
-
72
-
73
-
74
-
75
-
76
-
77
-
78
-
79
-
80
-
81
-
82
-
83
-
84
-
85
-
86
-
87
-
88
-
89
-
90
-
91
-
92
-
93
-
94
-
95
-
96
-
97
-
98
-
99
-
100
-
101
-
102
-
103
-
104
-
105
-
106
-
107
-
108
-
109
-
110
-
111
-
112
-
113
-
114
-
115
-
116
-
117
-
118
-
119
-
120
-
121
-
122
-
123
-
124
-
125
-
126
-
127
-
128
-
129
-
130
-
131
-
132
-
133
-
134
-
135
-
136
-
137
-
138
-
139
-
140
-
141
-
142
-
143
-
144
-
145
-
146
-
147
-
148
-
149
-
150
-
151
-
152
-
153
-
154
-
155
-
156
-
157
-
158
-
159
-
160
-
161
-
162
-
163
-
164
-
165
-
166
-
167
-
168
-
169
-
170
-
171
-
172
-
173
-
174
-
175
-
176
-
177
-
178
-
179
-
180
-
181
-
182
-
183
-
184
-
185
-
186
-
187
-
188
-
189
-
190
-
191
 |
 |
