Netgear GS728TXS GS728TXS/GS752TXS Software Administration Manual - Page 274
HTTP File Upload, the switch to understand. The most common usage of text-based configuration is
 |
View all Netgear GS728TXS manuals
Add to My Manuals
Save this manual to your list of manuals |
Page 274 highlights
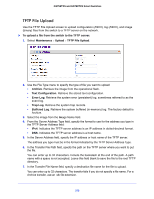
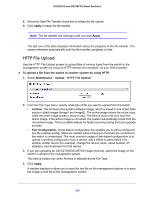
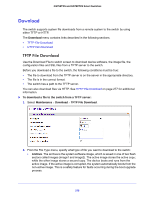
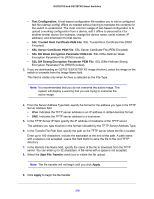
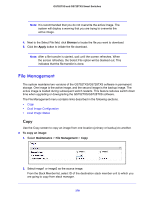
GS752TXS and GS728TXS Smart Switches 8. Select the Start File Transfer check box to initiate the file upload. 9. Click Apply to begin the file transfer. Note: The file transfer will not begin until you click Apply. The last row of the table displays information about the progress of the file transfer. The screen refreshes automatically until the file transfer completes or fails. HTTP File Upload Use the HTTP File Upload screen to upload files of various types from the switch to the management system by using an HTTP session (for example, via your Web browser). To upload a file from the switch to another system by using HTTP: 1. Select Maintenance Upload HTTP File Upload. 2. From the File Type menu, specify what type of file you want to upload from the switch: • Archive. The archive is the system software image, which is saved in one of two flash sectors called images (image1 and image2). The active image stores the active copy; while the other image stores a second copy. The device boots and runs from the active image. If the active image is corrupted, the system automatically boots from the non-active image. This is a safety feature for faults occurring during the boot upgrade process. • Text Configuration. A text-based configuration file enables you to edit a configured text file (startup-config) offline as needed without having to translate the contents for the switch to understand. The most common usage of text-based configuration is to upload a working configuration from a device, edit it offline to personalize it for another similar device (for example, change the device name, serial number, IP address), and download it to that device. 3. If you are uploading an GS752TXS/GS728TXS image (Archive), select the image on the switch to upload to the management system. This field is visible only when Archive is selected as the File Type. 4. Click Apply. A window displays to allow you to open the text file on the management system or to save the image or text file to the management system. 274
-
 1
1 -
2
-
3
-
4
-
5
-
6
-
7
-
8
-
9
-
10
-
11
-
12
-
13
-
14
-
15
-
16
-
17
-
18
-
19
-
20
-
21
-
22
-
23
-
24
-
25
-
26
-
27
-
28
-
29
-
30
-
31
-
32
-
33
-
34
-
35
-
36
-
37
-
38
-
39
-
40
-
41
-
42
-
43
-
44
-
45
-
46
-
47
-
48
-
49
-
50
-
51
-
52
-
53
-
54
-
55
-
56
-
57
-
58
-
59
-
60
-
61
-
62
-
63
-
64
-
65
-
66
-
67
-
68
-
69
-
70
-
71
-
72
-
73
-
74
-
75
-
76
-
77
-
78
-
79
-
80
-
81
-
82
-
83
-
84
-
85
-
86
-
87
-
88
-
89
-
90
-
91
-
92
-
93
-
94
-
95
-
96
-
97
-
98
-
99
-
100
-
101
-
102
-
103
-
104
-
105
-
106
-
107
-
108
-
109
-
110
-
111
-
112
-
113
-
114
-
115
-
116
-
117
-
118
-
119
-
120
-
121
-
122
-
123
-
124
-
125
-
126
-
127
-
128
-
129
-
130
-
131
-
132
-
133
-
134
-
135
-
136
-
137
-
138
-
139
-
140
-
141
-
142
-
143
-
144
-
145
-
146
-
147
-
148
-
149
-
150
-
151
-
152
-
153
-
154
-
155
-
156
-
157
-
158
-
159
-
160
-
161
-
162
-
163
-
164
-
165
-
166
-
167
-
168
-
169
-
170
-
171
-
172
-
173
-
174
-
175
-
176
-
177
-
178
-
179
-
180
-
181
-
182
-
183
-
184
-
185
-
186
-
187
-
188
-
189
-
190
-
191
-
192
-
193
-
194
-
195
-
196
-
197
-
198
-
199
-
200
-
201
-
202
-
203
-
204
-
205
-
206
-
207
-
208
-
209
-
210
-
211
-
212
-
213
-
214
-
215
-
216
-
217
-
218
-
219
-
220
-
221
-
222
-
223
-
224
-
225
-
226
-
227
-
228
-
229
-
230
-
231
-
232
-
233
-
234
-
235
-
236
-
237
-
238
-
239
-
240
-
241
-
242
-
243
-
244
-
245
-
246
-
247
-
248
-
249
-
250
-
251
-
252
-
253
-
254
-
255
-
256
-
257
-
258
-
259
-
260
-
261
-
262
-
263
-
264
-
265
-
266
-
267
-
268
-
 269
269 -
 270
270 -
 271
271 -
 272
272 -
 273
273 -
 274
274 -
 275
275 -
 276
276 -
 277
277 -
 278
278 -
 279
279 -
280
-
281
-
282
-
283
-
284
-
285
-
286
-
287
-
288
-
289
-
290
-
291
-
292
-
293
-
294
-
295
-
296
-
297
-
298
-
299
-
300
-
301
-
302
-
303
-
304
-
305
-
306
-
307
-
308
-
309
-
310
-
311
-
312
-
313
-
314
-
315
-
316
-
317
-
318
-
319
-
320
-
321
-
322
-
323
-
324
 |
 |
