Nokia 6230 Nokia 6230 User Guide in English - Page 142
Synchronize with a remote Internet server, Synchronize data, Stop synchronization
 |
View all Nokia 6230 manuals
Add to My Manuals
Save this manual to your list of manuals |
Page 142 highlights
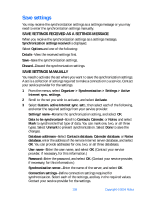
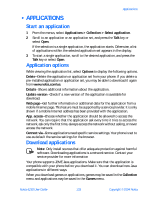
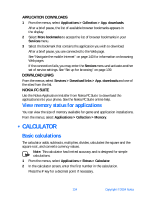
Organizer Synchronize with a remote Internet server If you have saved data in the remote Internet server, you can synchronize your phone by starting the synchronization from your phone. Once you have customized and selected the appropriate synchronization settings, you are ready to synchronize data. (See "Save settings" on page 128 or "Save settings manually" on page 128 for more information.) SYNCHRONIZE DATA 1 From the menus, select Organizer > Synchronization > Settings > Active Internet sync. settings. 2 Scroll to the set you want to activate, and select Activate. The synchronization settings may differ from the service settings required for browsing. After synchronizing, change your active service settings back to the previous ones if you want to use other services later. 3 If you have not already done so, mark the data to be synchronized. See step 3 of the procedure in "Save settings manually" on page 128 for more information. 4 From the menus, select Organizer > Synchronization > Synchronize. Synchronization begins. Depending on the type of connection you are using to synchronize data, connecting or initializing messages may appear. Synchronizing for the first time or after an interrupted synchronization may take up to 30 minutes, if contacts or calendar are full. STOP SYNCHRONIZATION 1 To stop synchronization, select Quit, or press the End key. 2 At the Quit synchronization? prompt, select OK. HANDLE CALLS DURING SYNCHRONIZATION During synchronization, outgoing calls are not possible. Incoming calls can still be received, and can be handled in one of the following ways: • To reject the incoming call, press the End key. Synchronization continues. • To answer the incoming call, press the Talk key. Synchronization is interrupted and a Synchronization suspended message appears. Once the incoming call is ended, a Start synchronization again? message appears. Selecting Yes starts synchronization over from the beginning. Nokia 6230 User Guide 129 Copyright © 2004 Nokia
-
 1
1 -
2
-
3
-
4
-
5
-
6
-
7
-
8
-
9
-
10
-
11
-
12
-
13
-
14
-
15
-
16
-
17
-
18
-
19
-
20
-
21
-
22
-
23
-
24
-
25
-
26
-
27
-
28
-
29
-
30
-
31
-
32
-
33
-
34
-
35
-
36
-
37
-
38
-
39
-
40
-
41
-
42
-
43
-
44
-
45
-
46
-
47
-
48
-
49
-
50
-
51
-
52
-
53
-
54
-
55
-
56
-
57
-
58
-
59
-
60
-
61
-
62
-
63
-
64
-
65
-
66
-
67
-
68
-
69
-
70
-
71
-
72
-
73
-
74
-
75
-
76
-
77
-
78
-
79
-
80
-
81
-
82
-
83
-
84
-
85
-
86
-
87
-
88
-
89
-
90
-
91
-
92
-
93
-
94
-
95
-
96
-
97
-
98
-
99
-
100
-
101
-
102
-
103
-
104
-
105
-
106
-
107
-
108
-
109
-
110
-
111
-
112
-
113
-
114
-
115
-
116
-
117
-
118
-
119
-
120
-
121
-
122
-
123
-
124
-
125
-
126
-
127
-
128
-
129
-
130
-
131
-
132
-
133
-
134
-
135
-
136
-
 137
137 -
 138
138 -
 139
139 -
 140
140 -
 141
141 -
 142
142 -
 143
143 -
 144
144 -
 145
145 -
 146
146 -
 147
147 -
148
-
149
-
150
-
151
-
152
-
153
-
154
-
155
-
156
-
157
-
158
-
159
-
160
-
161
-
162
-
163
-
164
-
165
-
166
-
167
-
168
-
169
-
170
-
171
-
172
-
173
-
174
-
175
-
176
-
177
-
178
-
179
-
180
-
181
-
182
-
183
-
184
-
185
-
186
-
187
-
188
-
189
-
190
-
191
-
192
-
193
 |
 |
