Philips 50PF9830A User manual - Page 46
To set a show to Record
 |
View all Philips 50PF9830A manuals
Add to My Manuals
Save this manual to your list of manuals |
Page 46 highlights
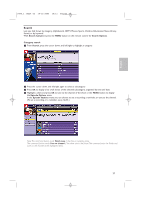
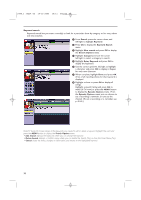
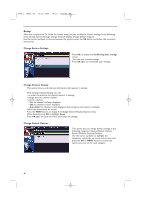
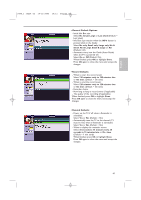
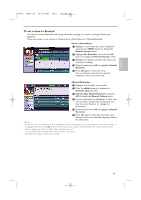
2496.1 16x24 en 14-12-2005 10:11 Pagina 42 To set a show to Record You can set a show to record and change record settings for a show in Listings, Search and Schedule. There are 3 ways to set a show to Record: with the ® button on the remote control, from a Panel Menu or Manual Recording. • Using the ® button on the Remote Control ON/OFF Ambilight MODE ® Ò ‡ † SCREEN - FAVORITES - º FORMAT VIEW ✓ π & Highlight a show (with the cursor up/down.) é Press the ® button on the remote control to record the show Once with the current default settings. Press the ® button repeatedly to select the record frequency (Once, Regularly, Weekly, Off and then Cancel). The proper Record icon appears on the show tile, as the ® button is pressed. Note: When recording via the ® button a default recorder will be chosen: • for analog signals this will be the recorder connected via G-LINK™* • for digital signals the default recorder will be defined by the TV. * G-LINK™ is a protocol sent by the G-LINK cable which connects the TV to the accessory DVR/VCR/Cable converter. G-LINK™ is used for analogue signals. See Connect Accessory devices, Recorder Cable/Converter box, p. 59. • From a Panel Menu & Highlight a show (with the cursor up/down) and press the MENU button to display the Episode Options menu. é Highlight Set Recording and press the OK button to display the Record Options menu. " Highlight the options one after the other and select your settings. ' When finished, press OK to highlight Schedule Recording. ( Press OK again to close the menu. You see a Record icon for the selected frequency next to the show title. • Manual Recording & Highlight the Schedule service label. é Press the MENU button to display the Schedule Options menu. " Highlight New Manual Recording and press OK to display the Record Options menu. ' Current information is displayed (i.e. date, start and end times, channel input). Use the cursor buttons to change the information. ( When finished, press OK to highlight Schedule Recording. § Press OK again to close the menu.You see a Record icon for the selected frequency next to the show title. Notes: - Before recording begins, a notification screen appears if your TV is On. At that time, you can choose to start or to cancel recording. If the TV is not On, the recording occurs as scheduled. - In case of Record conflicts, follow the on-screen instructions. - Recordings on locked channels are possible. 42
-
 1
1 -
2
-
3
-
4
-
5
-
6
-
7
-
8
-
9
-
10
-
11
-
12
-
13
-
14
-
15
-
16
-
17
-
18
-
19
-
20
-
21
-
22
-
23
-
24
-
25
-
26
-
27
-
28
-
29
-
30
-
31
-
32
-
33
-
34
-
35
-
36
-
37
-
38
-
39
-
40
-
 41
41 -
 42
42 -
 43
43 -
 44
44 -
 45
45 -
 46
46 -
 47
47 -
 48
48 -
 49
49 -
 50
50 -
 51
51 -
52
-
53
-
54
-
55
-
56
-
57
-
58
-
59
-
60
-
61
-
62
-
63
-
64
-
65
-
66
-
67
-
68
-
69
-
70
-
71
-
72
-
73
-
74
-
75
-
76
-
77
-
78
-
79
-
80
-
81
-
82
-
83
-
84
-
85
-
86
-
87
-
88
-
89
-
90
-
91
-
92
-
93
-
94
-
95
-
96
-
97
-
98
-
99
-
100
-
101
-
102
-
103
-
104
-
105
-
106
-
107
-
108
-
109
-
110
-
111
-
112
-
113
-
114
-
115
-
116
-
117
-
118
-
119
-
120
-
121
-
122
-
123
-
124
-
125
-
126
-
127
-
128
-
129
-
130
-
131
-
132
-
133
-
134
-
135
-
136
-
137
-
138
-
139
-
140
-
141
-
142
-
143
-
144
-
145
-
146
-
147
-
148
-
149
-
150
-
151
-
152
-
153
-
154
-
155
-
156
-
157
-
158
-
159
-
160
-
161
-
162
-
163
-
164
-
165
-
166
-
167
-
168
-
169
-
170
-
171
-
172
-
173
-
174
-
175
-
176
-
177
-
178
-
179
-
180
-
181
-
182
-
183
-
184
-
185
-
186
-
187
-
188
-
189
-
190
-
191
-
192
-
193
-
194
-
195
-
196
-
197
-
198
-
199
-
200
-
201
-
202
-
203
-
204
-
205
-
206
-
207
-
208
-
209
-
210
-
211
-
212
-
213
-
214
-
215
-
216
-
217
-
218
-
219
-
220
-
221
-
222
-
223
-
224
-
225
-
226
-
227
-
228
-
229
-
230
-
231
-
232
-
233
-
234
-
235
-
236
-
237
-
238
-
239
-
240
-
241
-
242
-
243
-
244
 |
 |
