Philips DVDR3455H User manual - Page 15
Step 1: Basic Recorder Connections
 |
UPC - 609585112773
View all Philips DVDR3455H manuals
Add to My Manuals
Save this manual to your list of manuals |
Page 15 highlights
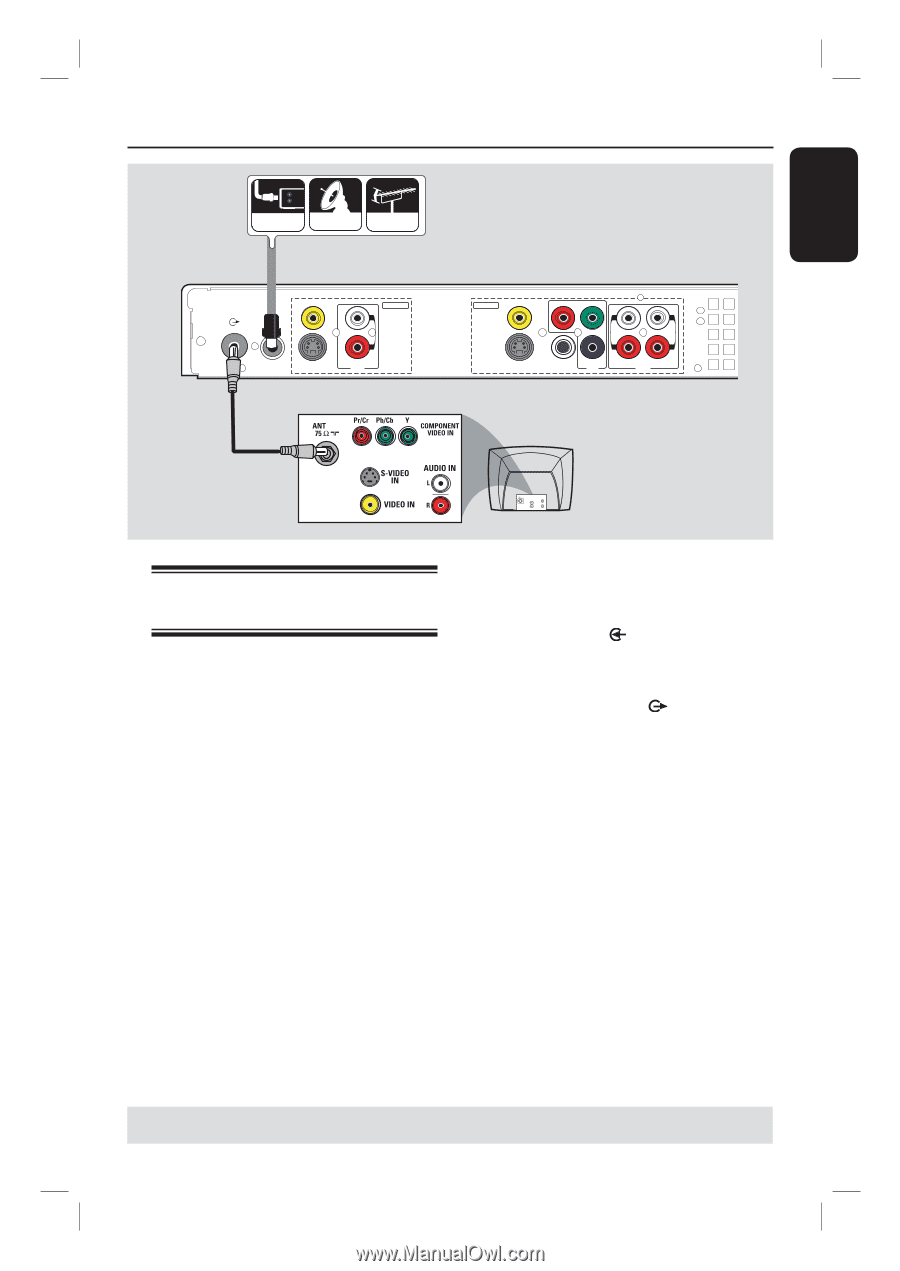
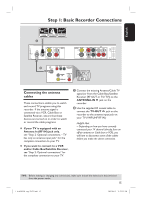
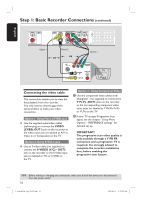
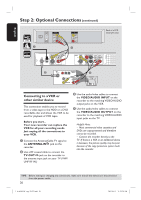
English Step 1: Basic Recorder Connections CABLE SATELLITE ANTENNA A VIDEO (CVBS) EXT 1 TV-OUT ANTENNA-IN EXT 2 S-VIDEO (Y/C) INPUT L R AUDIO B OUTPUT VIDEO (CVBS) PR COMPONENT Y VIDEO OUT 1 L L OUT 2 R R S-VIDEO (Y/C) COAXIAL PB (DIGITAL AUDIO) OUT 3 AUDIO TV AU D IO O UT S-V ID E O IN V ID E O IN Connecting the antenna cables These connections enable you to watch and record TV programs using this recorder. If the antenna signal is connected via a VCR, Cable Box or Satellite Receiver, ensure that these devices are turned on in order to watch or record the cable programs. If your TV is equipped with an Antenna In (RF IN) jack only, see "Step 2: Optional connections - TV has only an antenna input jack" for the complete connection to your TV. If you want to connect to a VCR and/or Cable Box/Satellite Receiver, see "Step 2: Optional connections" for the complete connection to your TV. A Connect the existing Antenna/Cable TV signal (or from the Cable Box/Satellite Receiver {RF OUT or TO TV}) to the ANTENNA-IN jack on the recorder. B Use the supplied RF coaxial cable to connect the TV-OUT jack on the recorder to the antenna input jack on your TV (VHF/UHF RF IN.) Helpful Hint: - Depending on how you have currently connected your TV channel (directly from an off-air antenna or Cable box or VCR), you will have to disconnect some of the cables before you make the above connection. TIPS: Before making or changing any connections, make sure that all the devices are disconnected from the power outlet. 15 1_dvdr3455H_eng_21832.indd 15 2007-06-11 11:23:23 AM
-
 1
1 -
2
-
3
-
4
-
5
-
6
-
7
-
8
-
9
-
 10
10 -
 11
11 -
 12
12 -
 13
13 -
 14
14 -
 15
15 -
 16
16 -
 17
17 -
 18
18 -
 19
19 -
 20
20 -
21
-
22
-
23
-
24
-
25
-
26
-
27
-
28
-
29
-
30
-
31
-
32
-
33
-
34
-
35
-
36
-
37
-
38
-
39
-
40
-
41
-
42
-
43
-
44
-
45
-
46
-
47
-
48
-
49
-
50
-
51
-
52
-
53
-
54
-
55
-
56
-
57
-
58
-
59
-
60
-
61
-
62
-
63
-
64
-
65
-
66
-
67
-
68
-
69
-
70
-
71
-
72
-
73
-
74
-
75
-
76
-
77
-
78
-
79
-
80
-
81
-
82
-
83
 |
 |