Philips DVDR3455H User manual - Page 58
Edit Recordings - HDD
 |
UPC - 609585112773
View all Philips DVDR3455H manuals
Add to My Manuals
Save this manual to your list of manuals |
Page 58 highlights
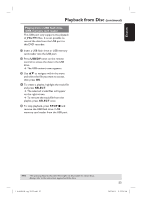
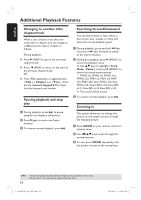
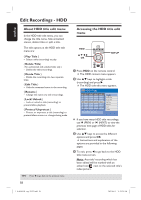
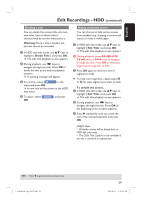
English Edit Recordings - HDD About HDD title edit menu In the HDD title edit menu, you can change the title name, hide unwanted scenes, delete titles or split a title. The edit options in the HDD title edit menu are: { Play Title } - Select a title (recording) to play. { Delete Title} ( For unprotected and unlocked titles only ) - Delete the title (recording). { Divide Title } - Divide the recording into two separate titles. { Edit Title } - Hide the unwanted scene in the recording. { Rename } - Change the name of a title (recording). { Lock/ Unlock } - Lock or unlock a title (recording) to prevent/allow playback. { Protect/ Unprotect } - Protect or unprotect a title (recording) to prevent/allow erasure or changes being made. TIPS: Press W to go back to the previous menu. 58 Accessing the HDD title edit menu HDD OK SETUP A Press HDD on the remote control. CH The HDD content menu appears. B Use ST keys to highlight a title (recording) and press X. The HDD title edit menu appears. HDD 8 Titles No Ch. Date Time Title Play Title 001 CH001 01/20/06 02.00 PM Travel 002 CH003 01/14/06 04.00 PM News 003 CH009 01/25/06 08.30 PM Drama Delete Title Divide Title 00:20:20 SP NTSC 004 CH008 02/30/06 03.30 AM Nature Edit Title 005 CH002 02/27/06 08.30 PM CSI 006 CH008 03/12/06 11.00 AM Title 3 Rename 007 CH012 04/08/06 08.30 PM News Lock 008 CH010 05/30/06 08.30 PM Discover Protect Press [OK] to play title. If you have many HDD title recordings, useí (PREV) or ë (NEXT) to view the previous/ next page of HDD titles for selection. C Use ST keys to access the different options and press OK. Instructions and explanation of the options are provided in the following pages. D To exit, press W to go back to the HDD title menu screen. Note: Any title/ recording which has been edited will be marked with an edited icon next to the selected title's index picture. 1_dvdr3455H_eng_21832.indd 58 2007-06-11 11:23:29 AM
-
 1
1 -
2
-
3
-
4
-
5
-
6
-
7
-
8
-
9
-
10
-
11
-
12
-
13
-
14
-
15
-
16
-
17
-
18
-
19
-
20
-
21
-
22
-
23
-
24
-
25
-
26
-
27
-
28
-
29
-
30
-
31
-
32
-
33
-
34
-
35
-
36
-
37
-
38
-
39
-
40
-
41
-
42
-
43
-
44
-
45
-
46
-
47
-
48
-
49
-
50
-
51
-
52
-
 53
53 -
 54
54 -
 55
55 -
 56
56 -
 57
57 -
 58
58 -
 59
59 -
 60
60 -
 61
61 -
 62
62 -
 63
63 -
64
-
65
-
66
-
67
-
68
-
69
-
70
-
71
-
72
-
73
-
74
-
75
-
76
-
77
-
78
-
79
-
80
-
81
-
82
-
83
 |
 |