Philips DVDR3455H User manual - Page 36
SOURCE, CAM 1, CAM 2, EXT 1, EXT 2, To record directly to a DVD, recordable disc
 |
UPC - 609585112773
View all Philips DVDR3455H manuals
Add to My Manuals
Save this manual to your list of manuals |
Page 36 highlights
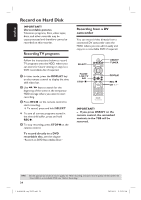
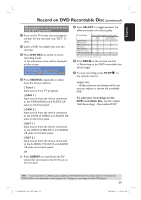
English Record on Hard Disk (continued) D Press SOURCE repeatedly to select the correct input channel that matches the connected jack of the device. { CAM 1 } Input source from the device connected to the CAM1(VIDEO) and AUDIO L/R jacks on the front panel. { CAM 2 } Input source from the device connected to the CAM2 (S-VIDEO) and AUDIO L/R jacks on the front panel. { EXT 1 } Input source from the device connected to the VIDEO (CVBS) EXT1 and AUDIO L/R jacks on the back panel. { EXT 2 } Input source from the device connected to the S-VIDEO (Y/C) EXT2 and AUDIO L/R jacks on the back panel. E Press RECâ to start recording. You can also press RECârepeatedly to increase the recording time in 30-minute increments. F Start playback on the connected device. To pause the playback on the device, press u. To continue, press u again. You can use this function to avoid any unwanted recording . G To stop the recording before the scheduled ending, press STOPÇ. To record directly to a DVD recordable disc, see the chapter "Record on DVD Recordable Disc." TIPS: 36 Set the appropriate mode of record quality for HDD recording, the same record quality will be transferred from HDD to a recordable DVD, see "Before Recording." 1_dvdr3455H_eng_21832.indd 36 2007-06-11 11:23:26 AM
-
 1
1 -
2
-
3
-
4
-
5
-
6
-
7
-
8
-
9
-
10
-
11
-
12
-
13
-
14
-
15
-
16
-
17
-
18
-
19
-
20
-
21
-
22
-
23
-
24
-
25
-
26
-
27
-
28
-
29
-
30
-
 31
31 -
 32
32 -
 33
33 -
 34
34 -
 35
35 -
 36
36 -
 37
37 -
 38
38 -
 39
39 -
 40
40 -
 41
41 -
42
-
43
-
44
-
45
-
46
-
47
-
48
-
49
-
50
-
51
-
52
-
53
-
54
-
55
-
56
-
57
-
58
-
59
-
60
-
61
-
62
-
63
-
64
-
65
-
66
-
67
-
68
-
69
-
70
-
71
-
72
-
73
-
74
-
75
-
76
-
77
-
78
-
79
-
80
-
81
-
82
-
83
 |
 |