Ricoh AP3800C Maintenance Guide - Page 17
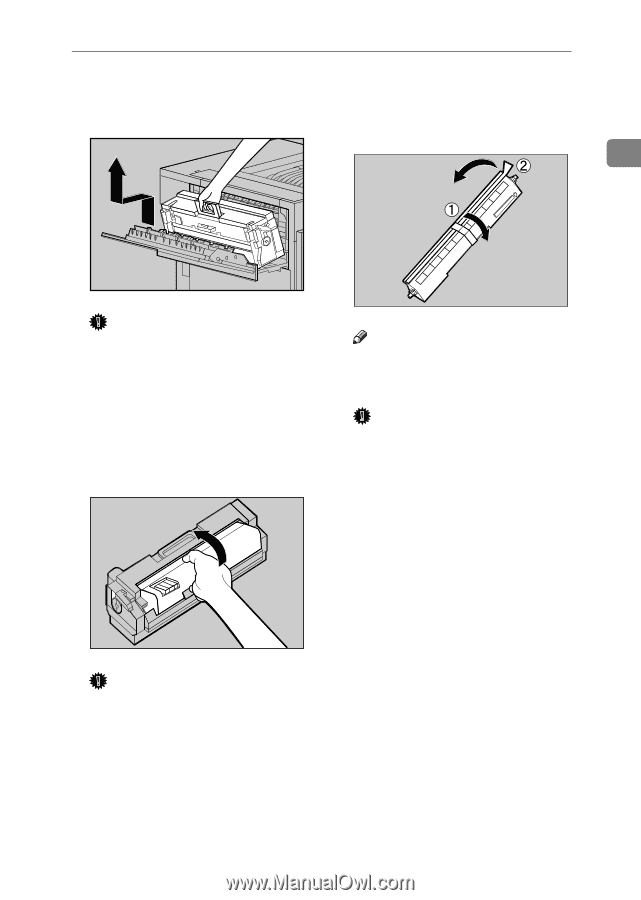
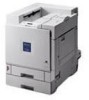
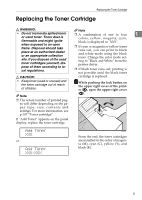
Take out the Fuser Oil Unit from, the illustration.
 |
View all Ricoh AP3800C manuals
Add to My Manuals
Save this manual to your list of manuals |
Page 17 highlights
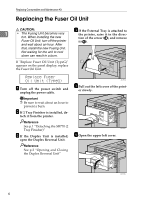
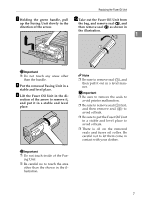
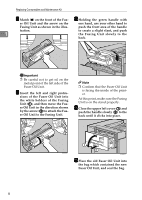
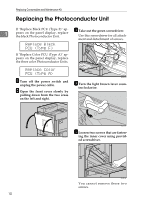
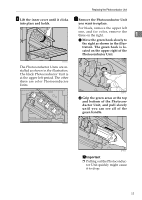
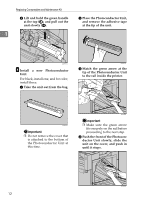
Replacing the Fuser Oil Unit G J Holding the green handle, pull Take out the Fuser Oil Unit from up the Fusing Unit slowly in the the bag, and remove seal (A), and direction of the arrow. then remove seal (B) as shown in the illustration. 1 ZDJH208J Important ❒ Do not touch any areas other than the handle. H Put the removed Fusing Unit in a stable and level place. I Lift the Fuser Oil Unit in the di- rection of the arrow to remove it, and put it in a stable and level place. ZDJH052E Important ❒ Do not touch inside of the Fus- ing Unit. ❒ Be careful no to touch the area other than the shown in the illustration. ZDJH053J Note ❒ Be sure to remove seal (A), and then pull it out in a level manner. Important ❒ Be sure to remove the seals to avoid printer malfunction. ❒ Be sure to remove seal (A) first, and then remove seal (B) to avoid oil leak. ❒ Be sure to put the Fuser Oil Unit in a stable and level place to avoid oil leak. ❒ There is oil on the removed seals and fuser oil roller. Be careful not to let them come in contact with your clothes. 7
-
 1
1 -
2
-
3
-
4
-
5
-
6
-
7
-
8
-
9
-
10
-
11
-
 12
12 -
 13
13 -
 14
14 -
 15
15 -
 16
16 -
 17
17 -
 18
18 -
 19
19 -
 20
20 -
 21
21 -
 22
22 -
23
-
24
-
25
-
26
-
27
-
28
-
29
-
30
-
31
-
32
-
33
-
34
-
35
-
36
-
37
-
38
-
39
-
40
-
41
-
42
-
43
-
44
-
45
-
46
-
47
-
48
-
49
-
50
-
51
-
52
-
53
-
54
-
55
-
56
-
57
-
58
-
59
-
60
-
61
-
62
-
63
-
64
-
65
-
66
-
67
-
68
-
69
-
70
-
71
-
72
-
73
-
74
-
75
-
76
-
77
-
78
-
79
-
80
-
81
-
82
-
83
-
84
-
85
-
86
-
87
-
88
-
89
-
90
-
91
-
92
-
93
-
94
-
95
-
96
-
97
-
98
-
99
-
100
-
101
-
102
-
103
-
104
-
105
-
106
-
107
-
108
-
109
-
110
-
111
-
112
-
113
-
114
-
115
-
116
-
117
-
118
-
119
-
120
-
121
-
122
-
123
-
124
 |
 |