Ricoh AP3800C Maintenance Guide - Page 30
Remove the Fuser Oil Unit in the, Put the removed Fuser Oil Unit
 |
View all Ricoh AP3800C manuals
Add to My Manuals
Save this manual to your list of manuals |
Page 30 highlights
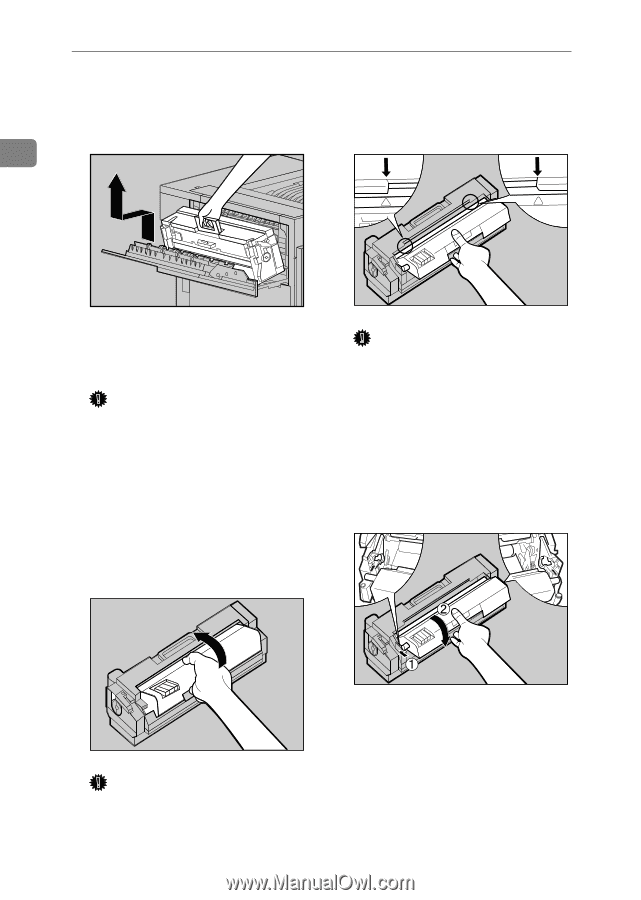
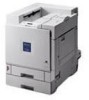
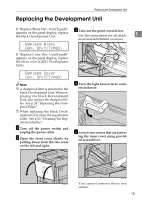
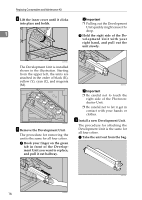
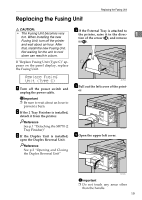
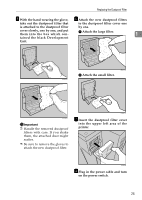
Replacing Consumables and Maintenance Kit G J Holding the green handle, pull Match (U) on the front of the Fus- up the Fusing Unit slowly in the er Oil Unit and the arrow on the direction of the arrow, and then Fusing Unit as shown in the illus- put it in a stable and level place. tration. 1 ZDJH208J H Take out the new Fusing Unit from the bag and put it in a stable and level place. Important ❒ The A3 paper which comes with the new Fusing Unit will be used in a later step T, so be careful not to lose it. ❒ Do not turn the blue dial at the side of the new fusing unit when replacing it or before turning on the power switch. I Remove the Fuser Oil Unit in the direction of the arrow. ZDJH055J Important ❒ Be careful not to get oil on the metal point of the left side of the Fuser Oil Unit. K Insert the left and right protru- sions of the Fuser Oil Unit into the white holders of the Fusing Unit (A), and then move the Fuser Oil Unit in the direction shown by the arrow (B) to attach the Fuser Oil Unit to the Fusing Unit. ZDJH054J L Put the removed Fuser Oil Unit in the bag that enclosed the new ZDJH052E Fusing Unit, and then seal it. Important ❒ Do not touch inside of the Fus- ing Unit. ❒ Be careful not to touch the oil. 20
-
 1
1 -
2
-
3
-
4
-
5
-
6
-
7
-
8
-
9
-
10
-
11
-
12
-
13
-
14
-
15
-
16
-
17
-
18
-
19
-
20
-
21
-
22
-
23
-
24
-
 25
25 -
 26
26 -
 27
27 -
 28
28 -
 29
29 -
 30
30 -
 31
31 -
 32
32 -
 33
33 -
 34
34 -
 35
35 -
36
-
37
-
38
-
39
-
40
-
41
-
42
-
43
-
44
-
45
-
46
-
47
-
48
-
49
-
50
-
51
-
52
-
53
-
54
-
55
-
56
-
57
-
58
-
59
-
60
-
61
-
62
-
63
-
64
-
65
-
66
-
67
-
68
-
69
-
70
-
71
-
72
-
73
-
74
-
75
-
76
-
77
-
78
-
79
-
80
-
81
-
82
-
83
-
84
-
85
-
86
-
87
-
88
-
89
-
90
-
91
-
92
-
93
-
94
-
95
-
96
-
97
-
98
-
99
-
100
-
101
-
102
-
103
-
104
-
105
-
106
-
107
-
108
-
109
-
110
-
111
-
112
-
113
-
114
-
115
-
116
-
117
-
118
-
119
-
120
-
121
-
122
-
123
-
124
 |
 |