Ricoh AP3800C Maintenance Guide - Page 18
er Oil Unit to the Fusing Unit., Place the old Fuser Oil Unit into
 |
View all Ricoh AP3800C manuals
Add to My Manuals
Save this manual to your list of manuals |
Page 18 highlights
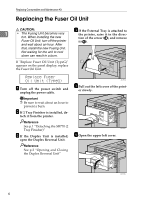
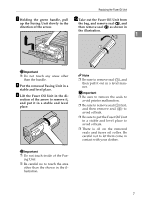
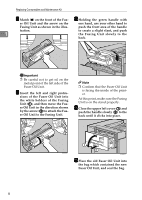
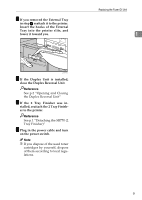
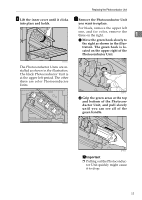
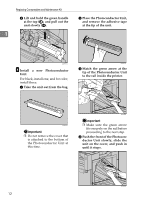
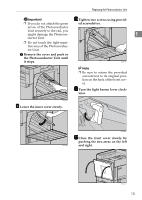
Replacing Consumables and Maintenance Kit K M Match (U) on the front of the Fus- Holding the green handle with er Oil Unit and the arrow on the one hand, use your other hand to Fusing Unit as shown in the illus- push the front area of the handle tration. 1 to create a slight slant, and push the Fusing Unit slowly to the back. ZDJH055J Important ❒ Be careful not to get oil on the metal point of the left side of the Fuser Oil Unit. L Insert the left and right protru- sions of the Fuser Oil Unit into the white holders of the Fusing Unit (A), and then move the Fuser Oil Unit in the direction shown by the arrow (B) to attach the Fuser Oil Unit to the Fusing Unit. ZDJH050E Note ❒ Confirm that the Fuser Oil Unit is facing the inside of the printer. At this point, make sure the Fusing Unit is on the stand properly. N Close the upper left cover (A) and push the handle slowly (B) to the back until it clicks into place. ZDJH054J ZDJH051J O Place the old Fuser Oil Unit into the bag which contained the new Fuser Oil Unit, and seal the bag. 8
-
 1
1 -
2
-
3
-
4
-
5
-
6
-
7
-
8
-
9
-
10
-
11
-
12
-
 13
13 -
 14
14 -
 15
15 -
 16
16 -
 17
17 -
 18
18 -
 19
19 -
 20
20 -
 21
21 -
 22
22 -
 23
23 -
24
-
25
-
26
-
27
-
28
-
29
-
30
-
31
-
32
-
33
-
34
-
35
-
36
-
37
-
38
-
39
-
40
-
41
-
42
-
43
-
44
-
45
-
46
-
47
-
48
-
49
-
50
-
51
-
52
-
53
-
54
-
55
-
56
-
57
-
58
-
59
-
60
-
61
-
62
-
63
-
64
-
65
-
66
-
67
-
68
-
69
-
70
-
71
-
72
-
73
-
74
-
75
-
76
-
77
-
78
-
79
-
80
-
81
-
82
-
83
-
84
-
85
-
86
-
87
-
88
-
89
-
90
-
91
-
92
-
93
-
94
-
95
-
96
-
97
-
98
-
99
-
100
-
101
-
102
-
103
-
104
-
105
-
106
-
107
-
108
-
109
-
110
-
111
-
112
-
113
-
114
-
115
-
116
-
117
-
118
-
119
-
120
-
121
-
122
-
123
-
124
 |
 |
