Ricoh Aficio SP 1200SF User's Guide - Page 133
Faint, Toner Save, Properties, Toner specks, All black, Examples of poor print, quality
 |
View all Ricoh Aficio SP 1200SF manuals
Add to My Manuals
Save this manual to your list of manuals |
Page 133 highlights
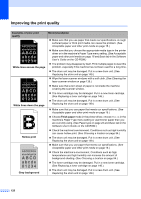
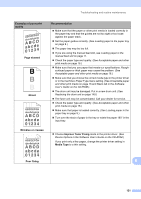
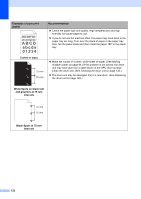
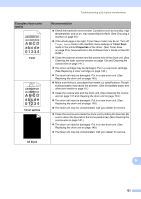
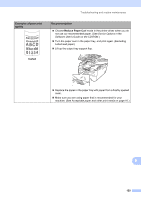
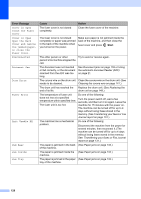
Troubleshooting and routine maintenance Examples of poor print quality ABCDEFGH abcdefghijk ABCD abcde 01234 Faint ABCDEFGH abcdefghijk ABCD abcde 01234 Toner specks All black Recommendation „ Check the machine's environment. Conditions such as humidity, high temperatures, and so on, may cause this print fault. (See Choosing a location on page 94.) „ If the whole page is too light, Toner Save mode may be on. Turn off Toner Save mode in the machine menu settings or Toner Save mode in the printer Properties of the driver. (See Toner Save on page 25 or Advanced tab in the Software User's Guide on the CDROM.) „ Clean the scanner window and the corona wire of the drum unit. (See Cleaning the laser scanner window on page 139 and Cleaning the corona wire on page 141.) „ The toner cartridge may be damaged. Put in a new toner cartridge. (See Replacing a toner cartridge on page 146.) „ The drum unit may be damaged. Put in a new drum unit. (See Replacing the drum unit on page 149.) „ Make sure that you use paper that meets our specifications. Roughsurfaced paper may cause the problem. (See Acceptable paper and other print media on page 16.) „ Clean the corona wire and the drum unit. (See Cleaning the corona wire on page 141 and Cleaning the drum unit on page 143.) „ The drum unit may be damaged. Put in a new drum unit. (See Replacing the drum unit on page 149.) „ The fuser unit may be contaminated. Call your dealer for service. „ Clean the corona wire inside the drum unit by sliding the blue tab. Be sure to return the blue tab to the home position (a). (See Cleaning the corona wire on page 141.) „ The drum unit may be damaged. Put in a new drum unit. (See Replacing the drum unit on page 149.) „ The fuser unit may be contaminated. Call your dealer for service. B 123
-
 1
1 -
2
-
3
-
4
-
5
-
6
-
7
-
8
-
9
-
10
-
11
-
12
-
13
-
14
-
15
-
16
-
17
-
18
-
19
-
20
-
21
-
22
-
23
-
24
-
25
-
26
-
27
-
28
-
29
-
30
-
31
-
32
-
33
-
34
-
35
-
36
-
37
-
38
-
39
-
40
-
41
-
42
-
43
-
44
-
45
-
46
-
47
-
48
-
49
-
50
-
51
-
52
-
53
-
54
-
55
-
56
-
57
-
58
-
59
-
60
-
61
-
62
-
63
-
64
-
65
-
66
-
67
-
68
-
69
-
70
-
71
-
72
-
73
-
74
-
75
-
76
-
77
-
78
-
79
-
80
-
81
-
82
-
83
-
84
-
85
-
86
-
87
-
88
-
89
-
90
-
91
-
92
-
93
-
94
-
95
-
96
-
97
-
98
-
99
-
100
-
101
-
102
-
103
-
104
-
105
-
106
-
107
-
108
-
109
-
110
-
111
-
112
-
113
-
114
-
115
-
116
-
117
-
118
-
119
-
120
-
121
-
122
-
123
-
124
-
125
-
126
-
127
-
 128
128 -
 129
129 -
 130
130 -
 131
131 -
 132
132 -
 133
133 -
 134
134 -
 135
135 -
 136
136 -
 137
137 -
 138
138 -
139
-
140
-
141
-
142
-
143
-
144
-
145
-
146
-
147
-
148
-
149
-
150
-
151
-
152
-
153
-
154
-
155
-
156
-
157
-
158
-
159
-
160
-
161
-
162
-
163
-
164
-
165
-
166
-
167
-
168
-
169
-
170
-
171
-
172
-
173
-
174
-
175
-
176
-
177
-
178
-
179
-
180
-
181
-
182
-
183
-
184
-
185
-
186
-
187
-
188
-
189
-
190
-
191
-
192
-
193
-
194
-
195
-
196
 |
 |
