Ricoh Aficio SP 1200SF User's Guide - Page 154
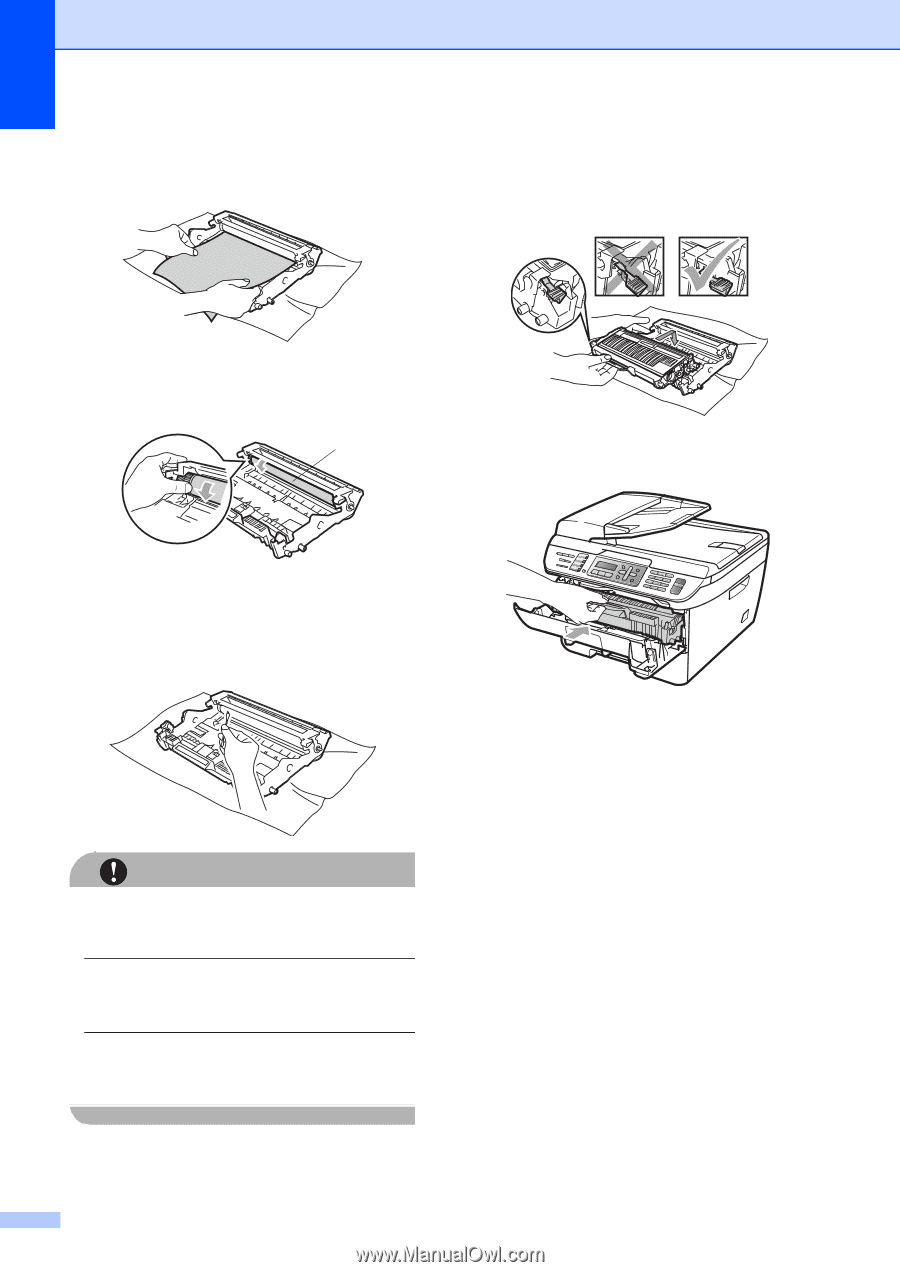
If you put the cartridge in correctly, the, green lock lever will lift automatically.
 |
View all Ricoh Aficio SP 1200SF manuals
Add to My Manuals
Save this manual to your list of manuals |
Page 154 highlights
e Put the print sample in front of the drum unit, and find the exact position of the poor print. h Put the toner cartridge back into the drum unit until you hear it lock into place. If you put the cartridge in correctly, the green lock lever will lift automatically. f Turn the drum unit gear by hand while looking at the surface of the OPC drum (1). 1 i Put the drum unit and toner cartridge assembly back in the machine. g When you have found the mark on the drum that matches the print sample, wipe the surface of the OPC drum with a dry cotton swab until the dust or glue on the surface comes off. CAUTION The drum is photosensitive so DO NOT touch it with your fingers. DO NOT clean the surface of the photosensitive drum with a sharp object. DO NOT use excessive force when cleaning the drum unit. j Close the front cover. k Plug the machine's power cord back into the electrical socket first, and then reconnect all cables and telephone line cord. Turn on the machine. 144
-
 1
1 -
2
-
3
-
4
-
5
-
6
-
7
-
8
-
9
-
10
-
11
-
12
-
13
-
14
-
15
-
16
-
17
-
18
-
19
-
20
-
21
-
22
-
23
-
24
-
25
-
26
-
27
-
28
-
29
-
30
-
31
-
32
-
33
-
34
-
35
-
36
-
37
-
38
-
39
-
40
-
41
-
42
-
43
-
44
-
45
-
46
-
47
-
48
-
49
-
50
-
51
-
52
-
53
-
54
-
55
-
56
-
57
-
58
-
59
-
60
-
61
-
62
-
63
-
64
-
65
-
66
-
67
-
68
-
69
-
70
-
71
-
72
-
73
-
74
-
75
-
76
-
77
-
78
-
79
-
80
-
81
-
82
-
83
-
84
-
85
-
86
-
87
-
88
-
89
-
90
-
91
-
92
-
93
-
94
-
95
-
96
-
97
-
98
-
99
-
100
-
101
-
102
-
103
-
104
-
105
-
106
-
107
-
108
-
109
-
110
-
111
-
112
-
113
-
114
-
115
-
116
-
117
-
118
-
119
-
120
-
121
-
122
-
123
-
124
-
125
-
126
-
127
-
128
-
129
-
130
-
131
-
132
-
133
-
134
-
135
-
136
-
137
-
138
-
139
-
140
-
141
-
142
-
143
-
144
-
145
-
146
-
147
-
148
-
 149
149 -
 150
150 -
 151
151 -
 152
152 -
 153
153 -
 154
154 -
 155
155 -
 156
156 -
 157
157 -
 158
158 -
 159
159 -
160
-
161
-
162
-
163
-
164
-
165
-
166
-
167
-
168
-
169
-
170
-
171
-
172
-
173
-
174
-
175
-
176
-
177
-
178
-
179
-
180
-
181
-
182
-
183
-
184
-
185
-
186
-
187
-
188
-
189
-
190
-
191
-
192
-
193
-
194
-
195
-
196
 |
 |