Ricoh Aficio SP 3510DN Software Guide - Page 25
Printing Confidential Documents, Storing a Locked Print File
 |
View all Ricoh Aficio SP 3510DN manuals
Add to My Manuals
Save this manual to your list of manuals |
Page 25 highlights
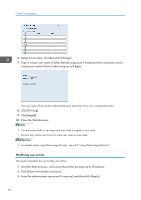
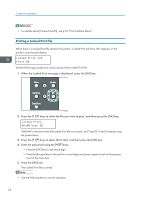
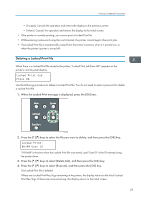
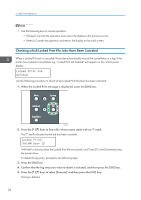
Printing Confidential Documents Printing Confidential Documents If you use the Locked Print function, you can password protect your print job. This means that your job is printed only after you enter the password using the printer's control panel. This function prevents unauthorized users from seeing sensitive documents at the printer. • This function is available only when using the PCL6 printer driver, and printing from a computer running a Windows operating system. Storing a Locked Print File This section describes how to store a Locked Print file in the printer using the printer driver. 1. Open the file you want to print on your computer. 2. Open the printer driver's properties. 3. Click the [Setup] tab, and then select [Locked Print]. The [User ID: (1 to 9 alphanumeric letters)] and [Password: (4 to 8 digits)] text boxes become available. The [User ID: (1 to 9 alphanumeric letters)] text box contains the login user name of your computer account or the user ID that you used for the previous Locked Print job. 4. Type the user ID (containing 1 to 9 alphanumeric characters) and password (containing 4 to 8 digits), and then click [OK]. The user ID will be used to identify your Locked Print file on the printer's control panel. 5. Execute a print command. The print job is stored in the printer as a Locked Print file. You can print the file by entering the password using the control panel. • The Locked Print file is automatically erased from the printer's memory when it is printed out, or when the printer's power is turned off. • The printer can store a maximum of 5 jobs or 5 MB of Locked Print data at a time. • Even if the printer cannot store any more Locked Print files, the printer holds a new Locked Print file for the period of time specified in [Timeout:LockPrt] under [Host Interface] before canceling the job. Within this time, you can print or delete the new Locked Print file. You can also print or delete an existing Locked Print file so that the new Locked Print file can be stored in the printer. • When a Locked Print job is canceled, the printer automatically records the cancellation in a log. You can use this log to identify which Locked Print jobs have been canceled. 23
-
 1
1 -
2
-
3
-
4
-
5
-
6
-
7
-
8
-
9
-
10
-
11
-
12
-
13
-
14
-
15
-
16
-
17
-
18
-
19
-
 20
20 -
 21
21 -
 22
22 -
 23
23 -
 24
24 -
 25
25 -
 26
26 -
 27
27 -
 28
28 -
 29
29 -
 30
30 -
31
-
32
-
33
-
34
-
35
-
36
-
37
-
38
-
39
-
40
-
41
-
42
-
43
-
44
-
45
-
46
-
47
-
48
-
49
-
50
-
51
-
52
-
53
-
54
-
55
-
56
-
57
-
58
-
59
-
60
-
61
-
62
-
63
-
64
-
65
-
66
-
67
-
68
-
69
-
70
-
71
-
72
-
73
-
74
-
75
-
76
-
77
-
78
-
79
-
80
-
81
-
82
-
83
-
84
-
85
-
86
-
87
-
88
-
89
-
90
-
91
-
92
-
93
-
94
-
95
-
96
-
97
-
98
-
99
-
100
-
101
-
102
-
103
-
104
-
105
-
106
-
107
-
108
-
109
-
110
-
111
-
112
-
113
-
114
-
115
-
116
-
117
-
118
-
119
-
120
-
121
-
122
-
123
-
124
-
125
-
126
-
127
-
128
-
129
-
130
-
131
-
132
-
133
-
134
-
135
-
136
-
137
-
138
-
139
-
140
 |
 |