Samsung ML-2551N User Manual (ENGLISH) - Page 200
Setting Network Protocols, Enter, Upper Level, ON Line/Continue
 |
UPC - 635753622706
View all Samsung ML-2551N manuals
Add to My Manuals
Save this manual to your list of manuals |
Page 200 highlights
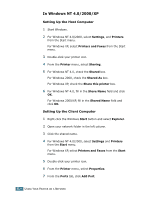
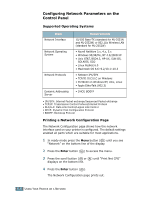
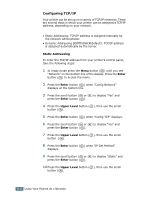
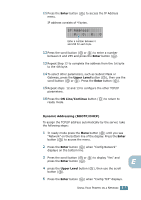
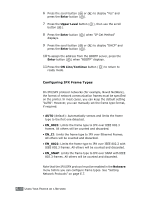
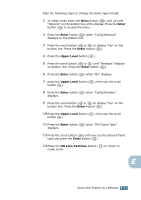
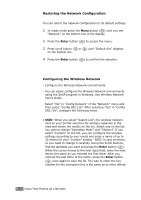
Setting Network Protocols When you first install the printer, all supported network protocols are enabled when you turn the printer on. If a network protocol is enabled, the printer may actively transmit on the network even when the protocol is not in use. This may increase network traffic slightly. To eliminate unnecessary traffic, you can disable unused protocols. 1 In ready mode press the Menu button ( ) until you see "Network" on the bottom line of the display. 2 Press the Enter button ( ) to access the menu. 3 Press the scroll button ( or ) until "Config Network" displays on the bottom line. Press the Enter button ( ). 4 Press the scroll button ( press the Enter button ( button ( ). or ) to display "Yes" and ). Then press the Upper Level 5 Press the scroll button ( or ) until you see the desired protocol on the bottom line. You can choose AppleTalk or Netware. 6 Press the Enter button ( ). 7 Press the scroll button ( or ) to change the setting to "On" (enable) or "Off" (disable). 8 Press the Enter button ( ) to save the selection. 9 Press the ON Line/Continue button ( ) to return to ready mode. E USING YOUR PRINTER ON A NETWORK E.7
-
 1
1 -
2
-
3
-
4
-
5
-
6
-
7
-
8
-
9
-
10
-
11
-
12
-
13
-
14
-
15
-
16
-
17
-
18
-
19
-
20
-
21
-
22
-
23
-
24
-
25
-
26
-
27
-
28
-
29
-
30
-
31
-
32
-
33
-
34
-
35
-
36
-
37
-
38
-
39
-
40
-
41
-
42
-
43
-
44
-
45
-
46
-
47
-
48
-
49
-
50
-
51
-
52
-
53
-
54
-
55
-
56
-
57
-
58
-
59
-
60
-
61
-
62
-
63
-
64
-
65
-
66
-
67
-
68
-
69
-
70
-
71
-
72
-
73
-
74
-
75
-
76
-
77
-
78
-
79
-
80
-
81
-
82
-
83
-
84
-
85
-
86
-
87
-
88
-
89
-
90
-
91
-
92
-
93
-
94
-
95
-
96
-
97
-
98
-
99
-
100
-
101
-
102
-
103
-
104
-
105
-
106
-
107
-
108
-
109
-
110
-
111
-
112
-
113
-
114
-
115
-
116
-
117
-
118
-
119
-
120
-
121
-
122
-
123
-
124
-
125
-
126
-
127
-
128
-
129
-
130
-
131
-
132
-
133
-
134
-
135
-
136
-
137
-
138
-
139
-
140
-
141
-
142
-
143
-
144
-
145
-
146
-
147
-
148
-
149
-
150
-
151
-
152
-
153
-
154
-
155
-
156
-
157
-
158
-
159
-
160
-
161
-
162
-
163
-
164
-
165
-
166
-
167
-
168
-
169
-
170
-
171
-
172
-
173
-
174
-
175
-
176
-
177
-
178
-
179
-
180
-
181
-
182
-
183
-
184
-
185
-
186
-
187
-
188
-
189
-
190
-
191
-
192
-
193
-
194
-
 195
195 -
 196
196 -
 197
197 -
 198
198 -
 199
199 -
 200
200 -
 201
201 -
 202
202 -
 203
203 -
 204
204 -
 205
205 -
206
-
207
-
208
-
209
-
210
-
211
-
212
-
213
-
214
-
215
-
216
-
217
-
218
-
219
-
220
-
221
-
222
-
223
-
224
-
225
-
226
-
227
-
228
-
229
-
230
-
231
-
232
-
233
 |
 |