Samsung ML-2551N User Manual (ENGLISH) - Page 27
Installing the Toner Cartridge - printer cartridge
 |
UPC - 635753622706
View all Samsung ML-2551N manuals
Add to My Manuals
Save this manual to your list of manuals |
Page 27 highlights
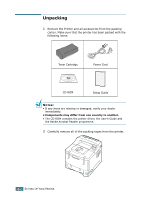
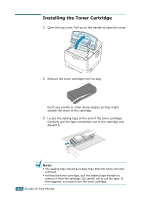
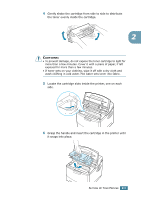
Installing the Toner Cartridge 1 Open the top cover. Pull up on the handle to open the cover. 2 Remove the toner cartridge from its bag. Don't use a knife or other sharp objects as they might scratch the drum of the cartridge. 3 Locate the sealing tape at the end of the toner cartridge. Carefully pull the tape completely out of the cartridge and discard it. NOTE: • The sealing tape should be longer than 550 mm when correctly removed. • Holding the toner cartridge, pull the sealing tape straight to remove it from the cartridge. Be careful not to cut the tape. If this happens, you cannot use the toner cartridge. 2.4 SETTING UP YOUR PRINTER
-
 1
1 -
2
-
3
-
4
-
5
-
6
-
7
-
8
-
9
-
10
-
11
-
12
-
13
-
14
-
15
-
16
-
17
-
18
-
19
-
20
-
21
-
 22
22 -
 23
23 -
 24
24 -
 25
25 -
 26
26 -
 27
27 -
 28
28 -
 29
29 -
 30
30 -
 31
31 -
 32
32 -
33
-
34
-
35
-
36
-
37
-
38
-
39
-
40
-
41
-
42
-
43
-
44
-
45
-
46
-
47
-
48
-
49
-
50
-
51
-
52
-
53
-
54
-
55
-
56
-
57
-
58
-
59
-
60
-
61
-
62
-
63
-
64
-
65
-
66
-
67
-
68
-
69
-
70
-
71
-
72
-
73
-
74
-
75
-
76
-
77
-
78
-
79
-
80
-
81
-
82
-
83
-
84
-
85
-
86
-
87
-
88
-
89
-
90
-
91
-
92
-
93
-
94
-
95
-
96
-
97
-
98
-
99
-
100
-
101
-
102
-
103
-
104
-
105
-
106
-
107
-
108
-
109
-
110
-
111
-
112
-
113
-
114
-
115
-
116
-
117
-
118
-
119
-
120
-
121
-
122
-
123
-
124
-
125
-
126
-
127
-
128
-
129
-
130
-
131
-
132
-
133
-
134
-
135
-
136
-
137
-
138
-
139
-
140
-
141
-
142
-
143
-
144
-
145
-
146
-
147
-
148
-
149
-
150
-
151
-
152
-
153
-
154
-
155
-
156
-
157
-
158
-
159
-
160
-
161
-
162
-
163
-
164
-
165
-
166
-
167
-
168
-
169
-
170
-
171
-
172
-
173
-
174
-
175
-
176
-
177
-
178
-
179
-
180
-
181
-
182
-
183
-
184
-
185
-
186
-
187
-
188
-
189
-
190
-
191
-
192
-
193
-
194
-
195
-
196
-
197
-
198
-
199
-
200
-
201
-
202
-
203
-
204
-
205
-
206
-
207
-
208
-
209
-
210
-
211
-
212
-
213
-
214
-
215
-
216
-
217
-
218
-
219
-
220
-
221
-
222
-
223
-
224
-
225
-
226
-
227
-
228
-
229
-
230
-
231
-
232
-
233
 |
 |
2.
4
S
ETTING
U
P
Y
OUR
P
RINTER
Installing the Toner Cartridge
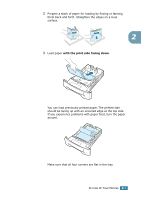
1
Open the top cover. Pull up on the handle to open the cover.
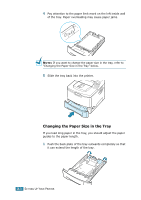
2
Remove the toner cartridge from its bag.
Don’t use a knife or other sharp objects as they might
scratch the drum of the cartridge.
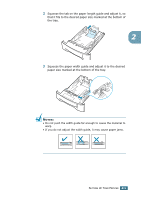
3
Locate the sealing tape at the end of the toner cartridge.
Carefully pull the tape completely out of the cartridge and
discard it.
N
OTE
:
• The sealing tape should be longer than 550 mm when correctly
removed.
• Holding the toner cartridge, pull the sealing tape straight to
remove it from the cartridge. Be careful not to cut the tape. If
this happens, you cannot use the toner cartridge.