Samsung ML-2551N User Manual (ENGLISH) - Page 85
printer's specifications., sheets stack up as they are printed out.
 |
UPC - 635753622706
View all Samsung ML-2551N manuals
Add to My Manuals
Save this manual to your list of manuals |
Page 85 highlights
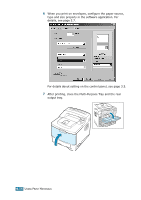
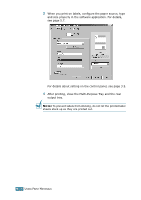
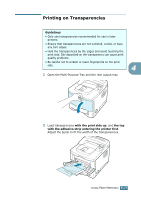
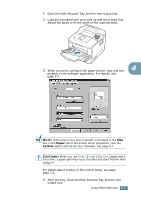
3 When you print on transparencies, configure the paper source, type and size properly in the software application. For details, see page 5.7. For details about setting on the control panel, see page 3.5. 4 After printing, close the Multi-Purpose Tray and the rear output tray. NOTES: • If you print on thin transparencies to the rear output tray, they can be curled. In this case, use the top output tray. If the problem persists, check if your transparencies meets the printer's specifications. • To prevent transparencies from sticking, do not let the printed sheets stack up as they are printed out. • Place transparencies on a flat surface after removing them from the printer. 4.20 USING PRINT MATERIALS
-
 1
1 -
2
-
3
-
4
-
5
-
6
-
7
-
8
-
9
-
10
-
11
-
12
-
13
-
14
-
15
-
16
-
17
-
18
-
19
-
20
-
21
-
22
-
23
-
24
-
25
-
26
-
27
-
28
-
29
-
30
-
31
-
32
-
33
-
34
-
35
-
36
-
37
-
38
-
39
-
40
-
41
-
42
-
43
-
44
-
45
-
46
-
47
-
48
-
49
-
50
-
51
-
52
-
53
-
54
-
55
-
56
-
57
-
58
-
59
-
60
-
61
-
62
-
63
-
64
-
65
-
66
-
67
-
68
-
69
-
70
-
71
-
72
-
73
-
74
-
75
-
76
-
77
-
78
-
79
-
 80
80 -
 81
81 -
 82
82 -
 83
83 -
 84
84 -
 85
85 -
 86
86 -
 87
87 -
 88
88 -
 89
89 -
 90
90 -
91
-
92
-
93
-
94
-
95
-
96
-
97
-
98
-
99
-
100
-
101
-
102
-
103
-
104
-
105
-
106
-
107
-
108
-
109
-
110
-
111
-
112
-
113
-
114
-
115
-
116
-
117
-
118
-
119
-
120
-
121
-
122
-
123
-
124
-
125
-
126
-
127
-
128
-
129
-
130
-
131
-
132
-
133
-
134
-
135
-
136
-
137
-
138
-
139
-
140
-
141
-
142
-
143
-
144
-
145
-
146
-
147
-
148
-
149
-
150
-
151
-
152
-
153
-
154
-
155
-
156
-
157
-
158
-
159
-
160
-
161
-
162
-
163
-
164
-
165
-
166
-
167
-
168
-
169
-
170
-
171
-
172
-
173
-
174
-
175
-
176
-
177
-
178
-
179
-
180
-
181
-
182
-
183
-
184
-
185
-
186
-
187
-
188
-
189
-
190
-
191
-
192
-
193
-
194
-
195
-
196
-
197
-
198
-
199
-
200
-
201
-
202
-
203
-
204
-
205
-
206
-
207
-
208
-
209
-
210
-
211
-
212
-
213
-
214
-
215
-
216
-
217
-
218
-
219
-
220
-
221
-
222
-
223
-
224
-
225
-
226
-
227
-
228
-
229
-
230
-
231
-
232
-
233
 |
 |

U
SING
P
RINT
M
ATERIALS
4.
20
3
When you print on transparencies, configure the paper
source, type and size properly in the software application.
For details, see page 5.7.
For details about setting on the control panel, see page 3.5.
4
After printing, close the Multi-Purpose Tray and the rear
output tray.
N
OTES
:
• If you print on thin transparencies to the rear output tray, they
can be curled. In this case, use the top output tray. If the
problem persists, check if your transparencies meets the
printer’s specifications.
• To prevent transparencies from sticking, do not let the printed
sheets stack up as they are printed out.
• Place transparencies on a flat surface after removing them from
the printer.