Sony DVWM2000 Product Manual (Operation Manual 1st Edition (Revised 6)) - Page 26
PLAYER button and RECORDER, button, Editing control AUDIO IN button and AUDIO OUT button
 |
View all Sony DVWM2000 manuals
Add to My Manuals
Save this manual to your list of manuals |
Page 26 highlights
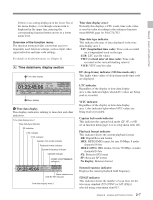
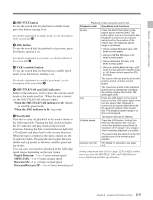
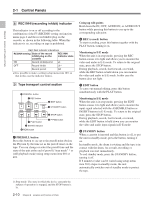
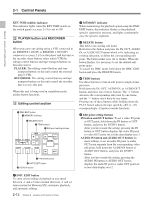
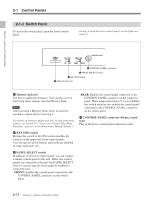
2-1 Control Panels Chapter 2 Location and Function of Parts KEY INHI (inhibit) indicator This indicator lights when the KEY INHI switch on the switch panel (see page 2-14) is set to ON. qs PLAYER button and RECORDER button When you carry out editing using a VTR connected to the REMOTE 1-IN(9P) or REMOTE 1-OUT(9P) connector (see page 2-18) as the player and this unit as the recorder, these buttons select which VTR the editing control buttons and tape transport buttons on this unit control. PLAYER: The editing control buttons and tape transport buttons on this unit control the external player VTR. RECORDER: The editing control buttons and tape transport buttons on this unit control the recorder, that is to say, this unit. When this unit is being used in standalone mode, neither button functions. qd Editing control section 1 DMC EDIT button 2 MEMORY indicator 3 DELETE button 4 TRIM buttons 5 Edit point setting buttons TRIM DMC EDIT DELETE MEMORY IN AUDIO OUT ENTRY PREVIEW AUTO EDIT REVIEW IN OUT 6 PREVIEW button 7 AUTO EDIT button 8 REVIEW button 2 MEMORY indicator When memorizing the playback speed using the DMC EDIT button, this indicator flashes as the playback speed is captured to memory, and lights continuously once the speed is captured. 3 DELETE button This deletes an existing edit point. Hold down this button and press the IN, OUT, AUDIO IN, or AUDIO OUT button which is lit, indicating an existing edit point, to delete the corresponding edit point. The button either goes off or flashes. When the button flashes, it is necessary to set the deleted edit point again. To cancel the DMC mode, hold down the DMC EDIT button and press the DELETE button. 4 TRIM buttons Use these buttons to trim an edit point to single-frame precision. Hold down the IN, OUT, AUDIO IN, or AUDIO OUT button, and press one of these buttons. The '+' button advances the corresponding edit point by one frame, and the '-' button sets it back by one frame. Pressing one of these buttons while holding down the PLAY button adjusts the tape speed by +8% or -8% correspondingly. (Capstan override function) 5 Edit point setting buttons IN button and OUT button: To set a video IN point or OUT point, hold down the IN button or OUT button, and press the ENTRY button. After you have made the setting, pressing the IN button or OUT button displays the video IN point or video OUT point set in time data display area 2. AUDIO IN button and AUDIO OUT button: In insert editing, to set an audio IN point or audio OUT point separate from the corresponding video edit point, hold down the AUDIO IN button or AUDIO OUT button, and press the ENTRY button. After you have made the setting, pressing the AUDIO IN button or AUDIO OUT button displays the audio IN point or audio OUT point set in time data display area 2. 1 DMC EDIT button To carry out recording of playback at any speed between -1 and +3 times normal (between -1 and +2 times normal for Betacam SX), automatic playback, and automatic editing. 2-12 Chapter 2 Location and Function of Parts
-
 1
1 -
2
-
3
-
4
-
5
-
6
-
7
-
8
-
9
-
10
-
11
-
12
-
13
-
14
-
15
-
16
-
17
-
18
-
19
-
20
-
 21
21 -
 22
22 -
 23
23 -
 24
24 -
 25
25 -
 26
26 -
 27
27 -
 28
28 -
 29
29 -
 30
30 -
 31
31 -
32
-
33
-
34
-
35
-
36
-
37
-
38
-
39
-
40
-
41
-
42
-
43
-
44
-
45
-
46
-
47
-
48
-
49
-
50
-
51
-
52
-
53
-
54
-
55
-
56
-
57
-
58
-
59
-
60
-
61
-
62
-
63
-
64
-
65
-
66
-
67
-
68
-
69
-
70
-
71
-
72
-
73
-
74
-
75
-
76
-
77
-
78
-
79
-
80
-
81
-
82
-
83
-
84
-
85
-
86
-
87
-
88
-
89
-
90
-
91
-
92
-
93
-
94
-
95
-
96
-
97
-
98
-
99
-
100
-
101
-
102
-
103
-
104
-
105
-
106
-
107
-
108
-
109
-
110
-
111
-
112
-
113
-
114
-
115
-
116
-
117
-
118
-
119
-
120
-
121
-
122
-
123
-
124
-
125
-
126
-
127
-
128
-
129
-
130
-
131
-
132
-
133
-
134
-
135
-
136
-
137
-
138
-
139
-
140
-
141
-
142
-
143
-
144
-
145
-
146
-
147
-
148
-
149
-
150
-
151
-
152
-
153
-
154
-
155
-
156
-
157
-
158
-
159
-
160
-
161
-
162
-
163
-
164
 |
 |