Sony DVWM2000 Product Manual (Operation Manual 1st Edition (Revised 6)) - Page 49
Setting an initial time code value, Setting the time code value to the real time
 |
View all Sony DVWM2000 manuals
Add to My Manuals
Save this manual to your list of manuals |
Page 49 highlights
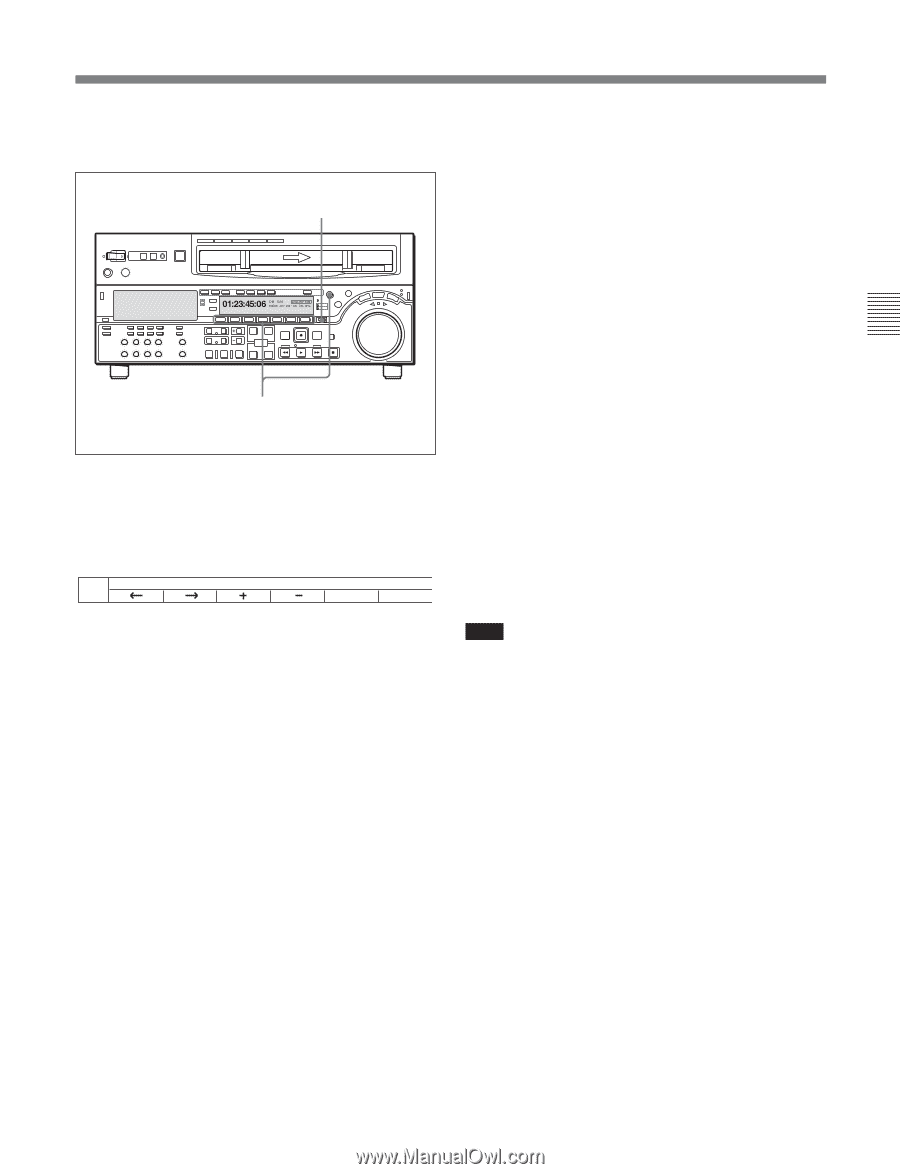
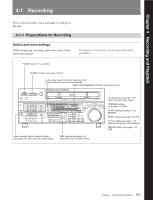
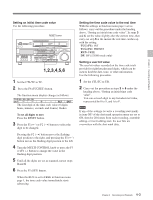
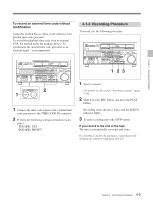
Chapter 4 Recording and Playback Setting an initial time code value Use the following procedure. RESET button Z 1,2,3,4,5,6 1 Set the CTL/TC to TC. 2 Press the F6 (TCGSET) button. The function menu display changes as follows. TCG 00 : 00 : 00 : 00 SET SET EXIT The first digit of the time code value (8 digits: hours, minutes, seconds, and frames) flashes. To set all digits to zero Press the RESET button. 3 Press the F1 (T) or F2 (t) button to select the digit to be changed. Pressing the F2 (t) button moves the flashing digit position to the right, and pressing the F1 (T) button moves the flashing digit position to the left. 4 Turn the MULTI CONTROL knob or press the F3 (+)/F4 (-) button to change the value in the flashing digit position. 5 Until all the digits are set as required, repeat steps 3 and 4. 6 Press the F5 (SET) button. When the RUN is set to FREE in function menu page 1, the time code value immediately starts advancing. Setting the time code value to the real time With the settings in function menu page 1 set as follows, carry out the procedure under the heading above, "Setting an initial time code value". In steps 3 and 4, set the value slightly after the current time, then carry out step 6 at the instant the real time catches up with the setting. TCG (F1): INT TCG (F2): PRESET RUN: FREE DF: DF (525/60 mode only) Setting a user bit value The user bit values recorded on the time code track provide for eight hexadecimal digits, which can be used to hold the date, time, or other information. Use the following procedure. 1 Set the CTL/TC to UB. 2 Carry out the procedure in steps 2 to 6 under the heading above, "Setting an initial time code value". You can set each digit to any hexadecimal value, represented by 0 to 9, and A to F. Note If any of the settings (to write a recording start mark) in item G03 of the shot mark operation menu are set to ON, then for 20 frames from each recording, assemble editing, or insert editing start, the user bits are overwritten with the shot mark data. 4-3 Chapter 4 Recording and Playback
-
 1
1 -
2
-
3
-
4
-
5
-
6
-
7
-
8
-
9
-
10
-
11
-
12
-
13
-
14
-
15
-
16
-
17
-
18
-
19
-
20
-
21
-
22
-
23
-
24
-
25
-
26
-
27
-
28
-
29
-
30
-
31
-
32
-
33
-
34
-
35
-
36
-
37
-
38
-
39
-
40
-
41
-
42
-
43
-
 44
44 -
 45
45 -
 46
46 -
 47
47 -
 48
48 -
 49
49 -
 50
50 -
 51
51 -
 52
52 -
 53
53 -
 54
54 -
55
-
56
-
57
-
58
-
59
-
60
-
61
-
62
-
63
-
64
-
65
-
66
-
67
-
68
-
69
-
70
-
71
-
72
-
73
-
74
-
75
-
76
-
77
-
78
-
79
-
80
-
81
-
82
-
83
-
84
-
85
-
86
-
87
-
88
-
89
-
90
-
91
-
92
-
93
-
94
-
95
-
96
-
97
-
98
-
99
-
100
-
101
-
102
-
103
-
104
-
105
-
106
-
107
-
108
-
109
-
110
-
111
-
112
-
113
-
114
-
115
-
116
-
117
-
118
-
119
-
120
-
121
-
122
-
123
-
124
-
125
-
126
-
127
-
128
-
129
-
130
-
131
-
132
-
133
-
134
-
135
-
136
-
137
-
138
-
139
-
140
-
141
-
142
-
143
-
144
-
145
-
146
-
147
-
148
-
149
-
150
-
151
-
152
-
153
-
154
-
155
-
156
-
157
-
158
-
159
-
160
-
161
-
162
-
163
-
164
 |
 |