Sony DVWM2000 Product Manual (Operation Manual 1st Edition (Revised 6)) - Page 64
Setting split edit points, Automatic setting of edit points in split editing
 |
View all Sony DVWM2000 manuals
Add to My Manuals
Save this manual to your list of manuals |
Page 64 highlights
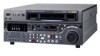
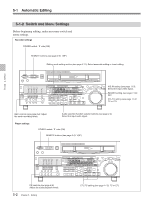
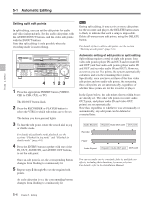
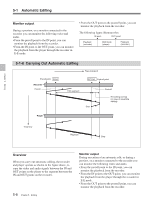
5-1 Automatic Editing Chapter 5 Editing Setting split edit points In split editing, you can set the edit points for audio and video independently. Set the audio edit points with the AUDIO IN/OUT buttons, and the video edit points with the IN/OUT buttons. Note that split editing is only possible when the recording mode is insert editing. Z 4 123 1 Press the appropriate INSERT button (VIDEO, CH1 to CH4, CUE, or TC). The IN/OUT button flash. 2 Press the RECORDER or PLAYER button to select the VTR for which edit points are to be set. The button you have pressed lights. 3 To find the edit point, rotate the search dial in jog or shuttle mode. For details of jog/shuttle mode playback, see the sections "Playback in jog mode" and "Playback in shuttle mode" (page 4-8). 4 Press the ENTRY button together with one of the IN, OUT, AUDIO IN, and AUDIO OUT buttons, to set the edit point. Once an edit point is set, the corresponding button changes from flashing to continuously lit. 5 Repeat steps 2 through 4 to set the required edit points. As each edit point is set, the corresponding button changes from flashing to continuously lit. Note During split editing, if you set six or more edit points for the recorder and player, the DELETE button starts to flash, to indicate that such a setup is impossible. Delete all unnecessary edit points, using the DELETE button. For details of how to delete edit points, see the section "Deleting an edit point" (page 5-6). Automatic setting of edit points in split editing Split editing requires a total of eight edit points: four video edit points (player IN and OUT and recorder IN and OUT) and four audio edit points (player audio IN and OUT and recorder audio IN and OUT). However, as soon as you set five points, the system automatically calculates and sets the remaining three points. Specifically, once you have set three of the four video edit points and two audio edit points, the remaining three edit points are set automatically, regardless of whether these points are for the recorder or player. In the figure below, the edit points shown within boxes are already set. The other edit points (recorder audio OUT point, and player audio IN and video OUT points) are set automatically. Note that, regardless of whether it was set manually or automatically, any edit point can be deleted or corrected later. Audio IN point IN point Audio OUT point OUT point Recorder Player Audio IN point IN point Audio OUT point OUT point You can set audio cut in, crossfade, fade in, and fade out effects, including their durations, by menu selection. For details, refer to the Installation Manual. 5-4 Chapter 5 Editing
-
 1
1 -
2
-
3
-
4
-
5
-
6
-
7
-
8
-
9
-
10
-
11
-
12
-
13
-
14
-
15
-
16
-
17
-
18
-
19
-
20
-
21
-
22
-
23
-
24
-
25
-
26
-
27
-
28
-
29
-
30
-
31
-
32
-
33
-
34
-
35
-
36
-
37
-
38
-
39
-
40
-
41
-
42
-
43
-
44
-
45
-
46
-
47
-
48
-
49
-
50
-
51
-
52
-
53
-
54
-
55
-
56
-
57
-
58
-
 59
59 -
 60
60 -
 61
61 -
 62
62 -
 63
63 -
 64
64 -
 65
65 -
 66
66 -
 67
67 -
 68
68 -
 69
69 -
70
-
71
-
72
-
73
-
74
-
75
-
76
-
77
-
78
-
79
-
80
-
81
-
82
-
83
-
84
-
85
-
86
-
87
-
88
-
89
-
90
-
91
-
92
-
93
-
94
-
95
-
96
-
97
-
98
-
99
-
100
-
101
-
102
-
103
-
104
-
105
-
106
-
107
-
108
-
109
-
110
-
111
-
112
-
113
-
114
-
115
-
116
-
117
-
118
-
119
-
120
-
121
-
122
-
123
-
124
-
125
-
126
-
127
-
128
-
129
-
130
-
131
-
132
-
133
-
134
-
135
-
136
-
137
-
138
-
139
-
140
-
141
-
142
-
143
-
144
-
145
-
146
-
147
-
148
-
149
-
150
-
151
-
152
-
153
-
154
-
155
-
156
-
157
-
158
-
159
-
160
-
161
-
162
-
163
-
164
 |
 |