Sony DVWM2000 Product Manual (Operation Manual 1st Edition (Revised 6)) - Page 74
Standalone Editing, 5-3-5 Preread Editing, Carrying out standalone editing
 |
View all Sony DVWM2000 manuals
Add to My Manuals
Save this manual to your list of manuals |
Page 74 highlights
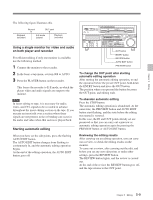
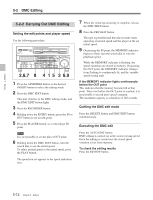
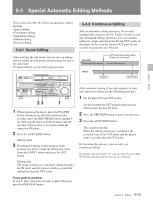
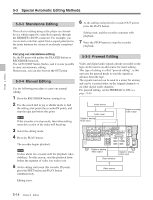
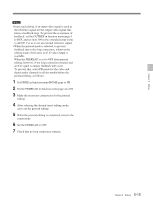
Chapter 5 Editing 5-3 Special Automatic Editing Methods 5-3-3 Standalone Editing This refers to editing using as the player an external device which cannot be controlled remotely through the REMOTE1-IN(9P) connector. For example, you can record a color bar signal from a signal generator in the joints between the scenes of an already completed tape. Carrying out standalone editing Set the IN point with neither the PLAYER button or RECORDER button lit. The AUTO EDIT button flashes, and it is now possible to carry out automatic editing. If necessary, you can also first set the OUT point. 5-3-4 Manual Editing Use the following procedure to carry out manual editing. 1 Press the RECORDER button, turning it on. 2 Use the search dial in jog or shuttle mode to find the editing start point (the recorder IN point), and stop the tape just before this point. Note If the recorder is in stop mode, then when editing starts this section of the video will break up. 3 Select the editing mode. 4 Press the PLAY button. The recorder begins playback. Note It takes about two seconds until the playback video stabilizes. For this reason, start the playback from before the segment of video you wish to use. 5 At the editing start point (the recorder IN point), press the EDIT button and PLAY button simultaneously. Editing starts. 6 At the editing end point (the recorder OUT point), press the PLAY button. Editing ends, and the recorder continues with playback. 7 Press the STOP button to stop the recorder playback. 5-3-5 Preread Editing Video and digital audio signals already recorded on the tape can be used as an edit source for insert editing. This type of editing is called "preread editing", as this unit uses the preread heads to read the signals in advance from the tape. The signals read out can be send to a mixer for mixing, and can be recorded either on the original channels or on other digital audio channels. For preread editing, set the PREREAD to ON (see page 11-8). Audio source Audio mixer Digital or analog Audio input 75Ω 75Ω Digital or analog audio output Digital or analog video output Video switcher Digital or analog video input Video source 5-14 Chapter 5 Editing
-
 1
1 -
2
-
3
-
4
-
5
-
6
-
7
-
8
-
9
-
10
-
11
-
12
-
13
-
14
-
15
-
16
-
17
-
18
-
19
-
20
-
21
-
22
-
23
-
24
-
25
-
26
-
27
-
28
-
29
-
30
-
31
-
32
-
33
-
34
-
35
-
36
-
37
-
38
-
39
-
40
-
41
-
42
-
43
-
44
-
45
-
46
-
47
-
48
-
49
-
50
-
51
-
52
-
53
-
54
-
55
-
56
-
57
-
58
-
59
-
60
-
61
-
62
-
63
-
64
-
65
-
66
-
67
-
68
-
 69
69 -
 70
70 -
 71
71 -
 72
72 -
 73
73 -
 74
74 -
 75
75 -
 76
76 -
 77
77 -
 78
78 -
 79
79 -
80
-
81
-
82
-
83
-
84
-
85
-
86
-
87
-
88
-
89
-
90
-
91
-
92
-
93
-
94
-
95
-
96
-
97
-
98
-
99
-
100
-
101
-
102
-
103
-
104
-
105
-
106
-
107
-
108
-
109
-
110
-
111
-
112
-
113
-
114
-
115
-
116
-
117
-
118
-
119
-
120
-
121
-
122
-
123
-
124
-
125
-
126
-
127
-
128
-
129
-
130
-
131
-
132
-
133
-
134
-
135
-
136
-
137
-
138
-
139
-
140
-
141
-
142
-
143
-
144
-
145
-
146
-
147
-
148
-
149
-
150
-
151
-
152
-
153
-
154
-
155
-
156
-
157
-
158
-
159
-
160
-
161
-
162
-
163
-
164
 |
 |