Sony DVWM2000 Product Manual (Operation Manual 1st Edition (Revised 6)) - Page 80
Shot Mark List Operations, Erasing a shot mark, Displaying the shot mark list
 |
View all Sony DVWM2000 manuals
Add to My Manuals
Save this manual to your list of manuals |
Page 80 highlights
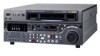
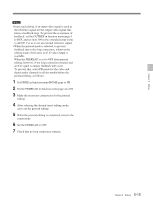
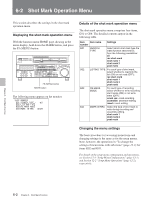
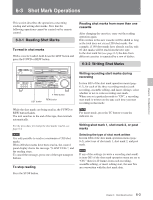
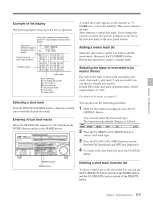
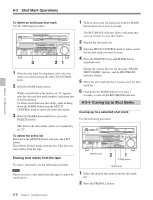
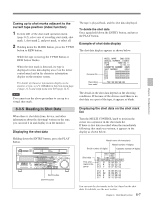
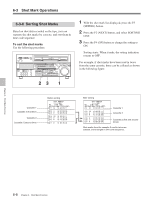
Chapter 6 Shot Mark Function 6-3 Shot Mark Operations To write in crash recording or assemble editing 1 Hold the MARK button down for at least 2 seconds. 2 At the position you wish to write the mark, hold down the ENTRY button, and press the MARK button. A mark of the type selected in item G04 of the shot mark operation menu is written. Z Erasing a shot mark Select the shot mark from the shot mark list, and then carry out the deletion operation. For details of the procedure, see page 6-6. 6-3-3 Shot Mark List Operations Displaying the shot mark list Hold down the ENTRY button and press the LIST button. Z ENTRY button MARK button REC/ERASE indicator Writing during playback, while stopped, or during a search When this unit is in any of the playback, stop, or search modes, you can write a post mark only. 1 Hold the MARK button down for at least 2 seconds. The REC/ERASE indicator lights. 2 At the position you wish to write the mark, hold down the ENTRY button and press the MARK button. A post mark is written the instant you pressed the MARK button. While the mark is being written, the message "RECORD SHOT MARK" appears on the monitor, and the REC/ERASE indicator flashes. ENTRY button LIST button All of the shot mark types for which item G02 in the shot mark operation menu is set to "ON" appear in the list. If you do the same operation again, the list display disappears. While the shot mark list is displayed, the function menu display changes as follows. SHT MRK MEMO SELECT DELETE SETING EXIT 6-4 Chapter 6 Shot Mark Function
-
 1
1 -
2
-
3
-
4
-
5
-
6
-
7
-
8
-
9
-
10
-
11
-
12
-
13
-
14
-
15
-
16
-
17
-
18
-
19
-
20
-
21
-
22
-
23
-
24
-
25
-
26
-
27
-
28
-
29
-
30
-
31
-
32
-
33
-
34
-
35
-
36
-
37
-
38
-
39
-
40
-
41
-
42
-
43
-
44
-
45
-
46
-
47
-
48
-
49
-
50
-
51
-
52
-
53
-
54
-
55
-
56
-
57
-
58
-
59
-
60
-
61
-
62
-
63
-
64
-
65
-
66
-
67
-
68
-
69
-
70
-
71
-
72
-
73
-
74
-
 75
75 -
 76
76 -
 77
77 -
 78
78 -
 79
79 -
 80
80 -
 81
81 -
 82
82 -
 83
83 -
 84
84 -
 85
85 -
86
-
87
-
88
-
89
-
90
-
91
-
92
-
93
-
94
-
95
-
96
-
97
-
98
-
99
-
100
-
101
-
102
-
103
-
104
-
105
-
106
-
107
-
108
-
109
-
110
-
111
-
112
-
113
-
114
-
115
-
116
-
117
-
118
-
119
-
120
-
121
-
122
-
123
-
124
-
125
-
126
-
127
-
128
-
129
-
130
-
131
-
132
-
133
-
134
-
135
-
136
-
137
-
138
-
139
-
140
-
141
-
142
-
143
-
144
-
145
-
146
-
147
-
148
-
149
-
150
-
151
-
152
-
153
-
154
-
155
-
156
-
157
-
158
-
159
-
160
-
161
-
162
-
163
-
164
 |
 |