Sony DVWM2000 Product Manual (Operation Manual 1st Edition (Revised 6)) - Page 91
Modifying Clip Data, appears, and it is not possible to change the data. Refer
 |
View all Sony DVWM2000 manuals
Add to My Manuals
Save this manual to your list of manuals |
Page 91 highlights
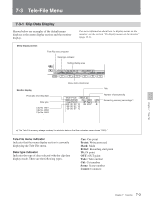
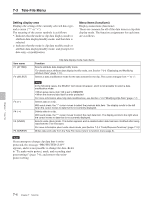
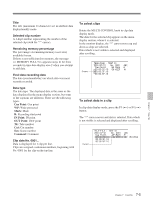
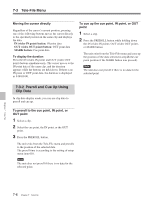
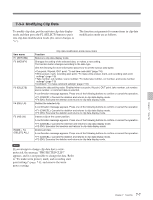
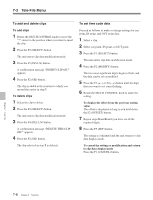
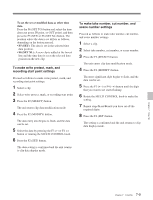
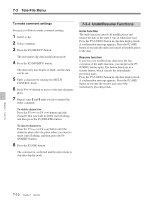
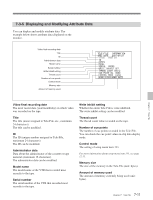
7-3-3 Modifying Clip Data To modify clip data, put the unit into clip data display mode and then press the F2 (SELECT) button to put it into clip data modification mode (the cursor changes to ">"). The function assignments for menu items in clip data modification mode are as follows. Item name F1 (RETURN) F2 (MODIFY) F3 (DELETE) F4 (DEL LN) F5 (INS LN) HOME + F4 (DELETE ALL) Clip data modification mode menu items Function Returns to clip data display mode. Changes the setting of the selected data, or makes a new setting. The function button changes according to the data type. See the following for more information about how to set the various data types. • Cue point, IN point, OUT point: "To set time code data" (page 7-8) • Write protect, mark, recording start point: "To make write protect, mark, and recording start point settings" (page 7-9) • Take number, cut number, scene number: "To make take number, cut number, and scene number settings" (page 7-9) • Comment: "To make comment settings" (page 7-10) Deletes the data setting value. Enabled when cue point, IN point, OUT point, take number, cut number, scene number, or comment data is selected. A confirmation message appears. Press one of the following buttons to confirm or cancel the operation. • F1 (CANCEL): Cancels the deletion and returns to clip data display mode. • F2 (OK): Executes the deletion and returns to clip data display mode. Deletes the selected clip. A confirmation message appears. Press one of the following buttons to confirm or cancel the operation. • F1 (CANCEL): Cancels the deletion and returns to clip data display mode. • F2 (OK): Executes the deletion and returns to clip data display mode. Inserts a clip at the cursor position. A confirmation message appears. Press one of the following buttons to confirm or cancel the operation. • F1 (CANCEL): Cancels the insertion and returns to clip data display mode. • F2 (OK): Executes the insertion and returns to clip data display mode. Deletes all clips. A confirmation message appears. Press one of the following buttons to confirm or cancel the operation. • F1 (CANCEL): Cancels the deletion and returns to clip data display mode. • F2 (OK): Executes the deletion and returns to clip data display mode. Note If you attempt to change clip data that is writeprotected, the message "PROTECTED CLIP!" appears, and it is not possible to change the data. Refer to "To make write protect, mark, and recording start point settings" (page 7-9), and remove the writeprotect setting. Chapter 7 Tele-File 7-7 Chapter 7 Tele-File
-
 1
1 -
2
-
3
-
4
-
5
-
6
-
7
-
8
-
9
-
10
-
11
-
12
-
13
-
14
-
15
-
16
-
17
-
18
-
19
-
20
-
21
-
22
-
23
-
24
-
25
-
26
-
27
-
28
-
29
-
30
-
31
-
32
-
33
-
34
-
35
-
36
-
37
-
38
-
39
-
40
-
41
-
42
-
43
-
44
-
45
-
46
-
47
-
48
-
49
-
50
-
51
-
52
-
53
-
54
-
55
-
56
-
57
-
58
-
59
-
60
-
61
-
62
-
63
-
64
-
65
-
66
-
67
-
68
-
69
-
70
-
71
-
72
-
73
-
74
-
75
-
76
-
77
-
78
-
79
-
80
-
81
-
82
-
83
-
84
-
85
-
 86
86 -
 87
87 -
 88
88 -
 89
89 -
 90
90 -
 91
91 -
 92
92 -
 93
93 -
 94
94 -
 95
95 -
 96
96 -
97
-
98
-
99
-
100
-
101
-
102
-
103
-
104
-
105
-
106
-
107
-
108
-
109
-
110
-
111
-
112
-
113
-
114
-
115
-
116
-
117
-
118
-
119
-
120
-
121
-
122
-
123
-
124
-
125
-
126
-
127
-
128
-
129
-
130
-
131
-
132
-
133
-
134
-
135
-
136
-
137
-
138
-
139
-
140
-
141
-
142
-
143
-
144
-
145
-
146
-
147
-
148
-
149
-
150
-
151
-
152
-
153
-
154
-
155
-
156
-
157
-
158
-
159
-
160
-
161
-
162
-
163
-
164
 |
 |