Xerox 3100MFPX User Guide - Phaser 3100 MFP/X - Page 27
Loading paper in the manual feed tray
 |
UPC - 095205741964
View all Xerox 3100MFPX manuals
Add to My Manuals
Save this manual to your list of manuals |
Page 27 highlights
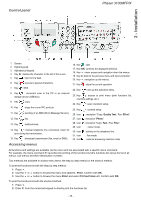
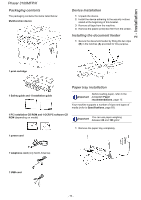
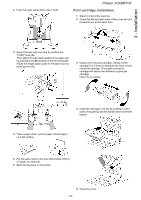
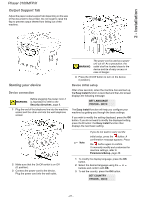
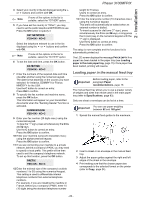
2 - Installation Phaser 3100MFP/X 4 Select your country in the list displayed using the or buttons and confirm with OK. Note If none of the options in the list is suitable, select the "OTHER" option. 5 If you have set the country to "Other", you may need to set the public telephone NETWORK to use. Press the OK button to specify it. SET NETWORK YES=OK - NO=C Select the telephone network to use in the list displayed using the or buttons and confirm with OK. Note If none of the options in the list is suitable, select the "OTHER" option. 6 To set the date and time, press the OK button. DATE/TIME YES=OK - NO=C 7 Enter the numbers of the required date and time one after another using the numerical keypad. The date format depends on the country you have selected: for instance, DDMMYY for France, MMDDYY for the USA. Use the C button to correct an entry. Press OK to confirm. 8 To specify the fax number and machine name, press the OK button. This information will appear on your transmitted documents when the "Sending Header" function is activated. NUMBER/NAME YES=OK - NO=C 9 Enter your fax number (20 digits max.) using the numerical keypad. To type the "+" sign, press simultaneously the CTRL and Q keys. Use the C button to correct an entry. Press the OK button to confirm. 10 Enter your machine name (20 characters max.) using the alphanumerical keypad. Press the OK button to confirm. 11 If you are connecting your machine to a private network, behind a company's PABX, you may need to specify a local prefix. This prefix will be then used to exit the company's telephone network. To set up this function, press the OK button. PREFIX YES=OK - NO=C 12 Enter the minimal size of the company's outside numbers (1 to 30) using the numerical keypad. This setting is used to differentiate internal telephone numbers from external telephone numbers. For example, if you are installing the machine in France, behind your company's PABX, enter 10 (10 digits being the standard telephone number length for France). Use C to correct an entry. Press the OK button to confirm. 13 Enter the local prefix number (10 characters max.) using the numerical keypad. This prefix will automatically be added when an external number is dialled. To insert a pause for dial tone ("/" sign), press simultaneously the CTRL and M keys, or long press the 0 (zero) key on the numerical keypad until the "/" sign is displayed. Use the C button to correct an entry. Press the OK button to confirm. The setup is now complete and the functions list is automatically printed out. The LCD screen displays the message PAPER EMPTY if no paper has been loaded in the paper tray (see Loading paper in the main paper tray, page 15). Once paper has been loaded, printing will resume. Loading paper in the manual feed tray Before loading paper, refer to the Important paragraph Paper recommendations, page 15. The manual feed tray allows you to use a greater variety of weights and sizes than those used in the main paper tray (refer to Specifications, page 83). Only one sheet or envelope can be fed at a time. Important You can use paper weighing between 52 and 160 g/m². 1 Spread the manual feed guides to the maximum. 2 Insert a sheet or an envelope in the manual feed tray. 3 Adjust the paper guides against the right and left edges of the sheet or the envelope. 4 Print making sure that the chosen paper size corresponds to the selected format on the printer (refer to Copy, page 24). - 22 -
-
 1
1 -
2
-
3
-
4
-
5
-
6
-
7
-
8
-
9
-
10
-
11
-
12
-
13
-
14
-
15
-
16
-
17
-
18
-
19
-
20
-
21
-
 22
22 -
 23
23 -
 24
24 -
 25
25 -
 26
26 -
 27
27 -
 28
28 -
 29
29 -
 30
30 -
 31
31 -
 32
32 -
33
-
34
-
35
-
36
-
37
-
38
-
39
-
40
-
41
-
42
-
43
-
44
-
45
-
46
-
47
-
48
-
49
-
50
-
51
-
52
-
53
-
54
-
55
-
56
-
57
-
58
-
59
-
60
-
61
-
62
-
63
-
64
-
65
-
66
-
67
-
68
-
69
-
70
-
71
-
72
-
73
-
74
-
75
-
76
-
77
-
78
-
79
-
80
-
81
-
82
-
83
-
84
-
85
-
86
-
87
-
88
-
89
-
90
 |
 |