Xerox 3100MFPX User Guide - Phaser 3100 MFP/X - Page 30
ID Card Copy mode, Special setups for copying - x drivers
 |
UPC - 095205741964
View all Xerox 3100MFPX manuals
Add to My Manuals
Save this manual to your list of manuals |
Page 30 highlights
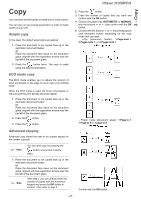
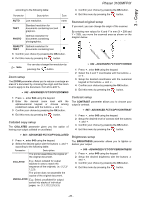
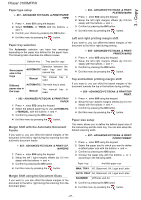
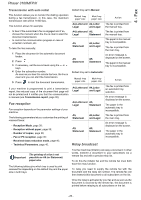
3 - Copy Phaser 3100MFP/X 6 Adjust the desired zoom level, from 25% TO 400% with the buttons or , confirm with the OK button (only available in 1 Page to 1 copy mode). 7 Adjust the desired origin values with the digital keyboard buttons or then confirm with the OK button. 8 Choose the resolution depending on the printing quality that you want AUTO, TEXT, PHOTO or QUALITY TEXT with the buttons or , then confirm with the OK button. 9 Adjust the contrast level with the buttons or , then confirm with the OK button. 10 Adjust the desired brightness level with the buttons or , then confirm with the OK button. 11 Choose the paper type NORMAL, THICK with the buttons or , then confirm with the OK button. 7 Adjust the contrast level with the buttons or , then confirm with the OK button. 8 Adjust the desired brightness level with the buttons or , then confirm with the OK button. 9 Choose the paper type NORMAL, THICK with the buttons or , then confirm with the OK button. The LCD screen displays the following message: PUT ID CARD THEN OK 10 Place your identity card or any other official document against the document glass, as shown below: ID Card Copy mode The ID CARD copy function is used for copying both sides of an identity card or driver's license type document on an A4 format sheet (original document size < A5) or on a Letter format sheet (original document size < Statement). The LCD screen displays useful operating instructions (when the original document should be placed, when the document should be turned over, etc.) and asks for your confirmation to proceed with the operation. Important This function is available only if the document to be copied is placed on the document glass, and if no paper is detected in the automatic document feeder. Zoom and Origin adjustments are not available in this copy mode. 1 Make sure that there is no document in the automatic document feeder. 2 Press the button. 3 Enter the desired number of copies and confirm with the OK button. 4 Choose the paper tray AUTOMATIC or MANUAL with the buttons or , then confirm with the OK button. Important Copying in ID Card mode is only possible on A4 (original document size < A5) or Letter (original document size < Statement) paper size. Make sure that the selected paper tray uses the correct paper size. 5 Choose the copying option ID CARD with the buttons or and confirm with the OK button. 6 Choose the resolution depending on the desired printing quality AUTO, TEXT, PHOTO or QUALITY TEXT with the buttons or , then confirm with the OK button. For optimal results with ID documents, select the PHOTO resolution. 11 Press the OK button. The document is scanned then the LCD screen displays the following message: TURN UP DOC THEN OK 12 Turn your document over then confirm with the OK button. The machine prints out a copy of your document. Special setups for copying Setups done through this menu become the device default setups after you confirm. Important When the quality of the printing is not satisfying, you can perform a calibration (see Calibrate your scanner, page 43). Resolution setup The RESOLUTION parameter allows you to setup the photocopy resolution. 841 - ADVANCED FCT/COPY/RESOLUTION 1 Press , enter 841 using the keypad. 2 Choose the resolution with the buttons or - 25 -
-
 1
1 -
2
-
3
-
4
-
5
-
6
-
7
-
8
-
9
-
10
-
11
-
12
-
13
-
14
-
15
-
16
-
17
-
18
-
19
-
20
-
21
-
22
-
23
-
24
-
 25
25 -
 26
26 -
 27
27 -
 28
28 -
 29
29 -
 30
30 -
 31
31 -
 32
32 -
 33
33 -
 34
34 -
 35
35 -
36
-
37
-
38
-
39
-
40
-
41
-
42
-
43
-
44
-
45
-
46
-
47
-
48
-
49
-
50
-
51
-
52
-
53
-
54
-
55
-
56
-
57
-
58
-
59
-
60
-
61
-
62
-
63
-
64
-
65
-
66
-
67
-
68
-
69
-
70
-
71
-
72
-
73
-
74
-
75
-
76
-
77
-
78
-
79
-
80
-
81
-
82
-
83
-
84
-
85
-
86
-
87
-
88
-
89
-
90
 |
 |
