Xerox 3100MFPX User Guide - Phaser 3100 MFP/X - Page 60
Telephony
 |
UPC - 095205741964
View all Xerox 3100MFPX manuals
Add to My Manuals
Save this manual to your list of manuals |
Page 60 highlights
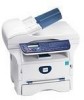
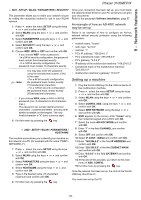
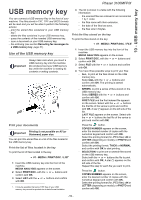
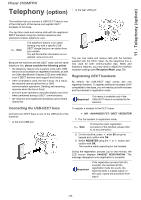
11 - Telephony (option) Phaser 3100MFP/X Telephony (option) • to the rear USB port The machine lets you connect a USB-DECT base to one of the USB ports of the device and register DECT handsets to this base. You can then make and receive calls with the registered DECT handsets using the machine telephone line (standard cordless telephone use). Note The telephony feature is an option working only with a specific USB DECT dongle that you can obtain from your retailer. You will find further information on our website: www.xerox.com. Because the machine and the DECT base use the same telephone line, please consider the following points: • the telephony feature only supports voice calls. SMS service is not available on registered handsets, as well as Caller Identification Display (CID) and notification, even if DECT devices used support this function. • when a handset is used, the line is busy. As a result, the machine cannot perform fax or SMS communication operations. Sending and receiving resumes when the line is freed. • print and scan operations may take slightly more time when performed during a DECT communication. • the machine and registered handset(s) cannot share directories. You can now make and receive calls with the handset supplied with the DECT base. As the telephone line is now used for both communication (fax, SMS) and telephony features, you may need to adjust the machine reception settings (see Reception Mode, page 38). Registering DECT handsets By default, the USB-DECT base comes with one registered handset. To register additional handsets (GAP compatible) to the base, you will need to put both the base and the handset in registration mode. This menu is available only if the Important USB-DECT base is connected to the machine. Connecting the USB-DECT base To register a handset to the DECT base: Connect your DECT base to one of the USB ports of the machine: • to the front USB port 891 - ADVANCED FCT / DECT / REGISTER 1 Put the handset in registration mode. Note To know the exact registration procedure of the handset, please refer to its documentation. 2 On the machine, press , enter 89 using the keypad and confirm with OK. 3 Select REGISTER using the or button and confirm with OK. The machine starts searching for the handset. During the registration process (up to one minute), the LCD screen displays HANDSET REGISTRATION. The message disappears once registration is complete. Important If the registration process fails (for example, the handset left the registration mode too soon), the machine emits a 3-beep signal. In this case, repeat the procedure from step 1. - 55 -
-
 1
1 -
2
-
3
-
4
-
5
-
6
-
7
-
8
-
9
-
10
-
11
-
12
-
13
-
14
-
15
-
16
-
17
-
18
-
19
-
20
-
21
-
22
-
23
-
24
-
25
-
26
-
27
-
28
-
29
-
30
-
31
-
32
-
33
-
34
-
35
-
36
-
37
-
38
-
39
-
40
-
41
-
42
-
43
-
44
-
45
-
46
-
47
-
48
-
49
-
50
-
51
-
52
-
53
-
54
-
 55
55 -
 56
56 -
 57
57 -
 58
58 -
 59
59 -
 60
60 -
 61
61 -
 62
62 -
 63
63 -
 64
64 -
 65
65 -
66
-
67
-
68
-
69
-
70
-
71
-
72
-
73
-
74
-
75
-
76
-
77
-
78
-
79
-
80
-
81
-
82
-
83
-
84
-
85
-
86
-
87
-
88
-
89
-
90
 |
 |