Xerox 3100MFPX User Guide - Phaser 3100 MFP/X - Page 31
Zoom setup, Collated copy setup, Scanned original setup, Contrast setup, Brightness setup
 |
UPC - 095205741964
View all Xerox 3100MFPX manuals
Add to My Manuals
Save this manual to your list of manuals |
Page 31 highlights
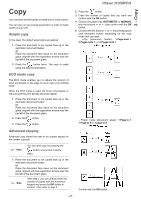
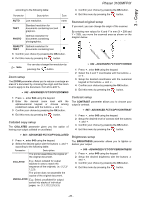
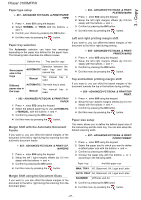
3 - Copy Phaser 3100MFP/X according to the following table: Parameter Description Icon AUTO Low resolution. none TEXT Standard resolution for documents containing text and graphics. PHOTO Optimal resolution for documents containing photographies. QUALITY Optimal resolution for TEXT documents containing text. 3 Confirm your choice by pressing the OK button. 4 Exit this menu by pressing the button. 3 Confirm your choice by pressing the OK button. 4 Exit this menu by pressing the button. Scanned original setup If you want, you can change the origin of the scanner. By entering new values for X and Y in mm (X < 209 and Y < 280), you move the scanned area as shown on the diagram below. Note You can also change the resolution by pressing the button. Zoom setup The ZOOM parameter allows you to reduce or enlarge an area of a document by choosing the origin and the zoom level to apply to the document, from 25 to 400 %. 842 - ADVANCED FCT/COPY/ZOOMING 1 Press , enter 842 using the keypad. 2 Enter the desired zoom level with the alphanumerical keypad or choose among predefined values with the buttons and . 3 Confirm your choice by pressing the OK button. 4 Exit this menu by pressing the button. Collated copy setup The COLLATED parameter gives you the option of having your output collated or uncollated. 844 - ADVANCED FCT/COPY/ORIGIN 1 Press , enter 844 using the keypad. 2 Select the X and Y coordinates with the buttons or . 3 Setup the desired coordinates with the numerical keypad or the buttons and . 4 Confirm your choice by pressing the OK button. 5 Exit this menu by pressing the button. Contrast setup The CONTRAST parameter allows you to choose your output's contrast. 845 - ADVANCED FCT/COPY/CONTRAST 1 Press , enter 845 using the keypad. 2 Setup the desired level of contrast with the buttons and . 3 Confirm your choice by pressing the OK button. 4 Exit this menu by pressing the button. 843 - ADVANCED FCT/COPY/COLLATED 1 Press , enter 843 using the keypad. 2 Select the desired option with the buttons and according to the following table: Parameter Description The printer assembles the copies of the original document. COLLATED E.g.: Select collated for output stacked in sets to match the sequence of the originals, i.e. (1,2,3/ 1,2,3). The printer does not assemble the copies of the original document. UNCOLLATED E.g.: Select uncollated for output sorted into stacks of individual pages, i.e. (1,1,1/2,2,2/3,3,3). Brightness setup The BRIGHTNESS parameter allows you to lighten or darken your output. 846 - ADVANCED FCT/COPY/BRIGHTNESS 1 Press , enter 846 using the keypad. 2 Setup the desired brightness with the buttons and . 3 Confirm your choice by pressing the OK button. 4 Exit this menu by pressing the button. - 26 -
-
 1
1 -
2
-
3
-
4
-
5
-
6
-
7
-
8
-
9
-
10
-
11
-
12
-
13
-
14
-
15
-
16
-
17
-
18
-
19
-
20
-
21
-
22
-
23
-
24
-
25
-
 26
26 -
 27
27 -
 28
28 -
 29
29 -
 30
30 -
 31
31 -
 32
32 -
 33
33 -
 34
34 -
 35
35 -
 36
36 -
37
-
38
-
39
-
40
-
41
-
42
-
43
-
44
-
45
-
46
-
47
-
48
-
49
-
50
-
51
-
52
-
53
-
54
-
55
-
56
-
57
-
58
-
59
-
60
-
61
-
62
-
63
-
64
-
65
-
66
-
67
-
68
-
69
-
70
-
71
-
72
-
73
-
74
-
75
-
76
-
77
-
78
-
79
-
80
-
81
-
82
-
83
-
84
-
85
-
86
-
87
-
88
-
89
-
90
 |
 |
