Yamaha MOTIF7 Owner's Manual - Page 164
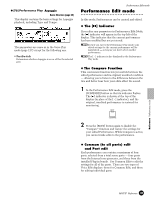
F5] Performance Play, From this display you can select a voice for each part
 |
View all Yamaha MOTIF7 manuals
Add to My Manuals
Save this manual to your list of manuals |
Page 164 highlights
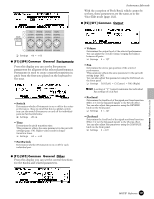
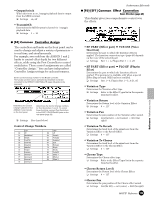
Performance Play mode • OutputSel (Output Select) Determines the output jack assignment for the A/D part. ❏ Settings See below. LCD L&R Output jack OUTPUT L&R as1&2 AIEB2 ASSIGNABLE OUTPUT 1&2 as3&4 AIEB2 ASSIGNABLE OUTPUT 3&4 as5&6 AIEB2 ASSIGNABLE OUTPUT 5&6 as1 AIEB2 ASSIGNABLE OUTPUT 1 as2 AIEB2 ASSIGNABLE OUTPUT 2 as3 AIEB2 ASSIGNABLE OUTPUT 3 as4 AIEB2 ASSIGNABLE OUTPUT 4 as5 AIEB2 ASSIGNABLE OUTPUT 5 as6 AIEB2 ASSIGNABLE OUTPUT 6 Stereo/ Mono Stereo Stereo 1 : L * 2 : R Stereo 3 : L * 4 : R Stereo 5 : L * 6 : R Mono * Mono * Mono * Mono * Mono * Mono * * Available only when the optional AIEB2 board has been installed. ● [F3] Performance Play Voices From this display you can select a voice for each part and determine the note range it can be played from. 1 Move the cursor to the desired part, then move it to the voice bank or number you wish to set for the part. 2 If the part is blank (i.e., no voice has been assigned), use these to enable a voice (Internal or Plug-in) for the part. Once a voice is assigned, select the specific bank and voice with the [INC/YES] and [DEC/NO] buttons, or the data dial. You can also use the BANK, GROUP and NUMBER buttons to select a voice (page 124). 4 Use this to delete the 3 Use these to set the note assigned voice, if desired. range, low and high, for the part's voice. • [SF1] ADD INT (Add Internal Voice) If no voice has been assigned and the selected part is blank, press this to enable an Internal voice for the part. • [SF2] ADD PLG (Add Plug-in Voice) If no voice has been assigned and the selected part is blank, press this to enable a Plug-in voice for the part. • [SF3] DELETE Pressing this button deletes the voice assignment for the selected part, leaving the part blank. • [SF4] LIMIT L (Note Limit Low) This sets the lowest note of the range over which the voice of the selected part sounds. Simultaneously hold down this button and press the desired key on the keyboard to set the note. • [SF5] LIMIT H (Note Limit High) This sets the highest note of the range over which the voice of the selected part sounds. Simultaneously hold down this button and press the desired key on the keyboard to set the note. ● [F4] Performance Play Portamento From this display you can set the Portamento parameters for each part. Portamento is used to create a smooth transition in pitch from the first note played on the keyboard to the next. • PortaSw (Portamento Switch) Determines whether Portamento is on or off for all parts. (This is a global switch and overrides the individual part settings in Part Switch below.) ❏ Settings off , on • Time Determines the pitch transition time. This parameter offsets the same parameter in the part edit (page 171). Higher values result in longer transition times. ❏ Settings -64 ~ +63 • PartSwitch Determines whether Portamento is on or off for each individual part. ● [F5] Performance Play EG(Envelope Generator) Basic Structure (page 47) This display contains the basic EG settings, both volume and filter, for the performance, as well as the filter's cutoff frequency and resonance settings. The settings made here are applied as offsets to the AEG and FEG settings in the Performance Edit mode (page 173, page 174). Same as in Voice Play mode. See page 127 . Reference Performance mode 164 MOTIF Reference
-
 1
1 -
2
-
3
-
4
-
5
-
6
-
7
-
8
-
9
-
10
-
11
-
12
-
13
-
14
-
15
-
16
-
17
-
18
-
19
-
20
-
21
-
22
-
23
-
24
-
25
-
26
-
27
-
28
-
29
-
30
-
31
-
32
-
33
-
34
-
35
-
36
-
37
-
38
-
39
-
40
-
41
-
42
-
43
-
44
-
45
-
46
-
47
-
48
-
49
-
50
-
51
-
52
-
53
-
54
-
55
-
56
-
57
-
58
-
59
-
60
-
61
-
62
-
63
-
64
-
65
-
66
-
67
-
68
-
69
-
70
-
71
-
72
-
73
-
74
-
75
-
76
-
77
-
78
-
79
-
80
-
81
-
82
-
83
-
84
-
85
-
86
-
87
-
88
-
89
-
90
-
91
-
92
-
93
-
94
-
95
-
96
-
97
-
98
-
99
-
100
-
101
-
102
-
103
-
104
-
105
-
106
-
107
-
108
-
109
-
110
-
111
-
112
-
113
-
114
-
115
-
116
-
117
-
118
-
119
-
120
-
121
-
122
-
123
-
124
-
125
-
126
-
127
-
128
-
129
-
130
-
131
-
132
-
133
-
134
-
135
-
136
-
137
-
138
-
139
-
140
-
141
-
142
-
143
-
144
-
145
-
146
-
147
-
148
-
149
-
150
-
151
-
152
-
153
-
154
-
155
-
156
-
157
-
158
-
 159
159 -
 160
160 -
 161
161 -
 162
162 -
 163
163 -
 164
164 -
 165
165 -
 166
166 -
 167
167 -
 168
168 -
 169
169 -
170
-
171
-
172
-
173
-
174
-
175
-
176
-
177
-
178
-
179
-
180
-
181
-
182
-
183
-
184
-
185
-
186
-
187
-
188
-
189
-
190
-
191
-
192
-
193
-
194
-
195
-
196
-
197
-
198
-
199
-
200
-
201
-
202
-
203
-
204
-
205
-
206
-
207
-
208
-
209
-
210
-
211
-
212
-
213
-
214
-
215
-
216
-
217
-
218
-
219
-
220
-
221
-
222
-
223
-
224
-
225
-
226
-
227
-
228
-
229
-
230
-
231
-
232
-
233
-
234
-
235
-
236
-
237
-
238
-
239
-
240
-
241
-
242
-
243
-
244
-
245
-
246
-
247
-
248
-
249
-
250
-
251
-
252
-
253
-
254
-
255
-
256
-
257
-
258
-
259
-
260
-
261
-
262
-
263
-
264
-
265
-
266
-
267
-
268
-
269
-
270
-
271
-
272
-
273
-
274
-
275
-
276
-
277
-
278
-
279
-
280
-
281
-
282
-
283
-
284
-
285
-
286
-
287
-
288
-
289
-
290
-
291
-
292
-
293
-
294
-
295
-
296
-
297
-
298
-
299
-
300
 |
 |
