Adobe 22011292 User Manual - Page 77
Single-band Compressor effect, Normalize To, Normalize All Channels Equally, DC Bias Adjust, Threshold
 |
UPC - 883919139081
View all Adobe 22011292 manuals
Add to My Manuals
Save this manual to your list of manuals |
Page 77 highlights
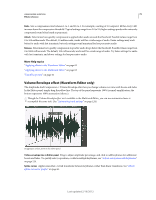
USING ADOBE AUDITION 73 Effects reference The Amplitude And Compression > Normalize effect lets you set a peak level for a file or selection. When you normalize audio to 100%, you achieve the maximum amplitude that digital audio allows-0 dBFS. If you're sending audio to a mastering engineer, however, normalize audio to between -3 and -6 dBFS, providing a cushion for further processing. The Normalize effect amplifies the entire file or selection equally. For example, if the original audio reaches a loud peak of 80% and a quiet low of 20%, normalizing to 100% amplifies the loud peak to 100% and the quiet low to 40%. To apply RMS normalization, choose Effects > Match Volume. If desired, you can apply that command to only one file. (See "Match volume across multiple files" on page 56.) Normalize To Sets the percentage of the highest peak relative to the maximum possible amplitude. Select dB to enter the Normalize value in decibels instead of a percentage. Normalize All Channels Equally Uses all channels of a stereo or surround waveform to calculate the amplification amount. If this option is deselected, the amount is calculated separately for each channel, potentially amplifying one considerably more than others. DC Bias Adjust Lets you adjust the position of the waveform in the wave display. Some recording hardware may introduce a DC bias, causing the recorded waveform to appear to be above or below the normal center line in the wave display. To center the waveform, set the percentage to zero. To skew the entire selected waveform above or below the center line, specify a positive or negative percentage. More Help topics "About process effects" on page 63 "Apply individual effects in the Waveform Editor" on page 62 Single-band Compressor effect The Amplitude And Compression > Single-band Compressor effect reduces dynamic range, producing consistent volume levels and increasing perceived loudness. Single-band compression is particularly effective for voice-overs, because it helps the speaker stand out over musical soundtracks and background audio. For examples of highly-compressed audio, listen to recordings of modern pop music. By contrast, most jazz recordings are lightly compressed, while typical classical recordings feature no compression at all. Threshold Sets the input level at which compression begins. The best setting depends on audio content and style. To compress only extreme peaks and retain more dynamic range, try thresholds around 5 dB below the peak input level. To highly compress audio and greatly reduce dynamic range, try settings around 15 dB below the peak input level. Ratio Sets a compression ratio between 1-to-1 and 30-to-1. For example, a setting of 3 outputs 1 dB for every 3-dB increase above the threshold. Typical settings range from 2 to 5; higher settings produce the extremely compressed sound often heard in pop music. Attack Determines how quickly compression starts after audio exceeds the Threshold setting. The default, 10 milliseconds, works well for a wide range of source material. Use faster settings only for audio with quick transients, such as percussion recordings. Release Determines how quickly compression stops when audio drops below the Threshold setting. The default, 100 milliseconds, works well for a wide range of audio. Try faster settings for audio with fast transients, and slower settings for less percussive audio. Output Gain Boosts or cuts amplitude after compression. Possible values range from -30 dB to +30 dB, where 0 is unity gain. Last updated 2/16/2012
-
 1
1 -
2
-
3
-
4
-
5
-
6
-
7
-
8
-
9
-
10
-
11
-
12
-
13
-
14
-
15
-
16
-
17
-
18
-
19
-
20
-
21
-
22
-
23
-
24
-
25
-
26
-
27
-
28
-
29
-
30
-
31
-
32
-
33
-
34
-
35
-
36
-
37
-
38
-
39
-
40
-
41
-
42
-
43
-
44
-
45
-
46
-
47
-
48
-
49
-
50
-
51
-
52
-
53
-
54
-
55
-
56
-
57
-
58
-
59
-
60
-
61
-
62
-
63
-
64
-
65
-
66
-
67
-
68
-
69
-
70
-
71
-
 72
72 -
 73
73 -
 74
74 -
 75
75 -
 76
76 -
 77
77 -
 78
78 -
 79
79 -
 80
80 -
 81
81 -
 82
82 -
83
-
84
-
85
-
86
-
87
-
88
-
89
-
90
-
91
-
92
-
93
-
94
-
95
-
96
-
97
-
98
-
99
-
100
-
101
-
102
-
103
-
104
-
105
-
106
-
107
-
108
-
109
-
110
-
111
-
112
-
113
-
114
-
115
-
116
-
117
-
118
-
119
-
120
-
121
-
122
-
123
-
124
-
125
-
126
-
127
-
128
-
129
-
130
-
131
-
132
-
133
-
134
-
135
-
136
-
137
-
138
-
139
-
140
-
141
-
142
-
143
-
144
-
145
-
146
-
147
 |
 |
