Adobe 65021048 User Guide - Page 120
Work in the Trim Monitor, Press Ctrl+Z Windows or Command+Z Mac OS, or use the History palette.
 |
UPC - 883919163222
View all Adobe 65021048 manuals
Add to My Manuals
Save this manual to your list of manuals |
Page 120 highlights
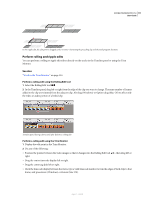
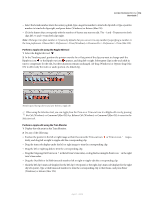
ADOBE PREMIERE PRO CS3 114 User Guide Perform a slide edit A slide edit shifts a clip in time while trimming adjacent clips to compensate for the move. As you drag a clip left or right with the Slide tool, the Out point of the preceding clip and the In point of the following clip are trimmed by the number of frames you move the clip. The clip's In and Out points (and hence, its duration) remain unchanged. In this slide edit, a clip is dragged left so that it starts earlier in the sequence, shortening the preceding clip and lengthening the following clip. 1 Select the Slide tool . 2 Position the pointer on the clip you want to adjust, and drag left to move the Out point of the preceding clip and the In point of the following clip earlier in time, or drag right to move the Out point of the preceding clip and the In point of the following clip later in time. When you release the mouse button, Adobe Premiere Pro updates the In and Out points for the adjacent clips, displaying the result in the Program Monitor and maintaining the clip and sequence duration. The only change to the clip you moved is its position in the sequence. Work in the Trim Monitor The Trim Monitor displays clip In and Out points at a cut so that you can see precisely which frames you are cutting. The left monitor shows the clip to the left of the edit point, and the right monitor shows the clip to the right of the cut. Open or close the Trim Monitor • To open the Trim Monitor, click the Trim button Trim Monitor. at the bottom of Program Monitor, or select Window > • To close the Trim Monitor, click the close box of the Trim Monitor. Display the edit point you want to trim 1 Select the target tracks by clicking near the track names in the track header area in the Timeline panel. 2 In the Trim Monitor, click the Go To Previous Edit Point or Go To Next Edit Point button. The frames on either side of the new edit point position appear in the Trim Monitor. Preview the edit in the Trim Monitor • To preview the edit once, click the Play Edit button . • To preview the edit repeatedly, click the Loop button . Cancel an edit ❖ Press Ctrl+Z (Windows) or Command+Z (Mac OS), or use the History palette. April 1, 2008
-
 1
1 -
2
-
3
-
4
-
5
-
6
-
7
-
8
-
9
-
10
-
11
-
12
-
13
-
14
-
15
-
16
-
17
-
18
-
19
-
20
-
21
-
22
-
23
-
24
-
25
-
26
-
27
-
28
-
29
-
30
-
31
-
32
-
33
-
34
-
35
-
36
-
37
-
38
-
39
-
40
-
41
-
42
-
43
-
44
-
45
-
46
-
47
-
48
-
49
-
50
-
51
-
52
-
53
-
54
-
55
-
56
-
57
-
58
-
59
-
60
-
61
-
62
-
63
-
64
-
65
-
66
-
67
-
68
-
69
-
70
-
71
-
72
-
73
-
74
-
75
-
76
-
77
-
78
-
79
-
80
-
81
-
82
-
83
-
84
-
85
-
86
-
87
-
88
-
89
-
90
-
91
-
92
-
93
-
94
-
95
-
96
-
97
-
98
-
99
-
100
-
101
-
102
-
103
-
104
-
105
-
106
-
107
-
108
-
109
-
110
-
111
-
112
-
113
-
114
-
 115
115 -
 116
116 -
 117
117 -
 118
118 -
 119
119 -
 120
120 -
 121
121 -
 122
122 -
 123
123 -
 124
124 -
 125
125 -
126
-
127
-
128
-
129
-
130
-
131
-
132
-
133
-
134
-
135
-
136
-
137
-
138
-
139
-
140
-
141
-
142
-
143
-
144
-
145
-
146
-
147
-
148
-
149
-
150
-
151
-
152
-
153
-
154
-
155
-
156
-
157
-
158
-
159
-
160
-
161
-
162
-
163
-
164
-
165
-
166
-
167
-
168
-
169
-
170
-
171
-
172
-
173
-
174
-
175
-
176
-
177
-
178
-
179
-
180
-
181
-
182
-
183
-
184
-
185
-
186
-
187
-
188
-
189
-
190
-
191
-
192
-
193
-
194
-
195
-
196
-
197
-
198
-
199
-
200
-
201
-
202
-
203
-
204
-
205
-
206
-
207
-
208
-
209
-
210
-
211
-
212
-
213
-
214
-
215
-
216
-
217
-
218
-
219
-
220
-
221
-
222
-
223
-
224
-
225
-
226
-
227
-
228
-
229
-
230
-
231
-
232
-
233
-
234
-
235
-
236
-
237
-
238
-
239
-
240
-
241
-
242
-
243
-
244
-
245
-
246
-
247
-
248
-
249
-
250
-
251
-
252
-
253
-
254
-
255
-
256
-
257
-
258
-
259
-
260
-
261
-
262
-
263
-
264
-
265
-
266
-
267
-
268
-
269
-
270
-
271
-
272
-
273
-
274
-
275
-
276
-
277
-
278
-
279
-
280
-
281
-
282
-
283
-
284
-
285
-
286
-
287
-
288
-
289
-
290
-
291
-
292
-
293
-
294
-
295
-
296
-
297
-
298
-
299
-
300
-
301
-
302
-
303
-
304
-
305
-
306
-
307
-
308
-
309
-
310
-
311
-
312
-
313
-
314
-
315
-
316
-
317
-
318
-
319
-
320
-
321
-
322
-
323
-
324
-
325
-
326
-
327
-
328
-
329
-
330
-
331
-
332
-
333
-
334
-
335
-
336
-
337
-
338
-
339
-
340
-
341
-
342
-
343
-
344
-
345
-
346
-
347
-
348
-
349
-
350
-
351
-
352
-
353
-
354
-
355
-
356
-
357
-
358
-
359
-
360
-
361
-
362
-
363
-
364
-
365
-
366
-
367
-
368
-
369
-
370
-
371
-
372
-
373
-
374
-
375
-
376
-
377
-
378
-
379
-
380
-
381
-
382
-
383
-
384
-
385
-
386
-
387
-
388
-
389
-
390
-
391
-
392
-
393
-
394
-
395
-
396
-
397
-
398
-
399
-
400
-
401
-
402
-
403
-
404
-
405
-
406
-
407
-
408
-
409
-
410
-
411
-
412
-
413
-
414
-
415
-
416
-
417
-
418
-
419
-
420
-
421
-
422
-
423
-
424
-
425
-
426
-
427
-
428
-
429
-
430
-
431
-
432
-
433
-
434
-
435
-
436
-
437
-
438
-
439
-
440
-
441
-
442
-
443
-
444
-
445
-
446
-
447
-
448
-
449
-
450
-
451
-
452
-
453
-
454
-
455
 |
 |
