Brother International DreamMaker„ XE VE2200 Users Manual - English - Page 156
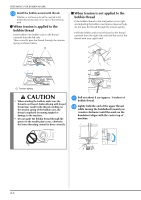
When tension is applied to the, bobbin thread, When tension is not applied to
 |
View all Brother International DreamMaker„ XE VE2200 manuals
Add to My Manuals
Save this manual to your list of manuals |
Page 156 highlights
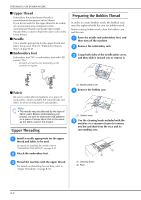
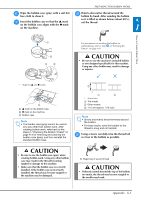
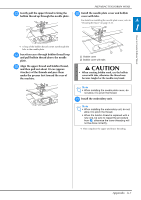
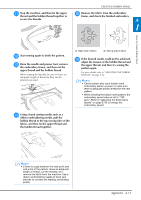
PREPARING FOR BOBBIN WORK j Install the bobbin wound with thread. Whether or not tension should be applied to the bobbin thread depends on the type of thread being used. ■ When tension is applied to the bobbin thread Insert bobbin into bobbin case so the thread unwinds from the left side. Then correctly pass the thread through the tension spring as shown below. ■ When tension is not applied to the bobbin thread If the bobbin thread in the trial pattern is too tight and adjusting the bobbin case tension does not help, do not pass the thread through the tension spring. Hold the bobbin with your left hand so the thread unwinds from the right side and hold the end of the thread with your right hand. a Tension spring CAUTION • When winding the bobbin, make sure the thread is not frayed. Embroidering with frayed thread may result in the thread catching on the tension spring of the bobbin case, the thread completely becoming tangled or damage to the machine. • Do not guide the bobbin thread through the groove in the needle plate cover, otherwise the lower threading cannot be done correctly. k Pull out about 8 bobbin thread. cm (approx. 3 inches) of l Lightly hold the end of the upper thread while turning the handwheel toward you (counterclockwise) until the mark on the handwheel aligns with the center top of machine. A-6
-
 1
1 -
2
-
3
-
4
-
5
-
6
-
7
-
8
-
9
-
10
-
11
-
12
-
13
-
14
-
15
-
16
-
17
-
18
-
19
-
20
-
21
-
22
-
23
-
24
-
25
-
26
-
27
-
28
-
29
-
30
-
31
-
32
-
33
-
34
-
35
-
36
-
37
-
38
-
39
-
40
-
41
-
42
-
43
-
44
-
45
-
46
-
47
-
48
-
49
-
50
-
51
-
52
-
53
-
54
-
55
-
56
-
57
-
58
-
59
-
60
-
61
-
62
-
63
-
64
-
65
-
66
-
67
-
68
-
69
-
70
-
71
-
72
-
73
-
74
-
75
-
76
-
77
-
78
-
79
-
80
-
81
-
82
-
83
-
84
-
85
-
86
-
87
-
88
-
89
-
90
-
91
-
92
-
93
-
94
-
95
-
96
-
97
-
98
-
99
-
100
-
101
-
102
-
103
-
104
-
105
-
106
-
107
-
108
-
109
-
110
-
111
-
112
-
113
-
114
-
115
-
116
-
117
-
118
-
119
-
120
-
121
-
122
-
123
-
124
-
125
-
126
-
127
-
128
-
129
-
130
-
131
-
132
-
133
-
134
-
135
-
136
-
137
-
138
-
139
-
140
-
141
-
142
-
143
-
144
-
145
-
146
-
147
-
148
-
149
-
150
-
 151
151 -
 152
152 -
 153
153 -
 154
154 -
 155
155 -
 156
156 -
 157
157 -
 158
158 -
 159
159 -
 160
160 -
 161
161 -
162
-
163
-
164
-
165
-
166
-
167
-
168
-
169
-
170
-
171
-
172
-
173
-
174
-
175
-
176
-
177
-
178
-
179
-
180
 |
 |
