Brother International DreamMaker„ XE VE2200 Users Manual - English - Page 66
Embroidery
 |
View all Brother International DreamMaker„ XE VE2200 manuals
Add to My Manuals
Save this manual to your list of manuals |
Page 66 highlights
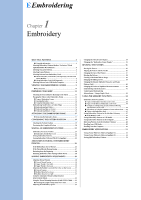
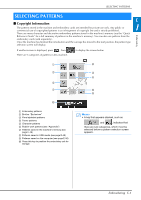
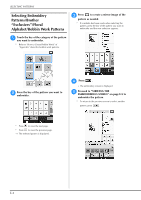
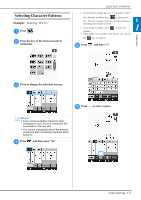
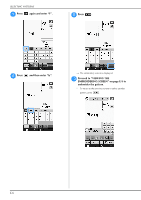
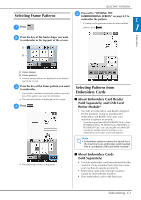
E Embroidering 1 Chapter Embroidery SELECTING PATTERNS 3 ■ Copyright Information 3 Selecting Embroidery Patterns/Brother "Exclusives"/Floral Alphabet/Bobbin Work Patterns 4 Selecting Character Patterns 5 Selecting Frame Patterns 7 Selecting Patterns from Embroidery Cards 7 ■ About Embroidery Card Reader (Sold Separately) and USB Card Writer Module 7 ■ About Embroidery Cards (Sold Separately 7 Selecting Patterns from USB Media/Computer 8 VIEWING THE EMBROIDERING SCREEN 9 ■ Key Functions 10 PREPARING THE FABRIC 11 Attaching Iron-on Stabilizers (Backing) to the Fabric 11 Hooping the Fabric in the Embroidery Frame 13 ■ Types of Embroidery Frames 13 ■ Inserting the Fabric 14 ■ Using the Embroidery Sheet 15 Embroidering Small Fabrics or Fabric Edges 16 ■ Embroidering Small Fabrics 16 ■ Embroidering Edges or Corners 16 ■ Embroidering Ribbons or Tape 16 ATTACHING THE EMBROIDERY FRAME 17 ■ Removing the Embroidery Frame 17 CONFIRMING THE PATTERN POSITION 19 Checking the Pattern Position 19 Previewing the Completed Pattern 20 SEWING AN EMBROIDERY PATTERN 21 Embroidery Attractive Finishes 21 ■ Embroidery Needle Plate Cover 22 Sewing Embroidery Patterns 22 Sewing Embroidery Patterns Which Use Appliqu 23 ADJUSTMENTS DURING THE EMBROIDERY PROCESS 26 If the Bobbin Runs Out of Thread 26 If the Thread Breaks During Sewing 27 Restarting from the Beginning 28 Resuming Embroidery After Turning Off the Power 28 MAKING EMBROIDERY ADJUSTMENTS 30 Adjusting Thread Tension 30 ■ Correct Thread Tension 30 ■ Upper Thread is Too Tight 30 ■ Upper Thread is Too Loose 30 Adjusting the Bobbin Case (with No Color on the Screw) ........31 ■ Correct Tension 31 ■ Bobbin Thread is Too Loose 31 ■ Bobbin Thread is Too Tight 32 Using the Automatic Thread Cutting Function (END COLOR TRIM 32 Using the Thread Trimming Function (JUMP STITCH TRIM) ......32 ■ Selecting the Length of Jump Stitch Not to Trim 33 Adjusting the Embroidery Speed 33 Changing the Thread Color Display 34 Changing the "Embroidery Frame Display 35 REVISING THE PATTERN 36 Moving the Pattern 36 Aligning the Pattern and the Needle 36 Changing the Size of the Pattern 37 Rotating the Pattern 38 Creating a Horizontal Mirror Image 39 Enlarging the Editing Screen 39 Changing the Density (Alphabet Character and Frame Patterns Only 40 Changing the Colors of Alphabet Character Patterns 40 Embroidering Linked Characters 41 Uninterrupted Embroidering (Monochrome - Using a Single Color 43 USING THE MEMORY FUNCTION 44 Embroidery Data Precautions 44 ■ Types of Embroidery Data that can be Used 44 ■ Types of USB Devices/Media that can be Used 44 ■ Computers and Operating Systems with the Following Specifications can be Used 44 ■ Precautions on Using the Computer to Create and Save Data.......44 ■ Tajima (.dst) Embroidery Data 45 Saving Embroidery Patterns in the Machine's Memory 45 ■ If the Memory is Full 45 Saving Embroidery Patterns to USB Media 46 Saving Embroidery Patterns in the Computer 47 Retrieving Patterns from the Machine's Memory 48 Recalling from USB Media 49 Recalling from the Computer 50 EMBROIDERY APPLICATIONS 51 Using a Frame Pattern to Make an Appliqué (1 51 Using a Frame Pattern to Make an Appliqué (2 52 Sewing Split Embroidery Patterns 53
-
 1
1 -
2
-
3
-
4
-
5
-
6
-
7
-
8
-
9
-
10
-
11
-
12
-
13
-
14
-
15
-
16
-
17
-
18
-
19
-
20
-
21
-
22
-
23
-
24
-
25
-
26
-
27
-
28
-
29
-
30
-
31
-
32
-
33
-
34
-
35
-
36
-
37
-
38
-
39
-
40
-
41
-
42
-
43
-
44
-
45
-
46
-
47
-
48
-
49
-
50
-
51
-
52
-
53
-
54
-
55
-
56
-
57
-
58
-
59
-
60
-
 61
61 -
 62
62 -
 63
63 -
 64
64 -
 65
65 -
 66
66 -
 67
67 -
 68
68 -
 69
69 -
 70
70 -
 71
71 -
72
-
73
-
74
-
75
-
76
-
77
-
78
-
79
-
80
-
81
-
82
-
83
-
84
-
85
-
86
-
87
-
88
-
89
-
90
-
91
-
92
-
93
-
94
-
95
-
96
-
97
-
98
-
99
-
100
-
101
-
102
-
103
-
104
-
105
-
106
-
107
-
108
-
109
-
110
-
111
-
112
-
113
-
114
-
115
-
116
-
117
-
118
-
119
-
120
-
121
-
122
-
123
-
124
-
125
-
126
-
127
-
128
-
129
-
130
-
131
-
132
-
133
-
134
-
135
-
136
-
137
-
138
-
139
-
140
-
141
-
142
-
143
-
144
-
145
-
146
-
147
-
148
-
149
-
150
-
151
-
152
-
153
-
154
-
155
-
156
-
157
-
158
-
159
-
160
-
161
-
162
-
163
-
164
-
165
-
166
-
167
-
168
-
169
-
170
-
171
-
172
-
173
-
174
-
175
-
176
-
177
-
178
-
179
-
180
 |
 |