Brother International DreamMaker„ XE VE2200 Users Manual - English - Page 95
Adjusting the Bobbin Case with, No Color on the Screw
 |
View all Brother International DreamMaker„ XE VE2200 manuals
Add to My Manuals
Save this manual to your list of manuals |
Page 95 highlights
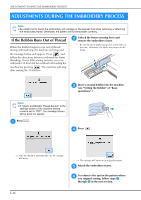
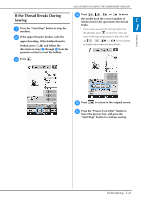
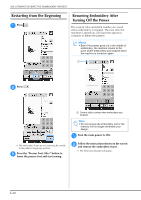
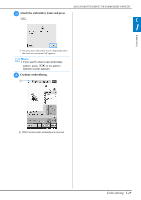
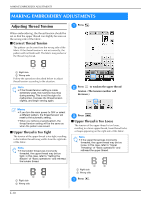
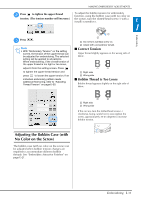
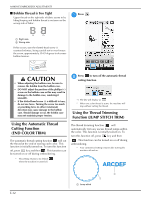
MAKING EMBROIDERY ADJUSTMENTS b Press to tighten the upper thread To adjust the bobbin tension for embroidery function, using the bobbin case (with no color on tension. (The tension number will increase.) the screw), turn the slotted-head screw (-) with a (small) screwdriver. E 1 Embroidery c Press . Note • With "Embroidery Tension" on the setting screen, the tension of the upper thread can be adjusted for embroidering. The selected setting will be applied to all patterns. When embroidering, if the overall tension of the upper thread is too tight or too loose, adjust it from the setting screen. Press to tighten the upper thread tension and press to loosen the upper tension. If an individual embroidery pattern needs additional fine tuning, refer to "Adjusting Thread Tension" on page E-30. a Do not turn a phillips screw (+). b Adjust with a screwdriver (small). ■ Correct Tension Upper thread slightly appears on the wrong side of fabric. a Right side b Wrong side ■ Bobbin Thread is Too Loose Bobbin thread appears slightly on the right side of fabric. a Right side b Wrong side If this occurs, turn the slotted-head screw (-) clockwise, being careful not to over-tighten the screw, approximately 30-45 degrees to increase bobbin tension. Adjusting the Bobbin Case (with No Color on the Screw) The bobbin case (with no color on the screw) can be adjusted when bobbin tension changes are required to accommodate different bobbin threads. See "Embroidery Attractive Finishes" on page E-21. Embroidering E-31
-
 1
1 -
2
-
3
-
4
-
5
-
6
-
7
-
8
-
9
-
10
-
11
-
12
-
13
-
14
-
15
-
16
-
17
-
18
-
19
-
20
-
21
-
22
-
23
-
24
-
25
-
26
-
27
-
28
-
29
-
30
-
31
-
32
-
33
-
34
-
35
-
36
-
37
-
38
-
39
-
40
-
41
-
42
-
43
-
44
-
45
-
46
-
47
-
48
-
49
-
50
-
51
-
52
-
53
-
54
-
55
-
56
-
57
-
58
-
59
-
60
-
61
-
62
-
63
-
64
-
65
-
66
-
67
-
68
-
69
-
70
-
71
-
72
-
73
-
74
-
75
-
76
-
77
-
78
-
79
-
80
-
81
-
82
-
83
-
84
-
85
-
86
-
87
-
88
-
89
-
 90
90 -
 91
91 -
 92
92 -
 93
93 -
 94
94 -
 95
95 -
 96
96 -
 97
97 -
 98
98 -
 99
99 -
 100
100 -
101
-
102
-
103
-
104
-
105
-
106
-
107
-
108
-
109
-
110
-
111
-
112
-
113
-
114
-
115
-
116
-
117
-
118
-
119
-
120
-
121
-
122
-
123
-
124
-
125
-
126
-
127
-
128
-
129
-
130
-
131
-
132
-
133
-
134
-
135
-
136
-
137
-
138
-
139
-
140
-
141
-
142
-
143
-
144
-
145
-
146
-
147
-
148
-
149
-
150
-
151
-
152
-
153
-
154
-
155
-
156
-
157
-
158
-
159
-
160
-
161
-
162
-
163
-
164
-
165
-
166
-
167
-
168
-
169
-
170
-
171
-
172
-
173
-
174
-
175
-
176
-
177
-
178
-
179
-
180
 |
 |