Brother International DreamMaker„ XE VE2200 Users Manual - English - Page 168
Adjusting The Screen
 |
View all Brother International DreamMaker„ XE VE2200 manuals
Add to My Manuals
Save this manual to your list of manuals |
Page 168 highlights
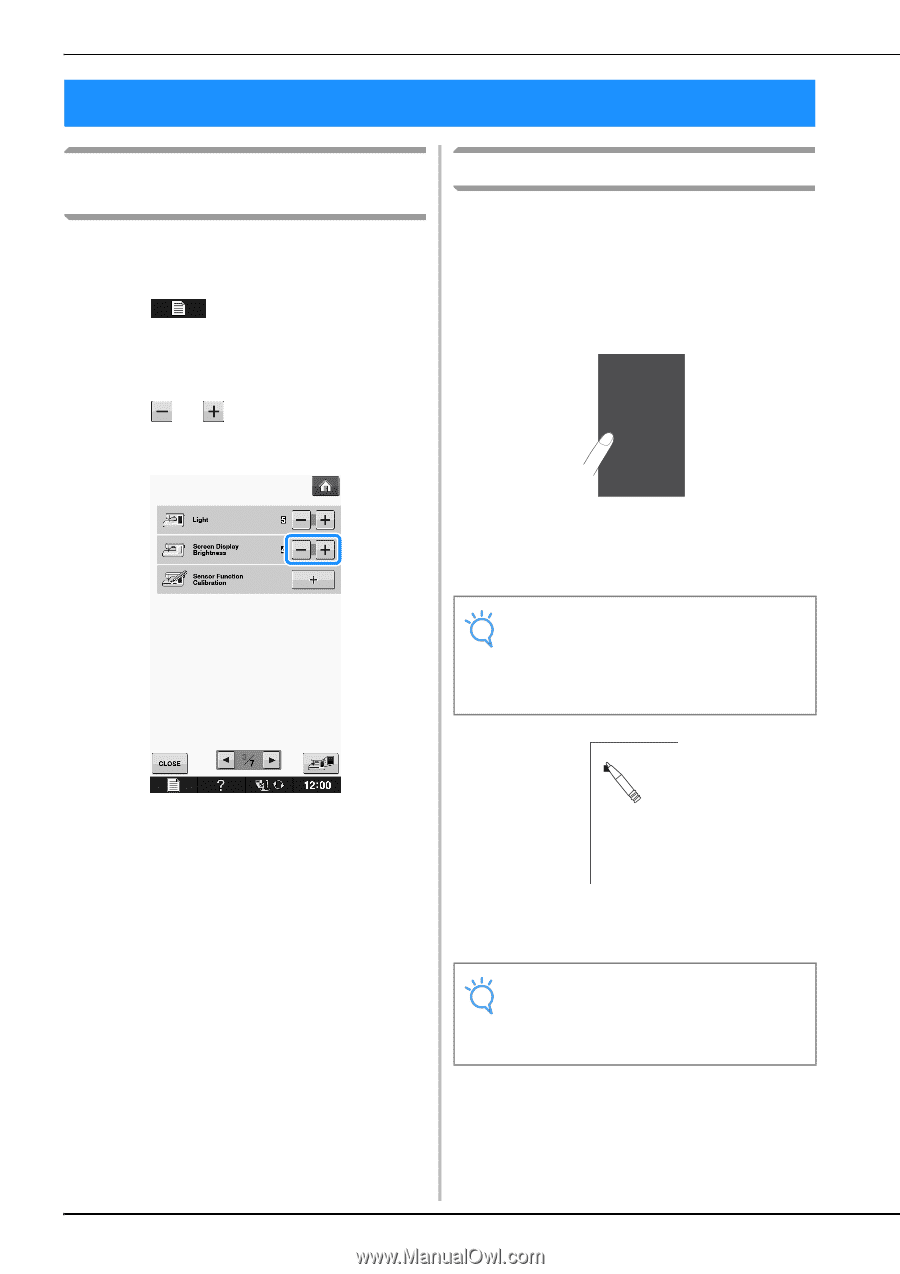
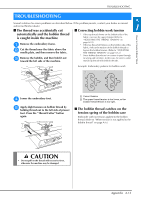
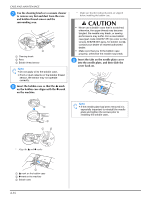
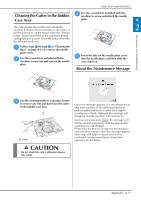
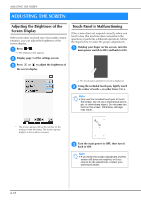
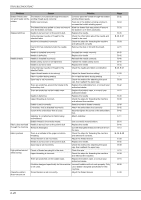
ADJUSTING THE SCREEN ADJUSTING THE SCREEN Adjusting the Brightness of the Screen Display If the screen does not look very clear under certain situation, you can adjust the brightness of the screen display. a Press . → The settings screen appears. b Display page 3 of the settings screen. c Press or to adjust the brightness of the screen display. Touch Panel is Malfunctioning If the screen does not respond correctly when you touch a key (the machine does not perform the operation or performs a different operation), follow the steps below to make the proper adjustments. a Holding your finger on the screen, turn the main power switch to OFF and back to ON. * The screen appears dim as the number on the settings screen decreases. The screen appears brighter as the number increases. → The touch panel adjustment screen is displayed. b Using the included touch pen, lightly the center of each +, in order from 1 touch to 5. Note • Only use the included touch pen to touch the screen. Do not use a mechanical pencil, pin, or other sharp object. Do not press too hard on the screen. Otherwise, damage may result. +1 +4 +5 +2 +3 c Turn back the main to ON. power to OFF, then turn it Note • If you finish the screen adjustment and the screen still does not respond, or if you cannot do the adjustment, contact your authorized dealer. A-18
-
 1
1 -
2
-
3
-
4
-
5
-
6
-
7
-
8
-
9
-
10
-
11
-
12
-
13
-
14
-
15
-
16
-
17
-
18
-
19
-
20
-
21
-
22
-
23
-
24
-
25
-
26
-
27
-
28
-
29
-
30
-
31
-
32
-
33
-
34
-
35
-
36
-
37
-
38
-
39
-
40
-
41
-
42
-
43
-
44
-
45
-
46
-
47
-
48
-
49
-
50
-
51
-
52
-
53
-
54
-
55
-
56
-
57
-
58
-
59
-
60
-
61
-
62
-
63
-
64
-
65
-
66
-
67
-
68
-
69
-
70
-
71
-
72
-
73
-
74
-
75
-
76
-
77
-
78
-
79
-
80
-
81
-
82
-
83
-
84
-
85
-
86
-
87
-
88
-
89
-
90
-
91
-
92
-
93
-
94
-
95
-
96
-
97
-
98
-
99
-
100
-
101
-
102
-
103
-
104
-
105
-
106
-
107
-
108
-
109
-
110
-
111
-
112
-
113
-
114
-
115
-
116
-
117
-
118
-
119
-
120
-
121
-
122
-
123
-
124
-
125
-
126
-
127
-
128
-
129
-
130
-
131
-
132
-
133
-
134
-
135
-
136
-
137
-
138
-
139
-
140
-
141
-
142
-
143
-
144
-
145
-
146
-
147
-
148
-
149
-
150
-
151
-
152
-
153
-
154
-
155
-
156
-
157
-
158
-
159
-
160
-
161
-
162
-
 163
163 -
 164
164 -
 165
165 -
 166
166 -
 167
167 -
 168
168 -
 169
169 -
 170
170 -
 171
171 -
 172
172 -
 173
173 -
174
-
175
-
176
-
177
-
178
-
179
-
180
 |
 |