Brother International DreamMaker„ XE VE2200 Users Manual - English - Page 75
Attaching Iron-on Stabilizers, Backing to the Fabric
 |
View all Brother International DreamMaker„ XE VE2200 manuals
Add to My Manuals
Save this manual to your list of manuals |
Page 75 highlights
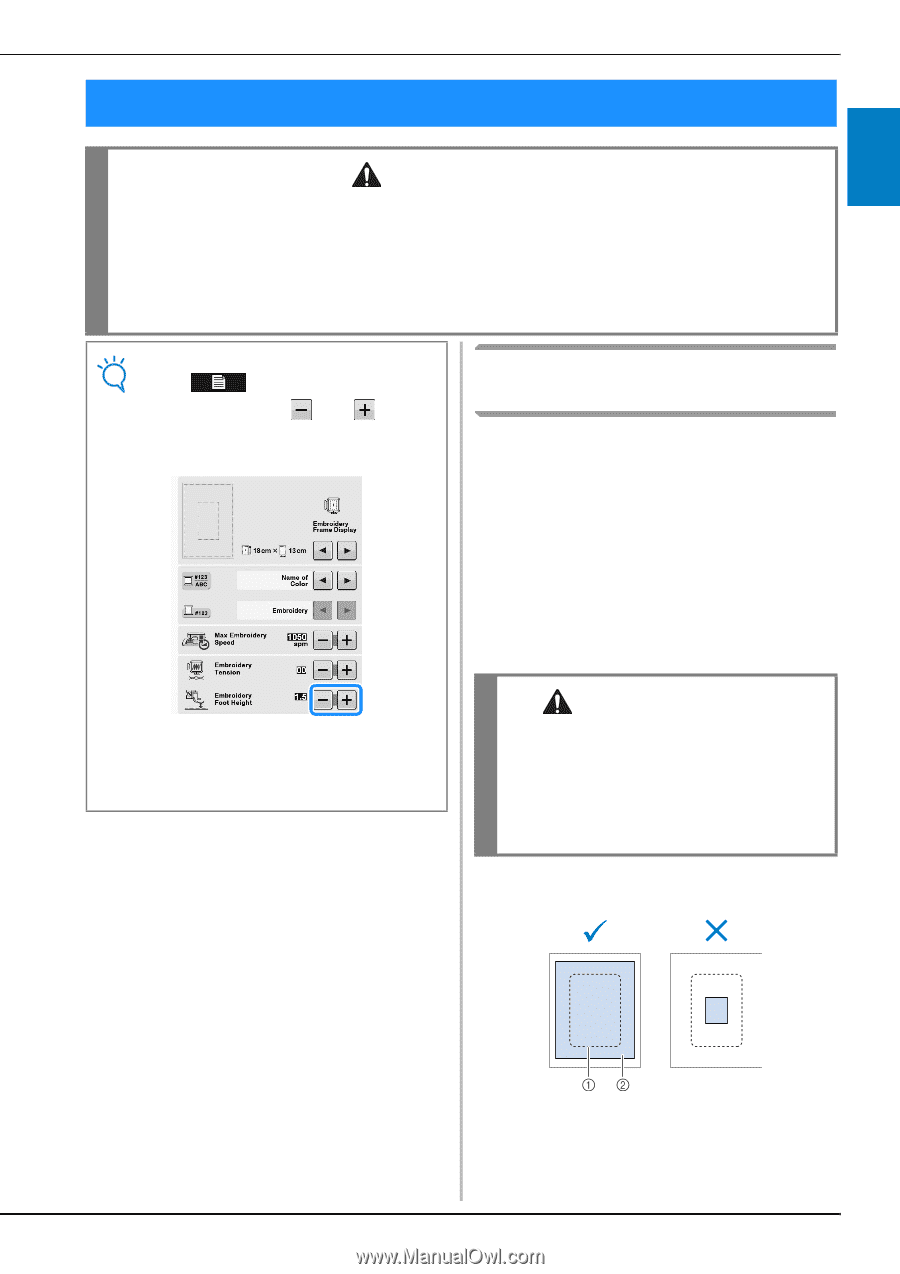
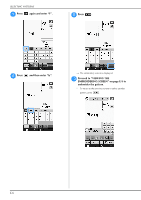
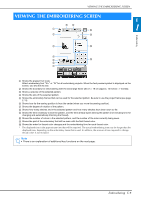
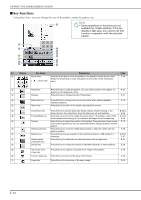
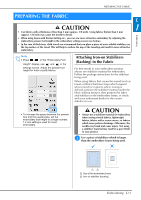
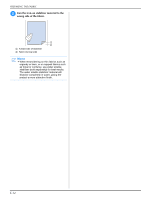
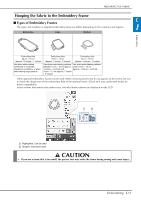
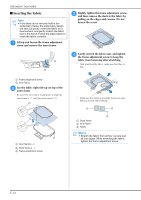
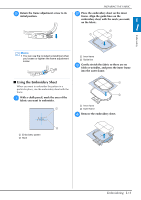
PREPARING THE FABRIC PREPARING THE FABRIC E CAUTION 1 • Use fabrics with a thickness of less than 3 mm (approx. 1/8 inch). Using fabrics thicker than 3 mm (approx. 1/8 inch) may cause the needle to break. Embroidery • When using layers with thicker batting etc., you can sew more attractive embroidery by adjusting the embroidery presser foot height in the embroidery settings screen (see below). • In the case of thick terry cloth towels we recommend that you place a piece of water soluble stabilizer on the top surface of the towel. This will help to reduce the nap of the toweling and result in more attractive embroidery. Note • Press . In the "Embroidery Foot Height" display, use and in the settings screen. Adjust the presser foot height for thick or puffy fabrics. Attaching Iron-on Stabilizers (Backing) to the Fabric For best results in your embroidery projects, always use stabilizer material for embroidery. Follow the package instructions for the stabilizer being used. When using fabrics that cannot be ironed (such as towel or fabrics that have loops which expand when ironed) or in places where ironing is difficult, position the stabilizer material under the fabric without fusing it, then position the fabric and stabilizer in the embroidery frame, or check with your authorized dealer for the correct stabilizer to use. • To increase the space between the presser foot and the needle plate, set the embroidery foot height to a larger number, 1.5 mm setting is used for most embroidery. CAUTION • Always use a stabilizer material for embroidery when sewing stretch fabrics, lightweight fabrics, fabrics with a coarse weave, or fabrics which cause pattern shrinkage. Otherwise, the needle may break and cause injury. Not using a stabilizer material may result in a poor finish to your project. a Use a piece of stabilizer which is than the embroidery frame being larger used. a Size of the embroidery frame b Iron-on stabilizer (backing) Embroidering E-11
-
 1
1 -
2
-
3
-
4
-
5
-
6
-
7
-
8
-
9
-
10
-
11
-
12
-
13
-
14
-
15
-
16
-
17
-
18
-
19
-
20
-
21
-
22
-
23
-
24
-
25
-
26
-
27
-
28
-
29
-
30
-
31
-
32
-
33
-
34
-
35
-
36
-
37
-
38
-
39
-
40
-
41
-
42
-
43
-
44
-
45
-
46
-
47
-
48
-
49
-
50
-
51
-
52
-
53
-
54
-
55
-
56
-
57
-
58
-
59
-
60
-
61
-
62
-
63
-
64
-
65
-
66
-
67
-
68
-
69
-
 70
70 -
 71
71 -
 72
72 -
 73
73 -
 74
74 -
 75
75 -
 76
76 -
 77
77 -
 78
78 -
 79
79 -
 80
80 -
81
-
82
-
83
-
84
-
85
-
86
-
87
-
88
-
89
-
90
-
91
-
92
-
93
-
94
-
95
-
96
-
97
-
98
-
99
-
100
-
101
-
102
-
103
-
104
-
105
-
106
-
107
-
108
-
109
-
110
-
111
-
112
-
113
-
114
-
115
-
116
-
117
-
118
-
119
-
120
-
121
-
122
-
123
-
124
-
125
-
126
-
127
-
128
-
129
-
130
-
131
-
132
-
133
-
134
-
135
-
136
-
137
-
138
-
139
-
140
-
141
-
142
-
143
-
144
-
145
-
146
-
147
-
148
-
149
-
150
-
151
-
152
-
153
-
154
-
155
-
156
-
157
-
158
-
159
-
160
-
161
-
162
-
163
-
164
-
165
-
166
-
167
-
168
-
169
-
170
-
171
-
172
-
173
-
174
-
175
-
176
-
177
-
178
-
179
-
180
 |
 |