Brother International DreamMaker„ XE VE2200 Users Manual - English - Page 90
Adjustments During The Embroidery Process
 |
View all Brother International DreamMaker„ XE VE2200 manuals
Add to My Manuals
Save this manual to your list of manuals |
Page 90 highlights
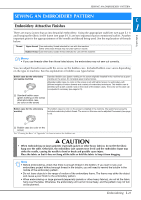
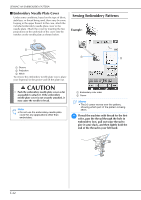
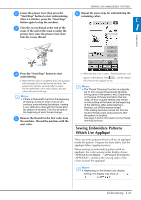
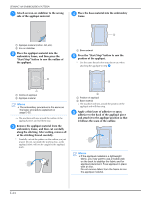
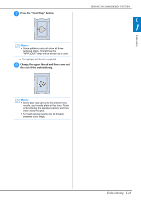
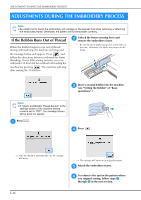
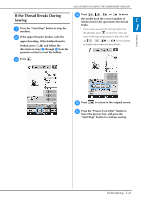
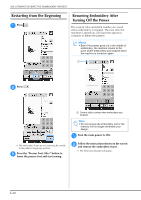
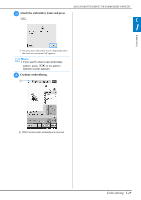
ADJ USTMENTS DURING THE EMBROIDERY PROCESS ADJUSTMENTS DURING THE EMBROIDERY PROCESS Note • Be careful not to bump the embroidery unit carriage or the presser foot when removing or attaching the embroidery frame. Otherwise, the pattern will not embroider correctly. If the Bobbin Runs Out of Thread When the bobbin begins to run out of thread during embroidering, the machine will stop and the message below will appear. Press and follow the directions below to rethread the lower threading. If very little sewing remains, you can embroider 10 final stitches without rethreading the machine by pressing . The machine will stop after sewing the 10 stitches. b Unlock the frame-securing lever remove the embroidery frame. and * Be careful not to apply strong force to the fabric at this time. Otherwise, the fabric may loosen in the frame. c Insert a wound bobbin into the machine. (see "Setting the Bobbin" of "Basic operations".) Note • If "Upper and Bobbin Thread Sensor" in the settings screen of the machine setting mode is set to "OFF", the message shown above does not appear. a Press . d Press . → After the thread is automatically cut, the carriage will move. → The carriage will return to its original position. e Attach the embroidery frame. f To return to the spot in the pattern where you stopped sewing, follow steps c through f in the next section. E-26
-
 1
1 -
2
-
3
-
4
-
5
-
6
-
7
-
8
-
9
-
10
-
11
-
12
-
13
-
14
-
15
-
16
-
17
-
18
-
19
-
20
-
21
-
22
-
23
-
24
-
25
-
26
-
27
-
28
-
29
-
30
-
31
-
32
-
33
-
34
-
35
-
36
-
37
-
38
-
39
-
40
-
41
-
42
-
43
-
44
-
45
-
46
-
47
-
48
-
49
-
50
-
51
-
52
-
53
-
54
-
55
-
56
-
57
-
58
-
59
-
60
-
61
-
62
-
63
-
64
-
65
-
66
-
67
-
68
-
69
-
70
-
71
-
72
-
73
-
74
-
75
-
76
-
77
-
78
-
79
-
80
-
81
-
82
-
83
-
84
-
 85
85 -
 86
86 -
 87
87 -
 88
88 -
 89
89 -
 90
90 -
 91
91 -
 92
92 -
 93
93 -
 94
94 -
 95
95 -
96
-
97
-
98
-
99
-
100
-
101
-
102
-
103
-
104
-
105
-
106
-
107
-
108
-
109
-
110
-
111
-
112
-
113
-
114
-
115
-
116
-
117
-
118
-
119
-
120
-
121
-
122
-
123
-
124
-
125
-
126
-
127
-
128
-
129
-
130
-
131
-
132
-
133
-
134
-
135
-
136
-
137
-
138
-
139
-
140
-
141
-
142
-
143
-
144
-
145
-
146
-
147
-
148
-
149
-
150
-
151
-
152
-
153
-
154
-
155
-
156
-
157
-
158
-
159
-
160
-
161
-
162
-
163
-
164
-
165
-
166
-
167
-
168
-
169
-
170
-
171
-
172
-
173
-
174
-
175
-
176
-
177
-
178
-
179
-
180
 |
 |