Brother International DreamMaker„ XE VE2200 Users Manual - English - Page 74
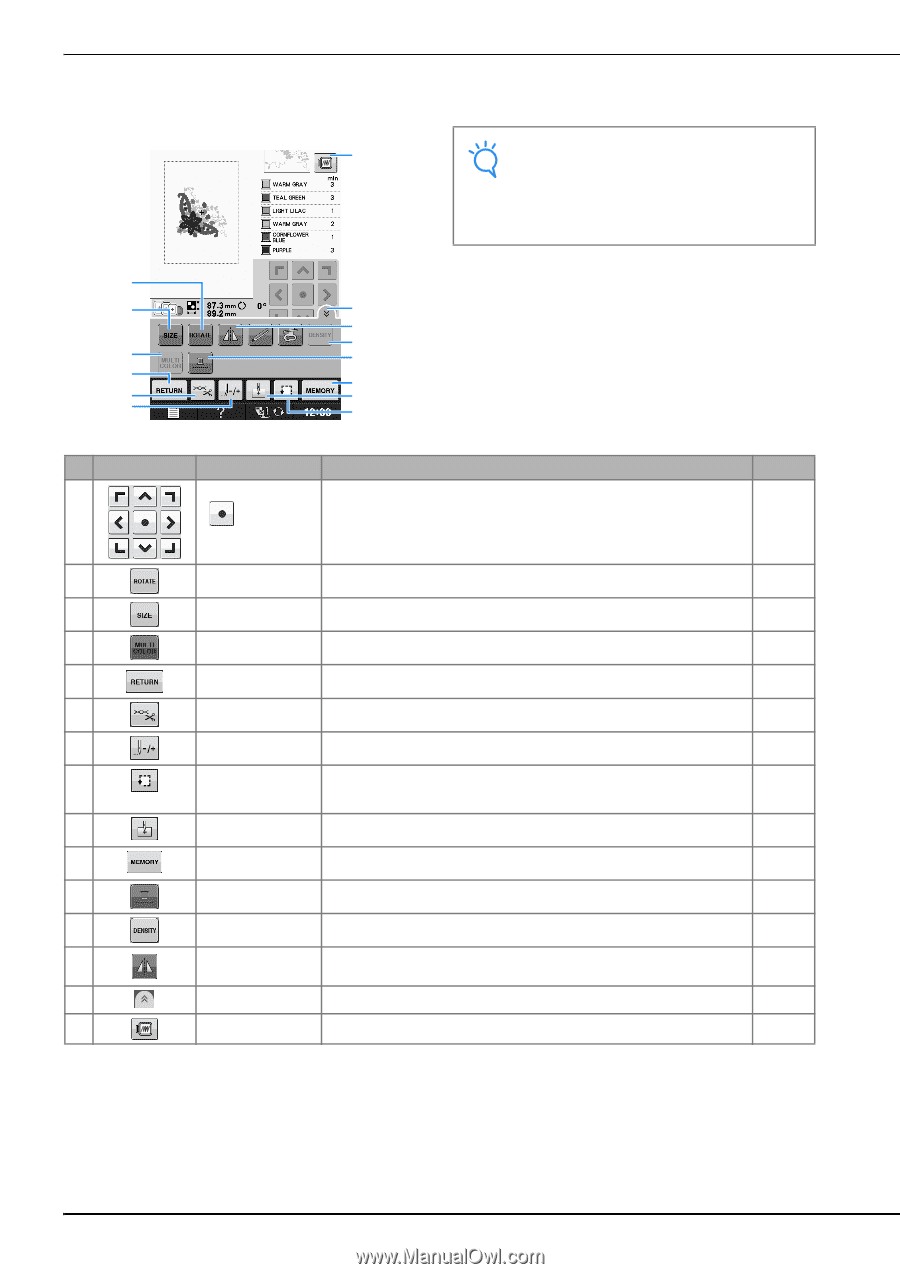
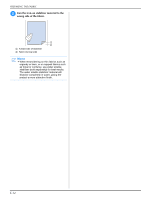
Using these keys, you can change the size of the pattern, rotate the pattern, etc.
 |
View all Brother International DreamMaker„ XE VE2200 manuals
Add to My Manuals
Save this manual to your list of manuals |
Page 74 highlights
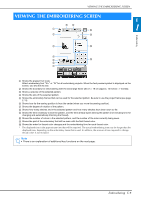
VIEWING THE EMBROIDERING SCREEN ■ Key Functions Using these keys, you can change the size of the pattern, rotate the pattern, etc. Note Q • Some operations or functions are not available for certain patterns. If the key display is light gray, you cannot use that function or operation with the selected pattern. n o z y x p w q v r u s t No. Display Key Name Explanation Page m Arrow keys Press an arrow key to move the pattern in the direction shown by the arrow. E-36 (Press the Center key to return the pattern to the center of the embroidery ( Center key) area.) n Rotate key Press this key to rotate the pattern. You can rotate a pattern one degree, 10 E-38 degrees or 90 degrees at a time. o Size key Press this key to change the size of the pattern. E-37 p Multi color key Press this key to change the color of each letter when sewing alphabet E-40 character patterns. q Return key Press this key to return to the pattern type selection screen. - r Cut/Tension key Press this key to specify automatic thread cutting, thread trimming or the E-32 to thread tension. For embroidery, these functions are set automatically. E-32 s Forward/Back key Press this key to move the needle forward or back in the pattern; useful if the E-27 to thread breaks while sewing or if you want to start again from the beginning. E-29 t Trial key Press this key to check the position of the pattern.The embroidery frame moves E-19 to the desired position so you can check that there is enough space to sew the pattern. u Starting point key Press this key to move the needle start position to align the needle with the E-36 pattern position. v Memory key Press this key to save a pattern in the machine's memory, USB media or a E-45 to computer. E-47 w Uninterrupted Press this key to embroider the selected pattern with a single color. E-43 embroidery key x Density key Press this key to change the density of alphabet character or frame patterns. E-40 y Horizontal mirror Press this key to create a horizontal mirror image of the pattern. E-39 image key z Function page key Press this key to show all the keys in this screen. E-40 Q Image key Press this key for a preview of the sewn image. E-20 E-10
-
 1
1 -
2
-
3
-
4
-
5
-
6
-
7
-
8
-
9
-
10
-
11
-
12
-
13
-
14
-
15
-
16
-
17
-
18
-
19
-
20
-
21
-
22
-
23
-
24
-
25
-
26
-
27
-
28
-
29
-
30
-
31
-
32
-
33
-
34
-
35
-
36
-
37
-
38
-
39
-
40
-
41
-
42
-
43
-
44
-
45
-
46
-
47
-
48
-
49
-
50
-
51
-
52
-
53
-
54
-
55
-
56
-
57
-
58
-
59
-
60
-
61
-
62
-
63
-
64
-
65
-
66
-
67
-
68
-
 69
69 -
 70
70 -
 71
71 -
 72
72 -
 73
73 -
 74
74 -
 75
75 -
 76
76 -
 77
77 -
 78
78 -
 79
79 -
80
-
81
-
82
-
83
-
84
-
85
-
86
-
87
-
88
-
89
-
90
-
91
-
92
-
93
-
94
-
95
-
96
-
97
-
98
-
99
-
100
-
101
-
102
-
103
-
104
-
105
-
106
-
107
-
108
-
109
-
110
-
111
-
112
-
113
-
114
-
115
-
116
-
117
-
118
-
119
-
120
-
121
-
122
-
123
-
124
-
125
-
126
-
127
-
128
-
129
-
130
-
131
-
132
-
133
-
134
-
135
-
136
-
137
-
138
-
139
-
140
-
141
-
142
-
143
-
144
-
145
-
146
-
147
-
148
-
149
-
150
-
151
-
152
-
153
-
154
-
155
-
156
-
157
-
158
-
159
-
160
-
161
-
162
-
163
-
164
-
165
-
166
-
167
-
168
-
169
-
170
-
171
-
172
-
173
-
174
-
175
-
176
-
177
-
178
-
179
-
180
 |
 |