Brother International MFC-9320CW Software Users Manual - English - Page 167
File types, Image (example: Apple Preview), Scan To Image, Software Button, Show Scanner Interface
 |
UPC - 012502622406
View all Brother International MFC-9320CW manuals
Add to My Manuals
Save this manual to your list of manuals |
Page 167 highlights
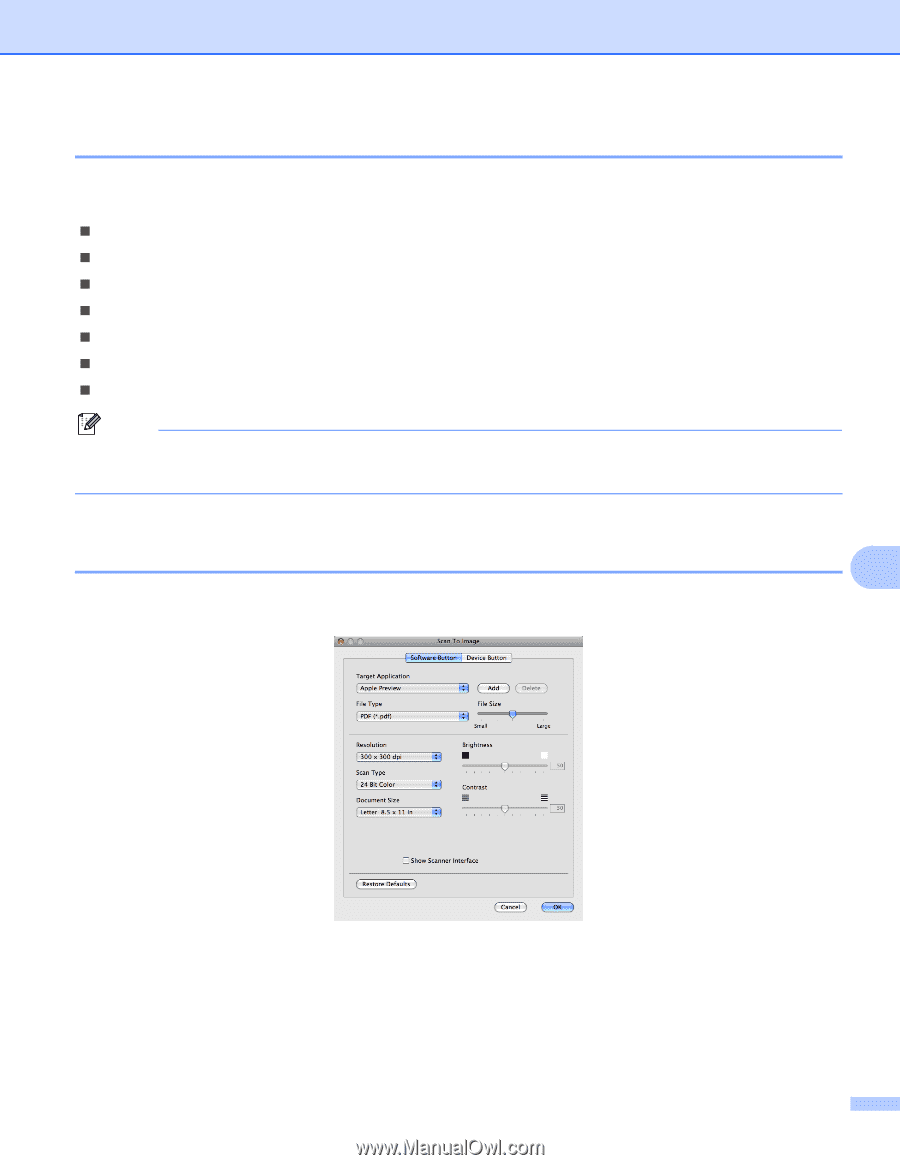
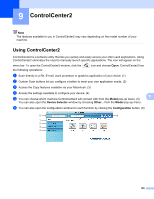
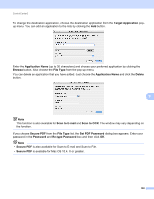
ControlCenter2 File types 9 You can choose from the following list of file types for attachments or for saving to a folder. Choose from the pop-up menu the type of file you want the scanned images to be saved in. „ Windows Bitmap (*.bmp) „ JPEG (*.jpg) „ TIFF (*.tif) „ TIFF Multi-Page (*.tif) „ Portable Network Graphics (*.png) „ PDF (*.pdf) „ Secure PDF (*.pdf) Note • If you set the file type to TIFF or TIFF Multi-Page, you can choose "Uncompressed" or "Compressed". • Secure PDF is available for Scan to Image, Scan to E-mail and Scan to File. Image (example: Apple Preview) 9 9 The Scan To Image feature lets you scan an image directly into your graphics application for image editing. To change the default settings, click the button while holding down the Ctrl key and choose Software Button. If you want to scan and then crop a portion of a page after pre-scanning the document, check the Show Scanner Interface box. Change the other settings, if needed. 159
-
 1
1 -
2
-
3
-
4
-
5
-
6
-
7
-
8
-
9
-
10
-
11
-
12
-
13
-
14
-
15
-
16
-
17
-
18
-
19
-
20
-
21
-
22
-
23
-
24
-
25
-
26
-
27
-
28
-
29
-
30
-
31
-
32
-
33
-
34
-
35
-
36
-
37
-
38
-
39
-
40
-
41
-
42
-
43
-
44
-
45
-
46
-
47
-
48
-
49
-
50
-
51
-
52
-
53
-
54
-
55
-
56
-
57
-
58
-
59
-
60
-
61
-
62
-
63
-
64
-
65
-
66
-
67
-
68
-
69
-
70
-
71
-
72
-
73
-
74
-
75
-
76
-
77
-
78
-
79
-
80
-
81
-
82
-
83
-
84
-
85
-
86
-
87
-
88
-
89
-
90
-
91
-
92
-
93
-
94
-
95
-
96
-
97
-
98
-
99
-
100
-
101
-
102
-
103
-
104
-
105
-
106
-
107
-
108
-
109
-
110
-
111
-
112
-
113
-
114
-
115
-
116
-
117
-
118
-
119
-
120
-
121
-
122
-
123
-
124
-
125
-
126
-
127
-
128
-
129
-
130
-
131
-
132
-
133
-
134
-
135
-
136
-
137
-
138
-
139
-
140
-
141
-
142
-
143
-
144
-
145
-
146
-
147
-
148
-
149
-
150
-
151
-
152
-
153
-
154
-
155
-
156
-
157
-
158
-
159
-
160
-
161
-
 162
162 -
 163
163 -
 164
164 -
 165
165 -
 166
166 -
 167
167 -
 168
168 -
 169
169 -
 170
170 -
 171
171 -
 172
172 -
173
-
174
-
175
-
176
-
177
-
178
-
179
-
180
-
181
-
182
-
183
-
184
-
185
-
186
-
187
-
188
-
189
-
190
-
191
-
192
-
193
-
194
-
195
-
196
-
197
-
198
-
199
-
200
-
201
-
202
-
203
-
204
-
205
-
206
-
207
-
208
-
209
 |
 |