Brother International MFC-9320CW Network Users Manual - English - Page 109
Ethernet (wired network only), Setup Wizard (MFC-9320CW wireless network only), Stop/Exit - mfc duplex
 |
UPC - 012502622406
View all Brother International MFC-9320CW manuals
Add to My Manuals
Save this manual to your list of manuals |
Page 109 highlights
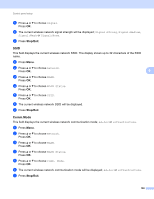
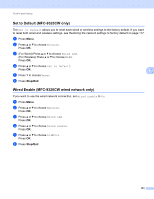
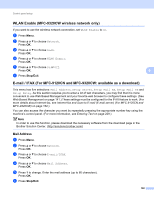
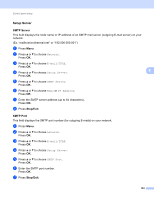
Control panel setup Ethernet (wired network only) 6 Ethernet link mode. Auto allows the print server to operate in 100BASE-TX full or half duplex, or in 10BASE-T full or half duplex mode by auto negotiation. You can fix the server link mode to 100BASE-TX Full Duplex (100B-FD) or Half Duplex (100B-HD) and 10BASE-T Full Duplex (10B-FD) or Half Duplex (10B-HD). This change is valid after the print server has been reset (default is Auto). Note If you incorrectly set this value, you may not be able to communicate with your print server. a Press Menu. b Press a or b to choose Network. Press OK. 6 c (MFC-9320CW only) Press a or b to choose Wired LAN. Press OK. d Press a or b to choose Ethernet. Press OK. e Press a or b to choose Auto, 100B-FD, 100B-HD, 10B-FD or 10B-HD. Press OK. f Press Stop/Exit. Setup Wizard (MFC-9320CW wireless network only) 6 The Setup Wizard guides you through the wireless network configuration. (For more information, see the Quick Setup Guide or Using the Setup Wizard from the control panel on page 31.) SES/WPS/AOSS (MFC-9320CW wireless network only) 6 If your wireless access point supports either SecureEasySetup™, Wi-Fi Protected Setup (PBC 1) or AOSS™ (one-push method), you can configure the machine easily without a computer. Your Brother machine has the SES/WPS/AOSS menu on the control panel. This feature automatically detects which mode your access point uses, SecureEasySetup™, Wi-Fi Protected Setup or AOSS™. By pushing a button on the wireless access point/router and the machine, you can setup the wireless network and security settings. See the user's guide for your wireless access point/router for instructions on how to access one-push mode. (For more information, see the Quick Setup Guide or Using the SES/WPS or AOSS control panel menu to configure your machine for a wireless network (Automatic Wireless mode) on page 35.) 1 Push Button Configuration 98
-
 1
1 -
2
-
3
-
4
-
5
-
6
-
7
-
8
-
9
-
10
-
11
-
12
-
13
-
14
-
15
-
16
-
17
-
18
-
19
-
20
-
21
-
22
-
23
-
24
-
25
-
26
-
27
-
28
-
29
-
30
-
31
-
32
-
33
-
34
-
35
-
36
-
37
-
38
-
39
-
40
-
41
-
42
-
43
-
44
-
45
-
46
-
47
-
48
-
49
-
50
-
51
-
52
-
53
-
54
-
55
-
56
-
57
-
58
-
59
-
60
-
61
-
62
-
63
-
64
-
65
-
66
-
67
-
68
-
69
-
70
-
71
-
72
-
73
-
74
-
75
-
76
-
77
-
78
-
79
-
80
-
81
-
82
-
83
-
84
-
85
-
86
-
87
-
88
-
89
-
90
-
91
-
92
-
93
-
94
-
95
-
96
-
97
-
98
-
99
-
100
-
101
-
102
-
103
-
 104
104 -
 105
105 -
 106
106 -
 107
107 -
 108
108 -
 109
109 -
 110
110 -
 111
111 -
 112
112 -
 113
113 -
 114
114 -
115
-
116
-
117
-
118
-
119
-
120
-
121
-
122
-
123
-
124
-
125
-
126
-
127
-
128
-
129
-
130
-
131
-
132
-
133
-
134
-
135
-
136
-
137
-
138
-
139
-
140
-
141
-
142
-
143
-
144
-
145
-
146
-
147
-
148
-
149
-
150
-
151
-
152
-
153
-
154
-
155
-
156
-
157
-
158
-
159
-
160
-
161
-
162
-
163
-
164
-
165
-
166
-
167
-
168
-
169
-
170
-
171
-
172
-
173
-
174
-
175
-
176
-
177
-
178
-
179
-
180
-
181
-
182
-
183
-
184
-
185
-
186
-
187
-
188
-
189
-
190
-
191
-
192
-
193
-
194
-
195
-
196
-
197
-
198
-
199
-
200
-
201
-
202
-
203
-
204
-
205
-
206
-
207
-
208
-
209
-
210
-
211
-
212
-
213
-
214
-
215
-
216
-
217
-
218
-
219
-
220
-
221
-
222
-
223
-
224
-
225
-
226
-
227
-
228
-
229
-
230
-
231
-
232
-
233
-
234
-
235
-
236
-
237
-
238
-
239
-
240
-
241
-
242
-
243
-
244
-
245
-
246
-
247
-
248
-
249
 |
 |