Canon imageFORMULA P-215 Scan-tini Personal Document Scanner User Manual - Page 54
E-mail settings] Tab, Launch method setting, Display setting for when scanner connected
 |
View all Canon imageFORMULA P-215 Scan-tini Personal Document Scanner manuals
Add to My Manuals
Save this manual to your list of manuals |
Page 54 highlights
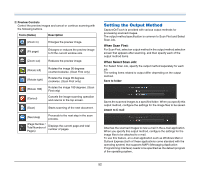
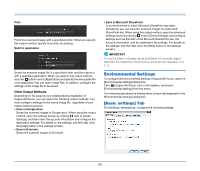
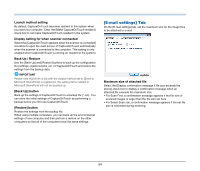
Launch method setting By default, CaptureOnTouch becomes resident in the system when you start your computer. Clear the [Make CaptureOnTouch resident] check box to not make CaptureOnTouch resident in the system. Display setting for when scanner connected Select the [CaptureOnTouch appears when the scanner is connected] checkbox to open the main screen of CaptureOnTouch automatically when the scanner is connected to the computer. This setting is only enabled when CaptureOnTouch is running (or resident in the system). Back Up / Restore Use the [Back Up] and [Restore] buttons to back up the configuration file (settings, registered jobs, etc.) of CaptureOnTouch and restore the settings from the backup data. IMPORTANT Please note that when a job with the output method set to [Send to Microsoft SharePoint] is registered, the setting items related to Microsoft SharePoint will not be backed up. [Back Up] button Back up the settings of CaptureOnTouch to a backup file (*.cot). You can store the initial settings of CaptureOnTouch by performing a backup before you first use CaptureOnTouch. [Restore] button Restore the settings from the backup file. When using multiple computers, you can back up the environmental settings of one computer and then perform a restore on the other computers so that all of the computers have the same settings. [E-mail settings] Tab On the [E-mail settings] tab, set the maximum size for the image files to be attached to e-mail. Maximum size of attached file Select the [Display confirmation message if file size exceeds the above] check box to display a confirmation message when an attached file exceeds the maximum size. • For Scan First, a confirmation message appears if the file size of scanned images is larger than the file size set here. • For Select Scan Job, a confirmation message appears if the set file size is exceeded during scanning. 54
-
 1
1 -
2
-
3
-
4
-
5
-
6
-
7
-
8
-
9
-
10
-
11
-
12
-
13
-
14
-
15
-
16
-
17
-
18
-
19
-
20
-
21
-
22
-
23
-
24
-
25
-
26
-
27
-
28
-
29
-
30
-
31
-
32
-
33
-
34
-
35
-
36
-
37
-
38
-
39
-
40
-
41
-
42
-
43
-
44
-
45
-
46
-
47
-
48
-
 49
49 -
 50
50 -
 51
51 -
 52
52 -
 53
53 -
 54
54 -
 55
55 -
 56
56 -
 57
57 -
 58
58 -
 59
59 -
60
-
61
-
62
-
63
-
64
-
65
-
66
-
67
-
68
-
69
-
70
-
71
-
72
-
73
-
74
-
75
-
76
-
77
-
78
-
79
-
80
-
81
-
82
-
83
-
84
-
85
-
86
-
87
-
88
-
89
-
90
-
91
-
92
-
93
-
94
-
95
-
96
-
97
-
98
-
99
-
100
-
101
-
102
-
103
-
104
-
105
-
106
-
107
-
108
-
109
-
110
-
111
-
112
-
113
-
114
-
115
-
116
 |
 |
