Dell 948 User Guide - Page 115
Advanced, Scan Now, Click this tab, Image Patterns - drivers
 |
View all Dell 948 manuals
Add to My Manuals
Save this manual to your list of manuals |
Page 115 highlights
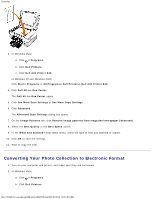
Scanning Select what kind of document is being scanned. Select a scan quality. 5. Click the Advanced button to change options such as paper size and quality. 6. To make any changes, click the following tabs: Click this tab: Scan Image Enhancements Image Patterns To: Choose a color depth. Select a scan resolution. Adjust the sensitivity of the auto-crop tool. Set the area to be scanned. Use the OCR program to convert scanned items to text. Indicate that you are scanning multiple items. Update the list of applications to send scans to. Update the default fax driver. Straighten images after scan (deskew). Sharpen your blurry images. Adjust the brightness of your image. Adjust the color correction curve (gamma) of your image. Smooth the conversion of a gray image to a black-and-white dot pattern. Remove image patterns from magazines or newspapers (descreen). Reduce the background noise on your color document. 7. Click OK. 8. After customizing your settings, click Scan Now. file:///T|/htdocs/systems/prn948/en/en/d0e6016.html[10/10/2012 11:05:49 AM]
-
 1
1 -
2
-
3
-
4
-
5
-
6
-
7
-
8
-
9
-
10
-
11
-
12
-
13
-
14
-
15
-
16
-
17
-
18
-
19
-
20
-
21
-
22
-
23
-
24
-
25
-
26
-
27
-
28
-
29
-
30
-
31
-
32
-
33
-
34
-
35
-
36
-
37
-
38
-
39
-
40
-
41
-
42
-
43
-
44
-
45
-
46
-
47
-
48
-
49
-
50
-
51
-
52
-
53
-
54
-
55
-
56
-
57
-
58
-
59
-
60
-
61
-
62
-
63
-
64
-
65
-
66
-
67
-
68
-
69
-
70
-
71
-
72
-
73
-
74
-
75
-
76
-
77
-
78
-
79
-
80
-
81
-
82
-
83
-
84
-
85
-
86
-
87
-
88
-
89
-
90
-
91
-
92
-
93
-
94
-
95
-
96
-
97
-
98
-
99
-
100
-
101
-
102
-
103
-
104
-
105
-
106
-
107
-
108
-
109
-
 110
110 -
 111
111 -
 112
112 -
 113
113 -
 114
114 -
 115
115 -
 116
116 -
 117
117 -
 118
118 -
 119
119 -
 120
120 -
121
-
122
-
123
-
124
-
125
-
126
-
127
-
128
-
129
-
130
-
131
-
132
-
133
-
134
-
135
-
136
-
137
-
138
-
139
-
140
-
141
-
142
-
143
-
144
 |
 |
