Dell 948 User Guide - Page 140
Blocking Faxes, Using a Speed or Group Dial List, Creating a Blocked Fax List
 |
View all Dell 948 manuals
Add to My Manuals
Save this manual to your list of manuals |
Page 140 highlights
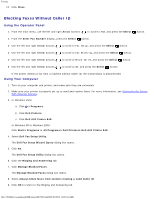
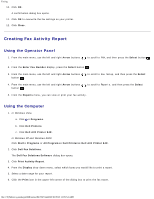
Faxing b. If you want to add the contact to your list, click on an available number on the Speed or Group Dial Settings section. If you want to overwrite an existing entry on your list, click on the entry you want to change. c. Click Add to or change list. d. After adding phonebook entries to your Speed or Group Dial list, click OK to return to the Speed Dial tab. 9. Click OK. A confirmation dialog box appears. 10. Click OK to overwrite the settings on your printer. 11. Click Close. Using a Speed or Group Dial List 1. From the main menu, use the left and right Arrow buttons . to scroll to FAX, and then press the Select button 2. From the Enter Fax Number display, use the keypad to enter the two-digit speed dial or group dial number. 3. To enter another speed dial or group dial number, press . Follow the instructions on the display. 4. Press the Start button to start sending your fax. NOTE: When you are entering numbers, if you only enter two numbers and an entry corresponds to this number, the printer assumes you are entering a speed dial entry. If the number you entered does not correspond to any entry in the Phone Book, the printer assumes you are entering an extension number. Blocking Faxes Creating a Blocked Fax List Using the Operator Panel 1. From the main menu, use the left and right Arrow buttons . to scroll to FAX, and then press the Select button 2. From the Enter Fax Number display, press the Select button . 3. From the Fax menu, use the left and right Arrow buttons button . to scroll to Fax Setup, and then press the Select 4. Use the left and right Arrow buttons to scroll to Fax Blocking, and then press the Select button . 5. Use the left and right Arrow buttons to scroll to Add, and then press the Select button . 6. Use the keypad to enter a fax number, and then press the Select button . file:///T|/htdocs/systems/prn948/en/en/d0e7047.html[10/10/2012 11:05:54 AM]
-
 1
1 -
2
-
3
-
4
-
5
-
6
-
7
-
8
-
9
-
10
-
11
-
12
-
13
-
14
-
15
-
16
-
17
-
18
-
19
-
20
-
21
-
22
-
23
-
24
-
25
-
26
-
27
-
28
-
29
-
30
-
31
-
32
-
33
-
34
-
35
-
36
-
37
-
38
-
39
-
40
-
41
-
42
-
43
-
44
-
45
-
46
-
47
-
48
-
49
-
50
-
51
-
52
-
53
-
54
-
55
-
56
-
57
-
58
-
59
-
60
-
61
-
62
-
63
-
64
-
65
-
66
-
67
-
68
-
69
-
70
-
71
-
72
-
73
-
74
-
75
-
76
-
77
-
78
-
79
-
80
-
81
-
82
-
83
-
84
-
85
-
86
-
87
-
88
-
89
-
90
-
91
-
92
-
93
-
94
-
95
-
96
-
97
-
98
-
99
-
100
-
101
-
102
-
103
-
104
-
105
-
106
-
107
-
108
-
109
-
110
-
111
-
112
-
113
-
114
-
115
-
116
-
117
-
118
-
119
-
120
-
121
-
122
-
123
-
124
-
125
-
126
-
127
-
128
-
129
-
130
-
131
-
132
-
133
-
134
-
 135
135 -
 136
136 -
 137
137 -
 138
138 -
 139
139 -
 140
140 -
 141
141 -
 142
142 -
 143
143 -
 144
144
 |
 |
