Dell 948 User Guide - Page 47
Peer-to-Peer Networking, Sharing the Printer on the Network
 |
View all Dell 948 manuals
Add to My Manuals
Save this manual to your list of manuals |
Page 47 highlights
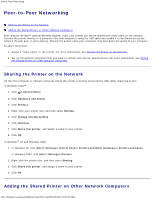
Peer-to-Peer Networking Peer-to-Peer Networking Sharing the Printer on the Network Adding the Shared Printer on Other Network Computers Even without the Dell™ Internal Wireless Adapter 1000, your printer can still be shared with other users on the network. Connect the printer directly to a computer (the host computer) using the USB cable and enable it to be shared across the network through peer-to-peer sharing. Sharing the printer using your computer may slow down the speed of your computer. To share the printer: 1. Assign a "share name" to the printer. For more information, see Sharing the Printer on the Network. 2. Set up the network computers that you want to connect and use the shared printer. For more information, see Adding the Shared Printer on Other Network Computers Sharing the Printer on the Network On the host computer or network computer where the printer is directly connected by USB cable, share the printer. In Windows Vista™: 1. Click ® Control Panel. 2. Click Hardware and Sound. 3. Click Printers. 4. Right-click your printer icon, and then select Sharing. 5. Click Change sharing options. 6. Click Continue. 7. Click Share this printer, and assign a name to your printer. 8. Click OK. In Windows® XP and Windows 2000: 1. In Windows XP, click Start® Settings® Control Panel® Printers and Other Hardware® Printers and Faxes. In Windows 2000, click Start® Settings® Printers. 2. Right-click the printer icon, and then select Sharing. 3. Click Share this printer, and assign a name to your printer. 4. Click OK. Adding the Shared Printer on Other Network Computers file:///T|/htdocs/systems/prn948/en/en/d0e10117.html[10/10/2012 11:05:30 AM]
-
 1
1 -
2
-
3
-
4
-
5
-
6
-
7
-
8
-
9
-
10
-
11
-
12
-
13
-
14
-
15
-
16
-
17
-
18
-
19
-
20
-
21
-
22
-
23
-
24
-
25
-
26
-
27
-
28
-
29
-
30
-
31
-
32
-
33
-
34
-
35
-
36
-
37
-
38
-
39
-
40
-
41
-
 42
42 -
 43
43 -
 44
44 -
 45
45 -
 46
46 -
 47
47 -
 48
48 -
 49
49 -
 50
50 -
 51
51 -
 52
52 -
53
-
54
-
55
-
56
-
57
-
58
-
59
-
60
-
61
-
62
-
63
-
64
-
65
-
66
-
67
-
68
-
69
-
70
-
71
-
72
-
73
-
74
-
75
-
76
-
77
-
78
-
79
-
80
-
81
-
82
-
83
-
84
-
85
-
86
-
87
-
88
-
89
-
90
-
91
-
92
-
93
-
94
-
95
-
96
-
97
-
98
-
99
-
100
-
101
-
102
-
103
-
104
-
105
-
106
-
107
-
108
-
109
-
110
-
111
-
112
-
113
-
114
-
115
-
116
-
117
-
118
-
119
-
120
-
121
-
122
-
123
-
124
-
125
-
126
-
127
-
128
-
129
-
130
-
131
-
132
-
133
-
134
-
135
-
136
-
137
-
138
-
139
-
140
-
141
-
142
-
143
-
144
 |
 |
