Dell PowerEdge C6100 Hardware Owner's Manual - Page 5
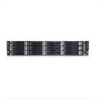
Hard Drives, Power Supplies, System-Board Assembly, Cooling Shroud, Heat Sinks, Processor - power supply
 |
View all Dell PowerEdge C6100 manuals
Add to My Manuals
Save this manual to your list of manuals |
Page 5 highlights
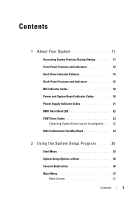
Hard Drives 55 Removing a Hard-Drive Blank 55 Installing a Hard-Drive Blank 55 Removing a Hard-Drive Carrier 56 Installing a Hard Drive Carrier 57 Removing a Hard Drive From a Hard-Drive Carrier 57 Installing a Hard Drive Into a Hard-Drive Carrier 58 Power Supplies 59 Removing a Power Supply 59 Installing a Power Supply 60 System-Board Assembly 61 Removing a System-Board Assembly 61 Installing a System-Board Assembly 62 Cooling Shroud 63 Removing the Cooling Shroud 63 Installing the Cooling Shroud 64 Heat Sinks 64 Removing the Heat Sink 64 Installing the Heat Sink 66 Processor 66 Removing a Processor 66 Installing a Processor 68 Expansion-Card Assembly and Expansion Card . . . . 69 Removing the Expansion Card 69 Installing the Expansion Card 71 Expansion-Card Connector 72 Removing the Expansion-Card Connector . . . . . 72 Contents 5
-
 1
1 -
 2
2 -
 3
3 -
 4
4 -
 5
5 -
 6
6 -
 7
7 -
 8
8 -
 9
9 -
 10
10 -
 11
11 -
12
-
13
-
14
-
15
-
16
-
17
-
18
-
19
-
20
-
21
-
22
-
23
-
24
-
25
-
26
-
27
-
28
-
29
-
30
-
31
-
32
-
33
-
34
-
35
-
36
-
37
-
38
-
39
-
40
-
41
-
42
-
43
-
44
-
45
-
46
-
47
-
48
-
49
-
50
-
51
-
52
-
53
-
54
-
55
-
56
-
57
-
58
-
59
-
60
-
61
-
62
-
63
-
64
-
65
-
66
-
67
-
68
-
69
-
70
-
71
-
72
-
73
-
74
-
75
-
76
-
77
-
78
-
79
-
80
-
81
-
82
-
83
-
84
-
85
-
86
-
87
-
88
-
89
-
90
-
91
-
92
-
93
-
94
-
95
-
96
-
97
-
98
-
99
-
100
-
101
-
102
-
103
-
104
-
105
-
106
-
107
-
108
-
109
-
110
-
111
-
112
-
113
-
114
-
115
-
116
-
117
-
118
-
119
-
120
-
121
-
122
-
123
-
124
-
125
-
126
-
127
-
128
-
129
-
130
-
131
-
132
-
133
-
134
-
135
-
136
-
137
-
138
-
139
-
140
-
141
-
142
-
143
-
144
-
145
-
146
-
147
-
148
-
149
-
150
-
151
-
152
-
153
-
154
-
155
-
156
-
157
-
158
-
159
-
160
 |
 |