Dell Vostro 220 Service Manual - Page 123
Processor Heat Sink/Fan Assembly
 |
UPC - 884116011958
View all Dell Vostro 220 manuals
Add to My Manuals
Save this manual to your list of manuals |
Page 123 highlights
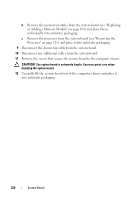
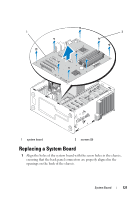
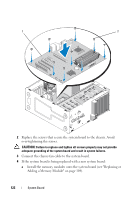
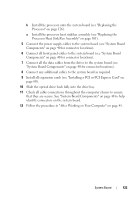
b Install the processor onto the system board (see "Replacing the Processor" on page 126). a Install the processor heat sink/fan assembly (see "Replacing the Processor Heat Sink/Fan Assembly" on page 101). 5 Connect the power supply cables to the system board (see "System Board Components" on page 40 for connector locations). 6 Connect all front panel cables to the system board (see "System Board Components" on page 40 for connector locations). 7 Connect all the data cables from the drives to the system board (see "System Board Components" on page 40 for connector locations). 8 Connect any additional cables to the system board as required. 9 Install all expansion cards (see "Installing a PCI or PCI Express Card" on page 60). 10 Slide the optical drive back fully into the drive bay. 11 Check all cable connections throughout the computer chassis to ensure that they are secure. See "System Board Components" on page 40 to help identify connectors on the system board. 12 Follow the procedure in "After Working on Your Computer" on page 45. System Board 123
-
 1
1 -
2
-
3
-
4
-
5
-
6
-
7
-
8
-
9
-
10
-
11
-
12
-
13
-
14
-
15
-
16
-
17
-
18
-
19
-
20
-
21
-
22
-
23
-
24
-
25
-
26
-
27
-
28
-
29
-
30
-
31
-
32
-
33
-
34
-
35
-
36
-
37
-
38
-
39
-
40
-
41
-
42
-
43
-
44
-
45
-
46
-
47
-
48
-
49
-
50
-
51
-
52
-
53
-
54
-
55
-
56
-
57
-
58
-
59
-
60
-
61
-
62
-
63
-
64
-
65
-
66
-
67
-
68
-
69
-
70
-
71
-
72
-
73
-
74
-
75
-
76
-
77
-
78
-
79
-
80
-
81
-
82
-
83
-
84
-
85
-
86
-
87
-
88
-
89
-
90
-
91
-
92
-
93
-
94
-
95
-
96
-
97
-
98
-
99
-
100
-
101
-
102
-
103
-
104
-
105
-
106
-
107
-
108
-
109
-
110
-
111
-
112
-
113
-
114
-
115
-
116
-
117
-
 118
118 -
 119
119 -
 120
120 -
 121
121 -
 122
122 -
 123
123 -
 124
124 -
 125
125 -
 126
126 -
 127
127 -
 128
128 -
129
-
130
-
131
-
132
-
133
-
134
-
135
-
136
-
137
-
138
 |
 |