Epson ActionLaser 1100 User Manual - Page 63
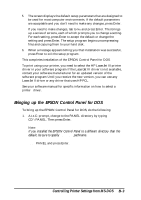
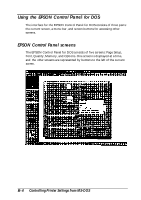
Bringing up the EPSON Control Panel for DOS, Controlling Printer Settings from MS-DOS
 |
View all Epson ActionLaser 1100 manuals
Add to My Manuals
Save this manual to your list of manuals |
Page 63 highlights
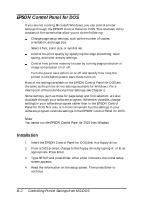
5. The screen displays the default setup parameters that are designed to be used for most computer environments. If the default parameters are acceptable and you don't need to make any changes, press Enter. If you need to make changes, tab to NO and press Enter. This brings up a series of screens, each of which prompts you to change a setting. For each setting, press Enter to accept the default or change the setting and press Enter. The setup program begins uncompressing files and copying them to your hard disk. 6. When a message appears telling you that installation was successful, press Enter to exit the setup program. This completes installation of the EPSON Control Panel for DOS. To print using your printer, you need to select the HP LaserJet III printer driver in your software program If the LaserJet III driver is not available, contact your software manufacturer for an updated version of the software program Until you receive the new version, you can use any LaserJet II driver or any driver that uses HP PCL. See your software manual for specific information on how to select a printer driver. Bringing up the EPSON Control Panel for DOS To bring up the EPSON Control Panel for DOS, do the following 1. At a C: prompt, change to the PANEL directory by typing CD \PANEL. Then press Enter. Note: If you installed the EPSON Control Panel to a different directory than the default, be sure to specify the correct pathname. 2. Type PANEL and press Enter. Controlling Printer Settings from MS-DOS B-3
-
 1
1 -
2
-
3
-
4
-
5
-
6
-
7
-
8
-
9
-
10
-
11
-
12
-
13
-
14
-
15
-
16
-
17
-
18
-
19
-
20
-
21
-
22
-
23
-
24
-
25
-
26
-
27
-
28
-
29
-
30
-
31
-
32
-
33
-
34
-
35
-
36
-
37
-
38
-
39
-
40
-
41
-
42
-
43
-
44
-
45
-
46
-
47
-
48
-
49
-
50
-
51
-
52
-
53
-
54
-
55
-
56
-
57
-
 58
58 -
 59
59 -
 60
60 -
 61
61 -
 62
62 -
 63
63 -
 64
64 -
 65
65 -
 66
66 -
 67
67 -
 68
68 -
69
-
70
-
71
-
72
-
73
-
74
-
75
-
76
-
77
-
78
-
79
-
80
-
81
-
82
-
83
-
84
-
85
-
86
-
87
-
88
-
89
 |
 |
