Fluke 199C/S FE 192,196,199 C Users Manual - Page 61
Using Trigger Delay or Pre-trigger, Trigger Delay or Pre-trigger View
 |
View all Fluke 199C/S manuals
Add to My Manuals
Save this manual to your list of manuals |
Page 61 highlights
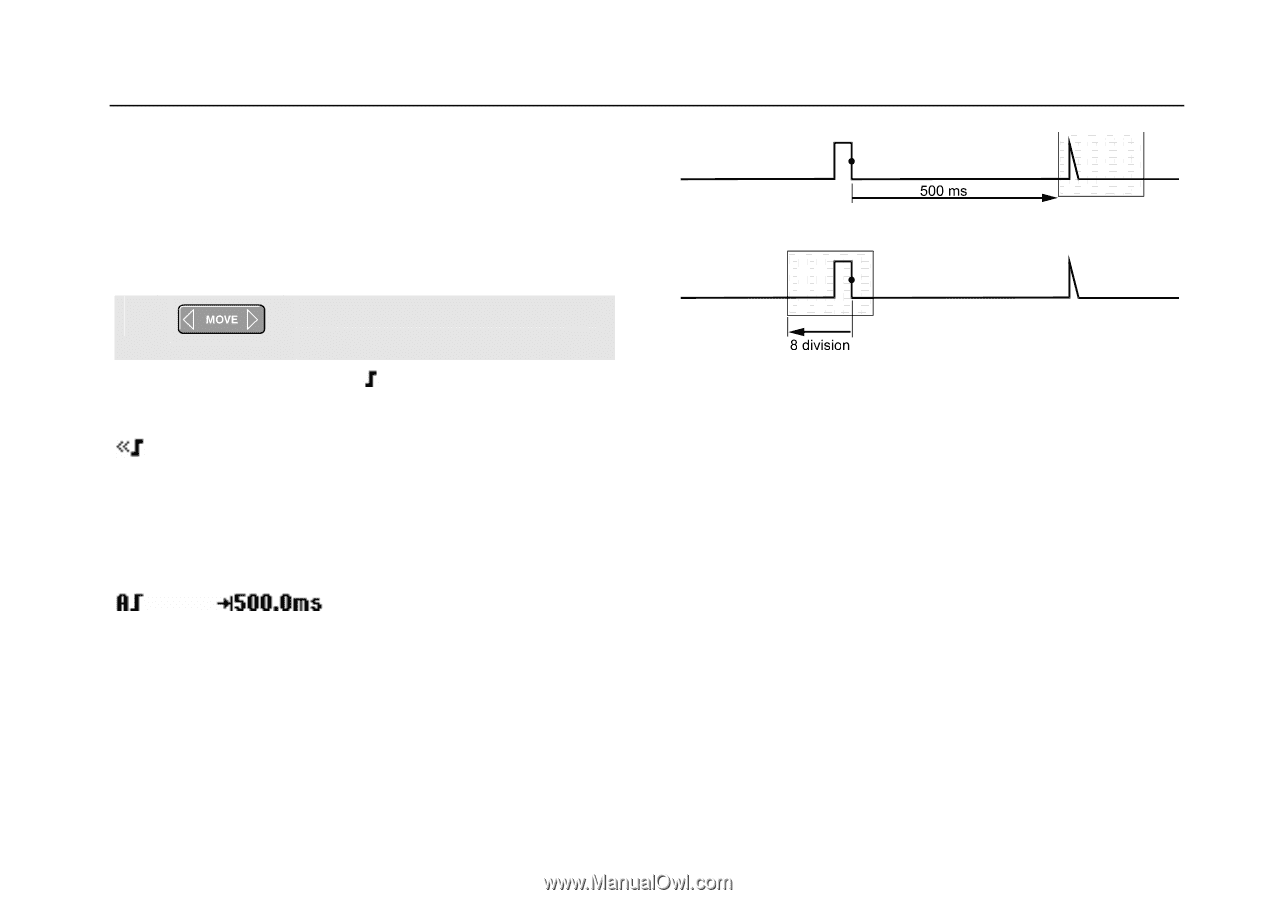
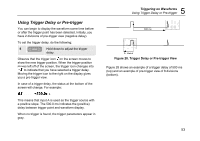
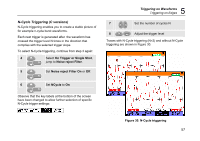
Using Trigger Delay or Pre-trigger You can begin to display the waveform some time before or after the trigger point has been detected. Initially, you have 2 divisions of pre-trigger view (negative delay). To set the trigger delay, do the following: 5 Hold down to adjust the trigger delay. Observe that the trigger icon on the screen moves to show the new trigger position. When the trigger position moves left off of the screen, the trigger icon changes into to indicate that you have selected a trigger delay. Moving the trigger icon to the right on the display gives you a pre-trigger view. In case of a trigger delay, the status at the bottom of the screen will change. For example: 5 Triggering on Waveforms Using Trigger Delay or Pre-trigger Figure 28. Trigger Delay or Pre-trigger View Figure 28 shows an example of a trigger delay of 500 ms (top) and an example of pre-trigger view of 8 divisions (bottom). This means that input A is used as the trigger source with a positive slope. The 500.0 ms indicates the (positive) delay between trigger point and waveform display. When no trigger is found, the trigger parameters appear in gray. 53
-
 1
1 -
2
-
3
-
4
-
5
-
6
-
7
-
8
-
9
-
10
-
11
-
12
-
13
-
14
-
15
-
16
-
17
-
18
-
19
-
20
-
21
-
22
-
23
-
24
-
25
-
26
-
27
-
28
-
29
-
30
-
31
-
32
-
33
-
34
-
35
-
36
-
37
-
38
-
39
-
40
-
41
-
42
-
43
-
44
-
45
-
46
-
47
-
48
-
49
-
50
-
51
-
52
-
53
-
54
-
55
-
 56
56 -
 57
57 -
 58
58 -
 59
59 -
 60
60 -
 61
61 -
 62
62 -
 63
63 -
 64
64 -
 65
65 -
 66
66 -
67
-
68
-
69
-
70
-
71
-
72
-
73
-
74
-
75
-
76
-
77
-
78
-
79
-
80
-
81
-
82
-
83
-
84
-
85
-
86
-
87
-
88
-
89
-
90
-
91
-
92
-
93
-
94
-
95
-
96
-
97
-
98
-
99
-
100
-
101
-
102
-
103
-
104
-
105
-
106
-
107
-
108
-
109
-
110
-
111
-
112
-
113
-
114
-
115
-
116
-
117
-
118
-
119
-
120
-
121
-
122
 |
 |