HTC T8282 User Manual - Page 198
Focus, Auto-focus, Touch Focus
 |
UPC - 411378094674
View all HTC T8282 manuals
Add to My Manuals
Save this manual to your list of manuals |
Page 198 highlights
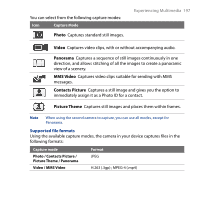
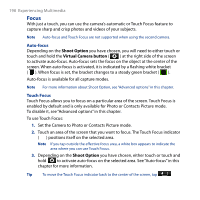
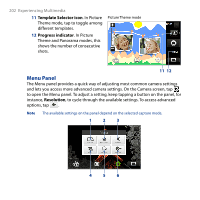
198 Experiencing Multimedia Focus With just a touch, you can use the camera's automatic or Touch Focus feature to capture sharp and crisp photos and videos of your subjects. Note Auto-focus and Touch Focus are not supported when using the second camera. Auto-focus Depending on the Shoot Option you have chosen, you will need to either touch or touch and hold the Virtual Camera button ( ) at the right side of the screen to activate auto-focus. Auto-focus sets the focus on the object at the center of the screen. When auto-focus is activated, it is indicated by a flashing white bracket ( ). When focus is set, the bracket changes to a steady green bracket ( ). Auto-focus is available for all capture modes. Note For more information about Shoot Option, see "Advanced options" in this chapter. Touch Focus Touch Focus allows you to focus on a particular area of the screen. Touch Focus is enabled by default and is only available for Photo or Contacts Picture mode. To disable it, see "Advanced options" in this chapter. To use Touch Focus: 1. Set the Camera to Photo or Contacts Picture mode. 2. Touch an area of the screen that you want to focus. The Touch Focus indicator ( ) positions itself on the selected area. Note If you tap outside the effective focus area, a white box appears to indicate the area where you can use Touch Focus. 3. Depending on the Shoot Option you have chosen, either touch or touch and hold to activate auto-focus on the selected area. See "Auto-focus" in this chapter for more information. Tip To move the Touch Focus indicator back to the center of the screen, tap
-
 1
1 -
2
-
3
-
4
-
5
-
6
-
7
-
8
-
9
-
10
-
11
-
12
-
13
-
14
-
15
-
16
-
17
-
18
-
19
-
20
-
21
-
22
-
23
-
24
-
25
-
26
-
27
-
28
-
29
-
30
-
31
-
32
-
33
-
34
-
35
-
36
-
37
-
38
-
39
-
40
-
41
-
42
-
43
-
44
-
45
-
46
-
47
-
48
-
49
-
50
-
51
-
52
-
53
-
54
-
55
-
56
-
57
-
58
-
59
-
60
-
61
-
62
-
63
-
64
-
65
-
66
-
67
-
68
-
69
-
70
-
71
-
72
-
73
-
74
-
75
-
76
-
77
-
78
-
79
-
80
-
81
-
82
-
83
-
84
-
85
-
86
-
87
-
88
-
89
-
90
-
91
-
92
-
93
-
94
-
95
-
96
-
97
-
98
-
99
-
100
-
101
-
102
-
103
-
104
-
105
-
106
-
107
-
108
-
109
-
110
-
111
-
112
-
113
-
114
-
115
-
116
-
117
-
118
-
119
-
120
-
121
-
122
-
123
-
124
-
125
-
126
-
127
-
128
-
129
-
130
-
131
-
132
-
133
-
134
-
135
-
136
-
137
-
138
-
139
-
140
-
141
-
142
-
143
-
144
-
145
-
146
-
147
-
148
-
149
-
150
-
151
-
152
-
153
-
154
-
155
-
156
-
157
-
158
-
159
-
160
-
161
-
162
-
163
-
164
-
165
-
166
-
167
-
168
-
169
-
170
-
171
-
172
-
173
-
174
-
175
-
176
-
177
-
178
-
179
-
180
-
181
-
182
-
183
-
184
-
185
-
186
-
187
-
188
-
189
-
190
-
191
-
192
-
 193
193 -
 194
194 -
 195
195 -
 196
196 -
 197
197 -
 198
198 -
 199
199 -
 200
200 -
 201
201 -
 202
202 -
 203
203 -
204
-
205
-
206
-
207
-
208
-
209
-
210
-
211
-
212
-
213
-
214
-
215
-
216
-
217
-
218
-
219
-
220
-
221
-
222
-
223
-
224
-
225
-
226
-
227
-
228
-
229
-
230
-
231
-
232
-
233
-
234
-
235
-
236
-
237
-
238
-
239
-
240
-
241
-
242
-
243
-
244
-
245
-
246
-
247
-
248
-
249
-
250
-
251
-
252
-
253
-
254
-
255
-
256
-
257
-
258
-
259
-
260
-
261
-
262
-
263
-
264
-
265
-
266
-
267
-
268
-
269
-
270
-
271
-
272
-
273
-
274
-
275
-
276
-
277
-
278
-
279
-
280
-
281
-
282
-
283
-
284
-
285
-
286
-
287
-
288
-
289
-
290
-
291
-
292
-
293
-
294
-
295
-
296
-
297
-
298
-
299
-
300
 |
 |